
API Management
Feature overview
Functional positioning
API Management is the service definition and joint debugging entrance of data services. It is used to configure database tables, SQL queries or forwardable assets into callable APIs, and maintain API properties, request parameters, return fields and test results in the same process. The configured API can continue to be used for application authorization, business calls, and call record viewing.
Simple understanding: First define "what is the interface called, where to get the data from, what needs to be transmitted, and what is returned". After passing the test, it is handed over to the application for use.
Usage suggestions
Before starting the configuration, first confirm that the [Service Classification], data source or forwardable assets have been prepared; when adding a new API, it is recommended to follow the sequence of attribute configuration -> parameter configuration -> test -> return to the list for verification -> detailed retest .
Main features
- Three-step configuration: Add or modify API through the "Property Configuration -> Parameter Configuration -> Test" wizard.
- Multiple data sources: Supports three parameter configuration methods: single table wizard, SQL script and third-party forwarding.
- Parameters and Access Control: Maintain request parameters, return fields, IP blacklist, current limit and API status.
- Online verification: Test the API in the configuration wizard or details page, and check the required verification, call failure or successful return data.
- Access Authentication Guidelines: Explain the relationship between application identity, API authorization, access token and business interface calls, and mark the verification boundary between historical versions and current versions.
Scope
[API Management] is used to configure database tables, SQL queries or forwardable assets into callable API services. The upstream relies on [service classification], data sources, database tables, SQL or forwardable assets; the downstream can be used for application authorization, business calls and call records. This page does not describe the independent [Interface Test] page, SQL complete save rules, third-party forwarding protocols, deletion results, or status switching linkage.
Preliminary steps
Preconditions
- Logged in to the qData platform.
- The current account can access the [Data Service] module and [API Management] menu.
- A usable data source, database table, SQL data source, or forwardable asset has been prepared.
- The category to which the API belongs has been prepared in [Service Category].
- The API name, address, version, request method and return format have been clarified.
Navigation path
Data Service > API Management
Page overview
After entering [API Management], the API service category search box and category tree are displayed on the left; the query area is displayed at the top of the page; the API list is displayed in the middle; [New] is provided above the list; [Modify], [Details], [Delete] and status switches are provided for each record.
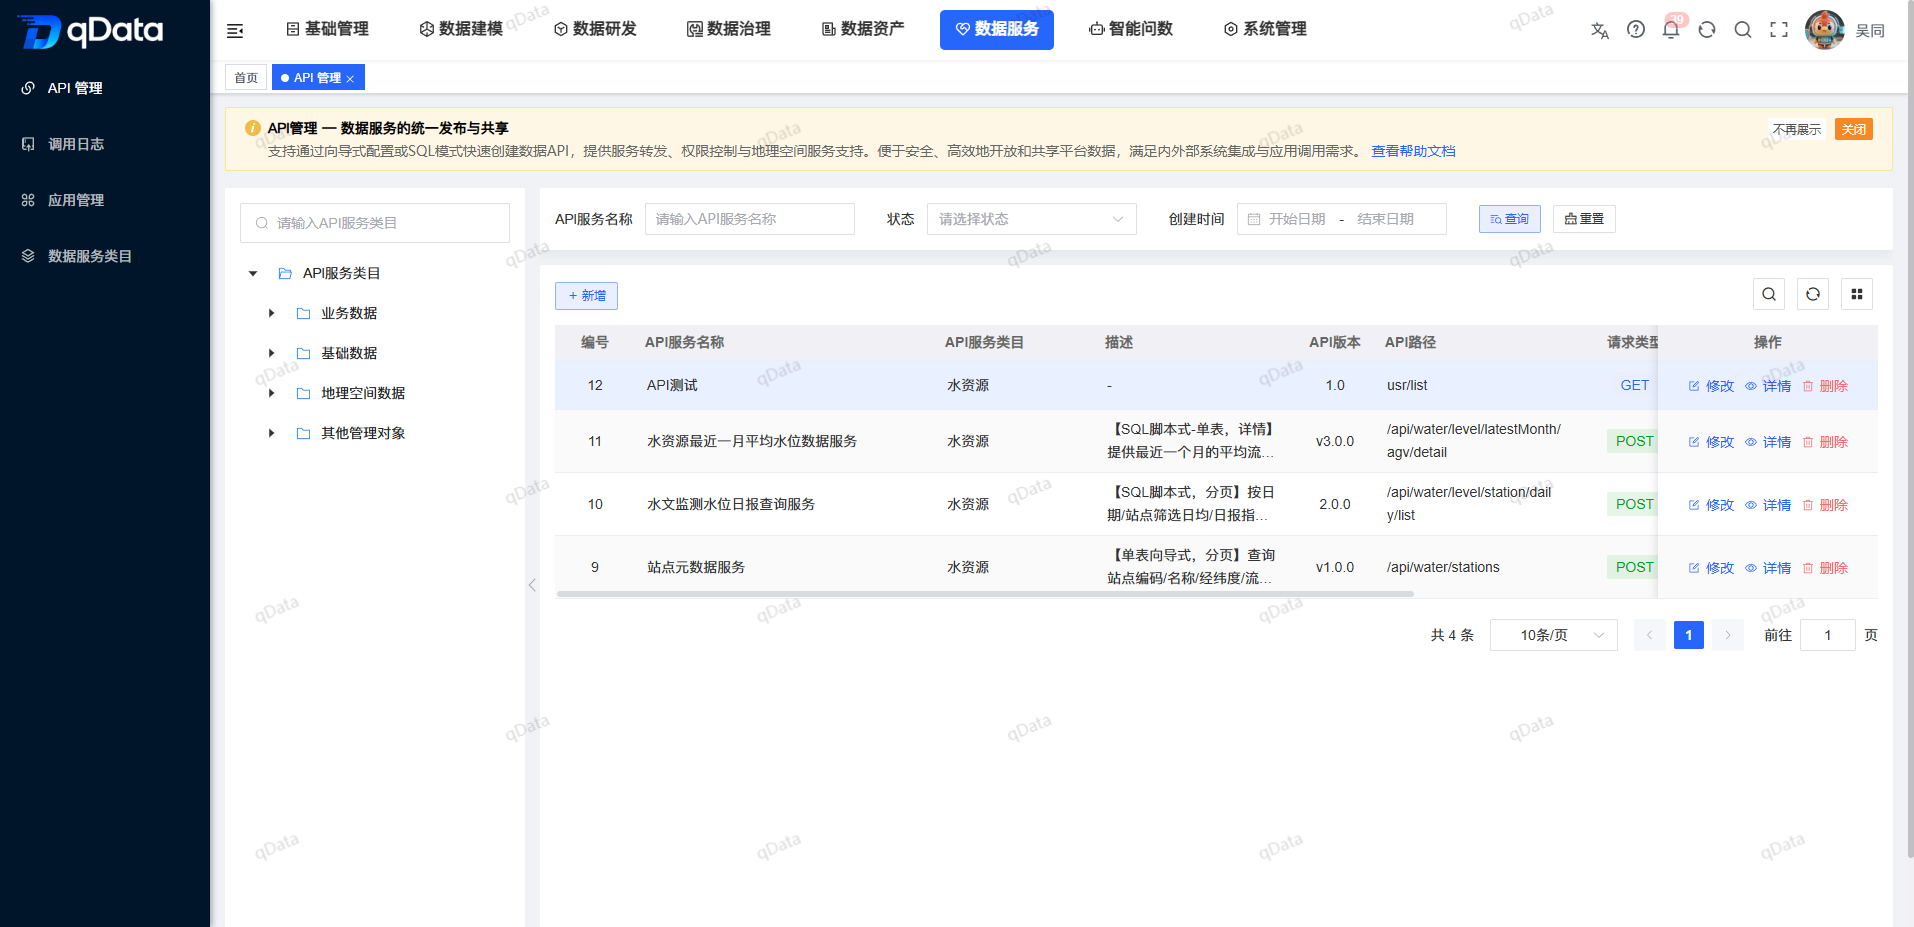
API list fields
| Field Name | Description | Required or not |
|---|---|---|
| Number | The API record number in the current list. | Not applicable (system display) |
| API name / version number / description | Combination display of API name, version identification and usage description. | Not applicable (system display) |
| Category | Displays the service category to which the API belongs. | Not applicable (system display) |
| API path / request type / return format | Combined display of call path, request method and response structure. | Not applicable (system display) |
| Status | Displays the current API status through switches. | Not applicable (system display) |
| Operation | Display the [Modify] [Details] [Delete] entry. | Not applicable (system display) |
The bottom of the list displays the total number of records, the number of entries per page, and paging controls; this page does not explain the page results after paging switching.
Recommended operating procedures
New API: Enter [API Management] -> Click [New] -> Complete attribute configuration -> Select parameter configuration method -> Configure request parameters and return fields -> Test interface -> Return list verification results.
Maintain inventory API: Locate records by category or query conditions -> Click [Modify] to adjust the configuration, or click [Details] to view the information and test again.
Calling problem location: First process the required parameter prompts on the test page -> then check the call success or failure feedback -> enter the [Test Information] tab of the details page when retesting is required.
Service access authentication: Complete API configuration and testing -> Create or select the calling application in [Application Management] -> Configure API authorization and validity period -> Obtain access token -> Call the business API with the token -> View the call record.
Functional operation instructions
Query API
- Locate and select the target API service category in the category area on the left.
- Fill in the name keyword in the "API service name" input box.
- Select the target status in the "Status" drop-down box.
- Select the query time range in "Creation time".
- Click [Query].
- View the results in the API list.
- When you need to clear the query conditions, click [Reset].
The query matching method and the refresh timing after clicking [Reset] are subject to the actual behavior of the page.
Enter API configuration
- When adding an API, click [Add] above the list.
- When modifying the API, click [Modify] on the right side of the target record.
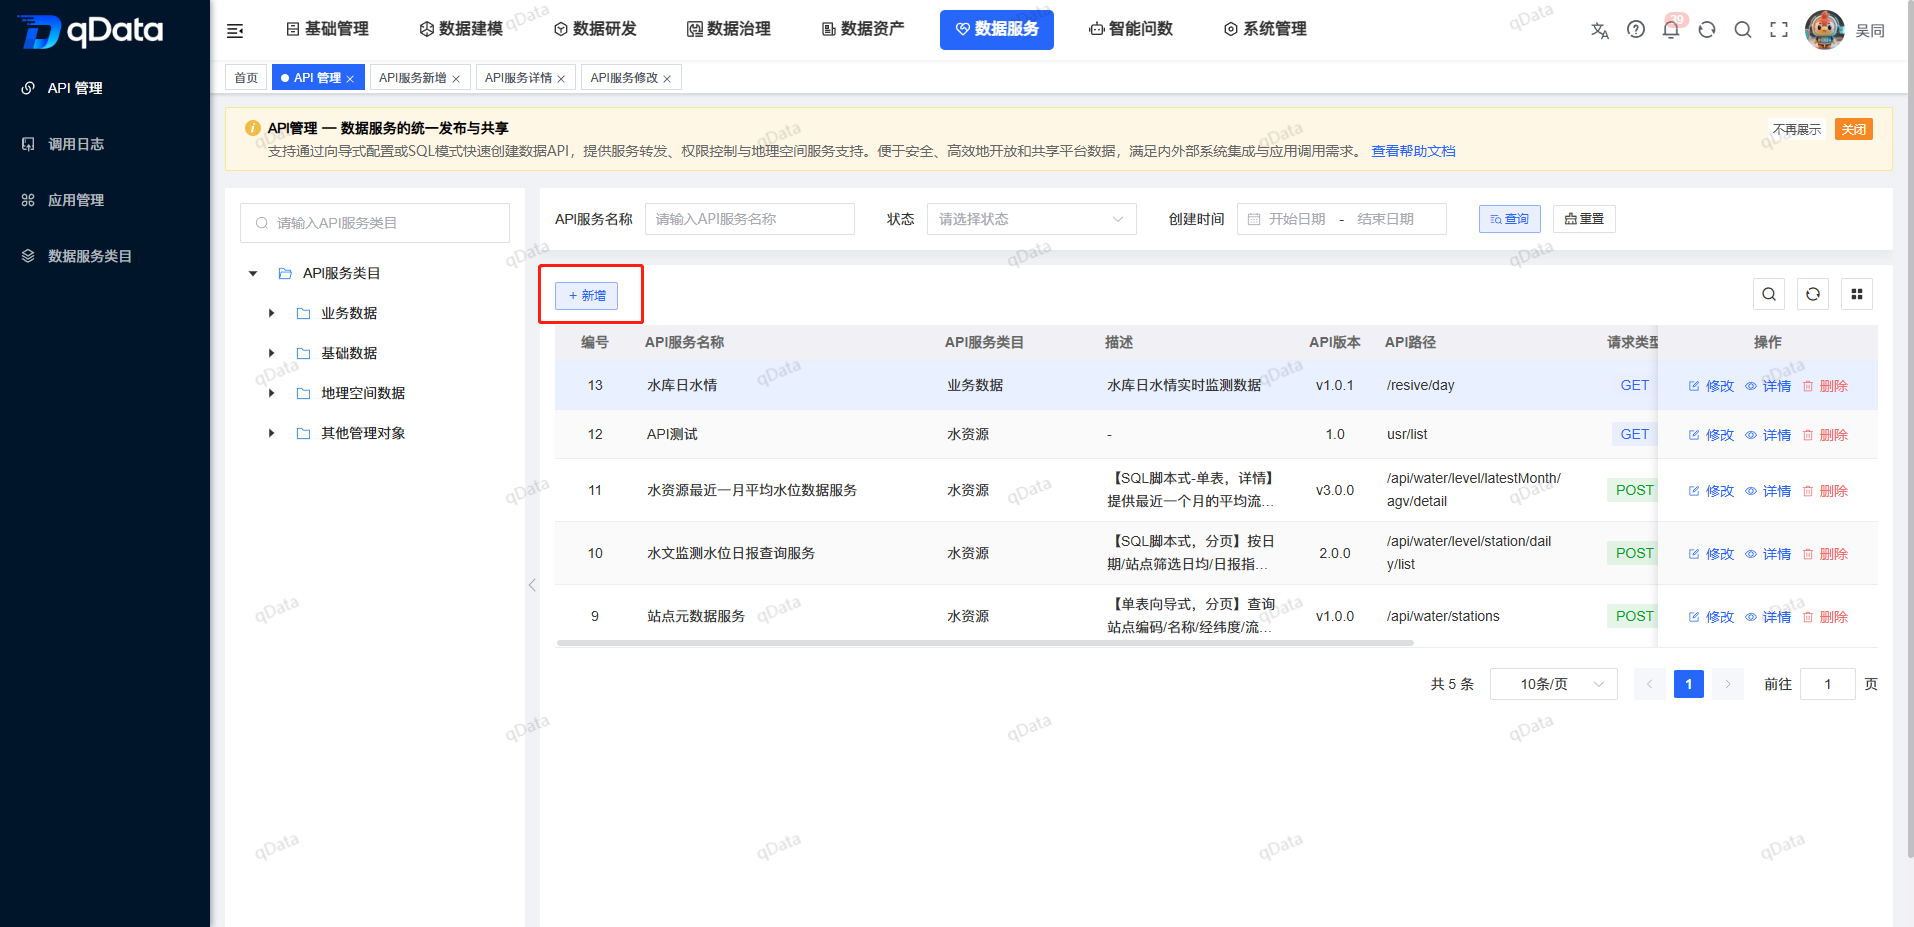
The three-step structure of "property configuration/parameter configuration/test" is displayed at the top of the page.
Step 1: Configure API properties
Fill in the basic attributes
- Select the category in "API Category".
- Fill in the service name in "API Name".
- Fill in the calling path in "API Address".
- Fill in the version identifier in "API Version".
- Select GET or POST in "Request Method".
- Select the response structure provided by the current page in "Return Format".
- Fill in the API purpose in "Description".
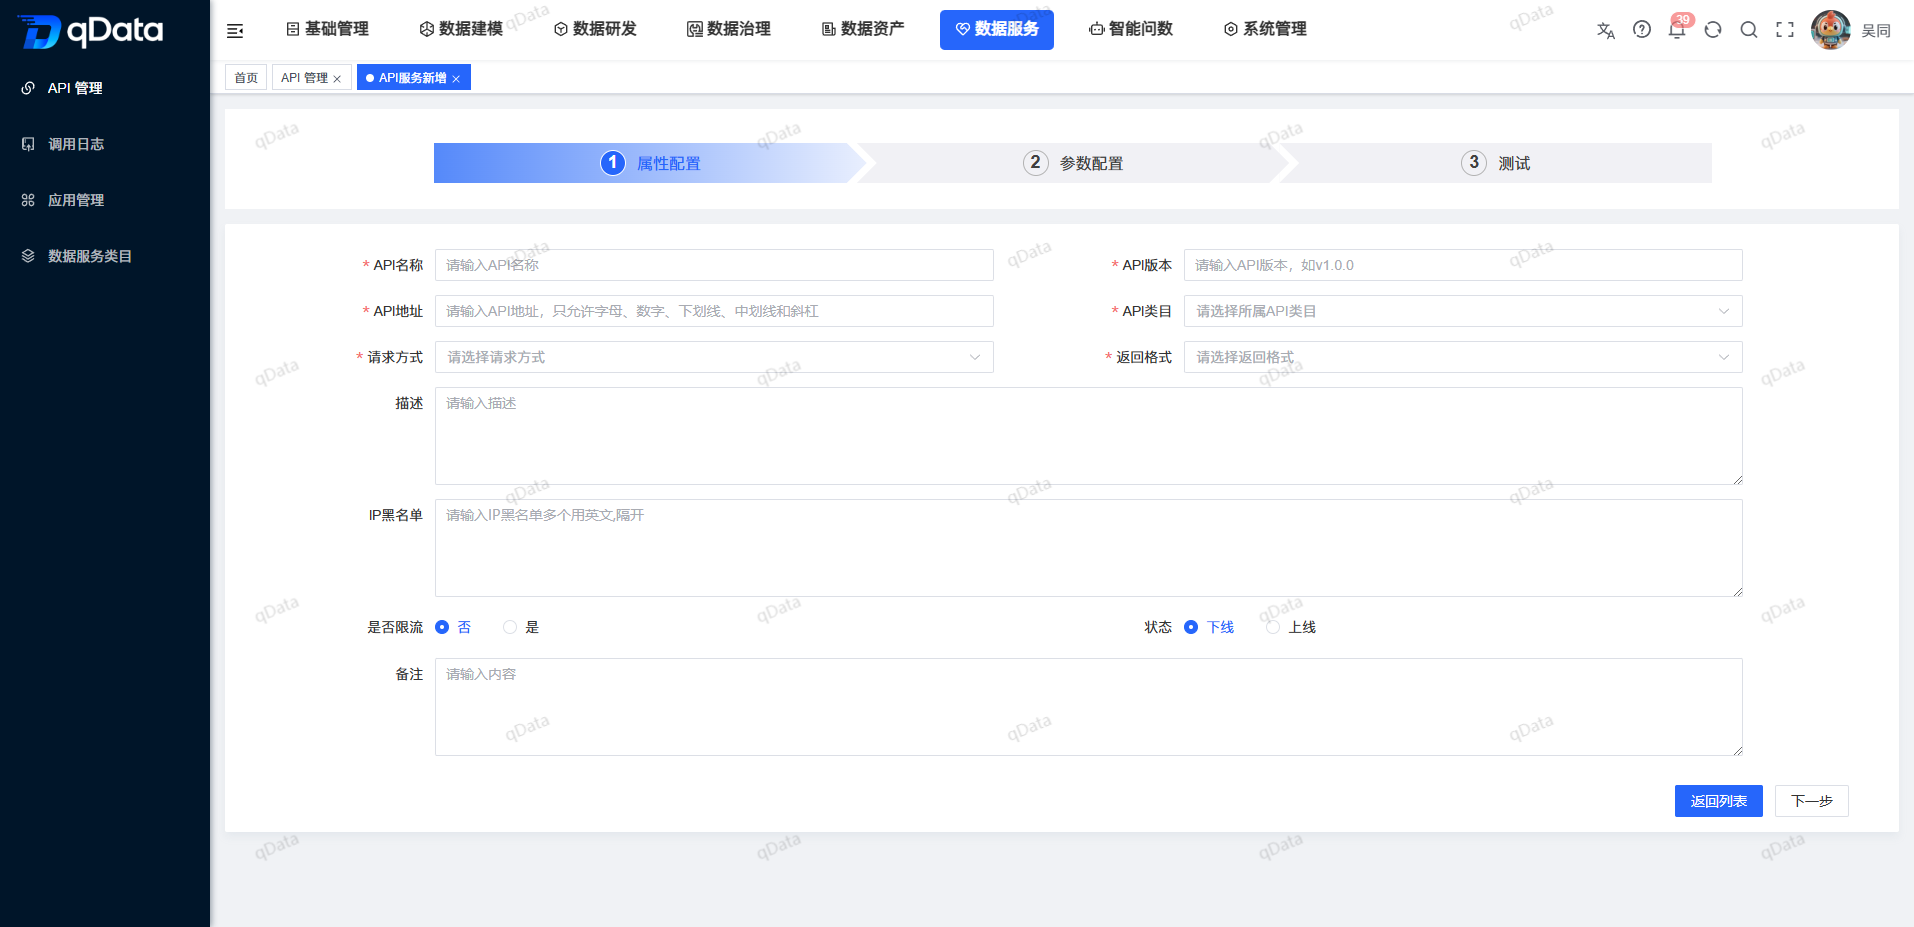
Configure access restrictions and status
- Fill in the IP address of the restricted call source in the "IP Blacklist".
- Select "No" or "Yes" in "Whether to limit traffic".
- When current limiting is enabled, set the current limiting time window.
- When current limiting is enabled, set the number of allowed requests.
- Select "Offline" or "Online" in "Status".
- Fill in the supplementary explanation in "Remarks".
- Click [Next].
Property configuration fields
| Field Name | Description | Required or not |
|---|---|---|
| API Category | Select the service category to which the API belongs. | Yes |
| API name | Fill in the API display name. | Yes |
| API address | Fill in the API call path; letters, numbers, underscores, underscores, and slashes can be used for page prompts. | Yes |
| API version | Fill in the service version identifier, such as v2.0.0. | Yes |
| Request method | Select GET or POST. | Yes |
| Return format | Select the response structure; list, details, and paging examples are visible on the current page. | Yes |
| Description | Fill in the business purpose of the API, up to 500 characters. | No |
| IP blacklist | Fill in the IP of the restricted call source; separate multiple IPs with commas. | No |
| Whether to limit current | Set whether to enable request frequency limit. | Page is undefined |
| Current limiting configuration | Set the time window and number of allowed requests after enabling current limiting. | Page is undefined |
| Status | Set the API to be offline or online. | Page is undefined |
| Remarks | Fill in the supplementary description, up to 500 characters. | No |
Step 2: Configure API parameters
After entering the "Parameter Configuration" step, select Single Table Wizard, SQL Script or Third-Party Forwarding in "Configuration Method".
Use single table wizard
Configure data sources and database tables
- Select "Single Table Wizard" in "Configuration Method".
- Select the target data source in Data Source.
- Select the target table in Database Table.
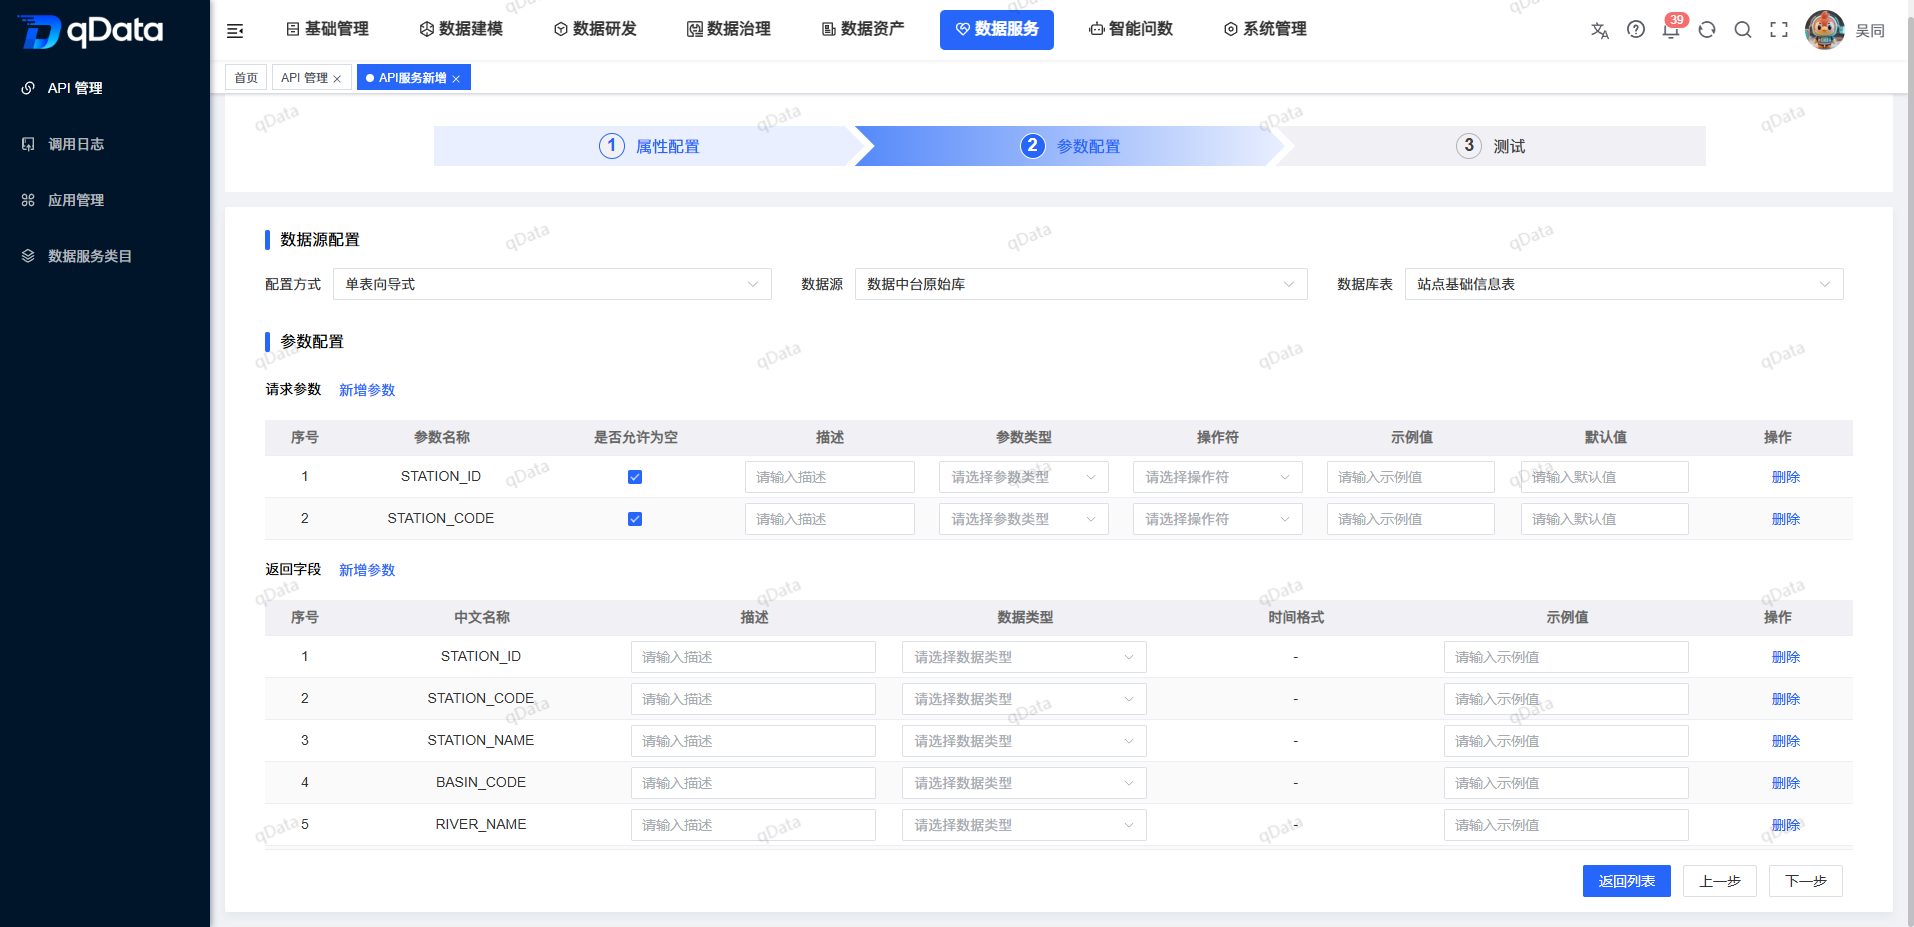
Configure request parameters
Click [Add Parameter] in the "Request Parameters" area.
Select the request parameter field in the field pop-up window.
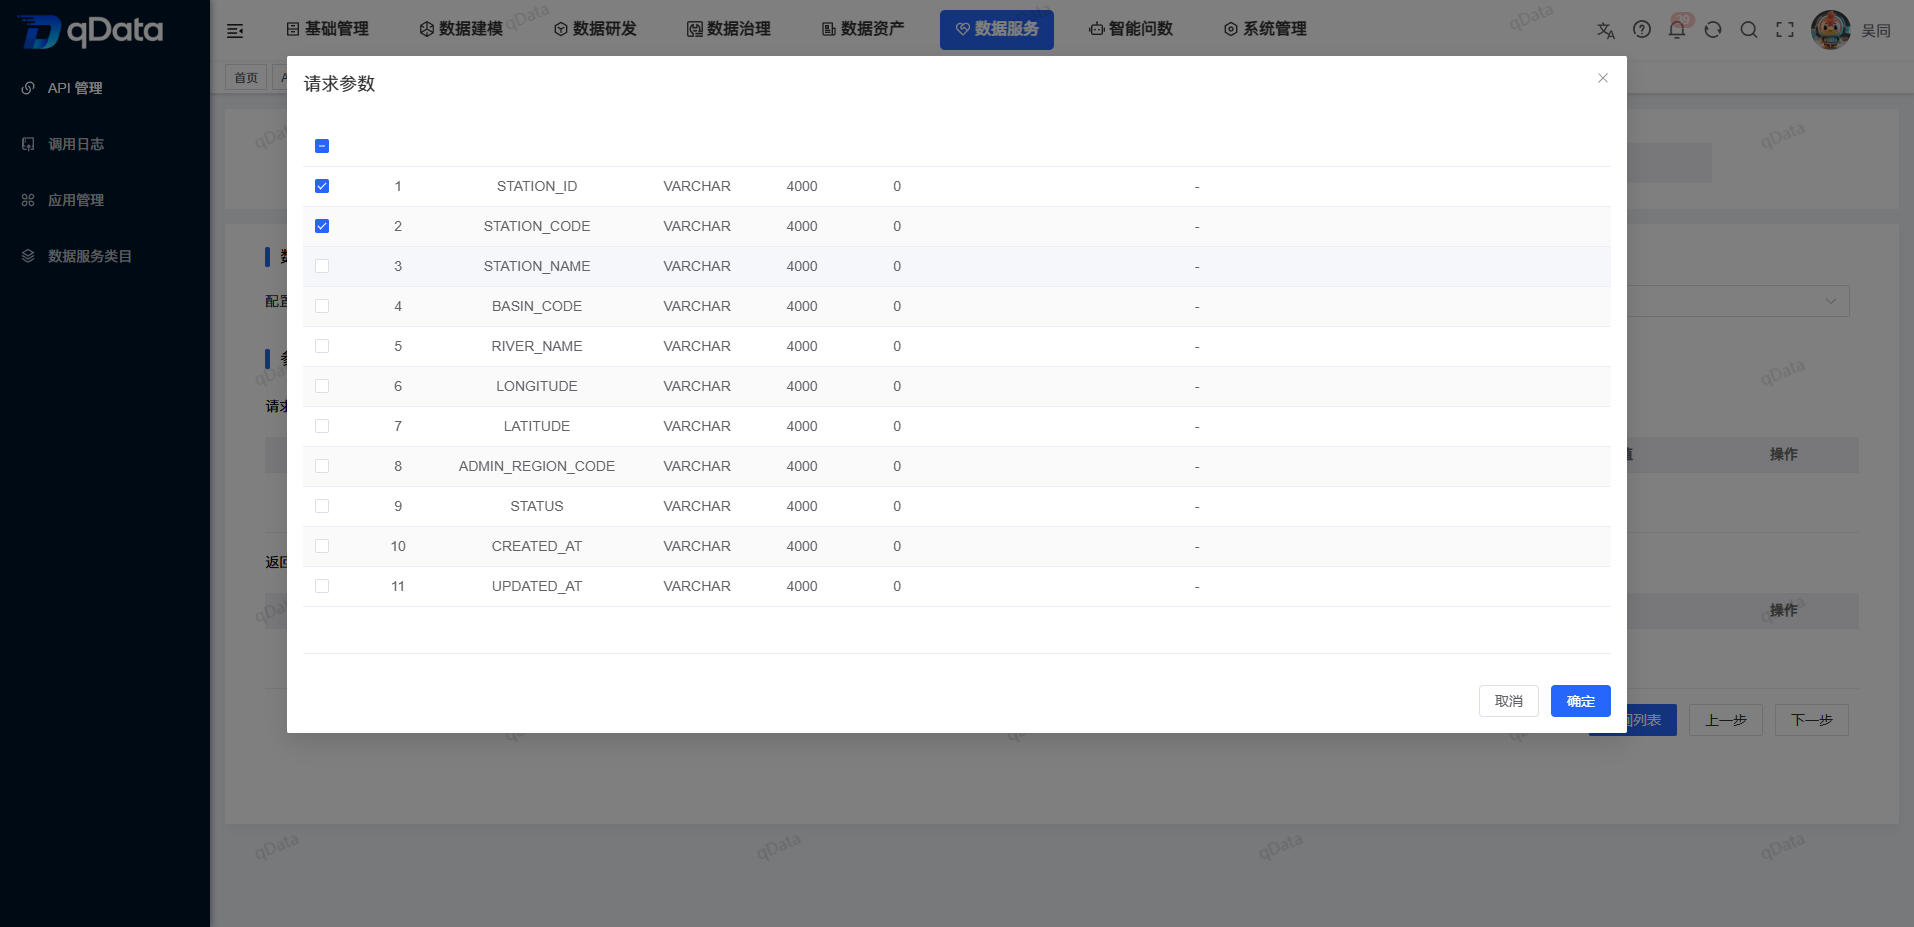
- Click [OK].
- Set whether empty values are allowed in the request parameter table.
- Fill in the description in the request parameters table.
- Select the parameter type in the request parameter table.
- Fill in the request parameters table with sample values.
- Fill in the default values in the request parameter table.
Configure return fields
Click [Add Parameter] in the "Return Field" area.
Select the return field in the field pop-up window.
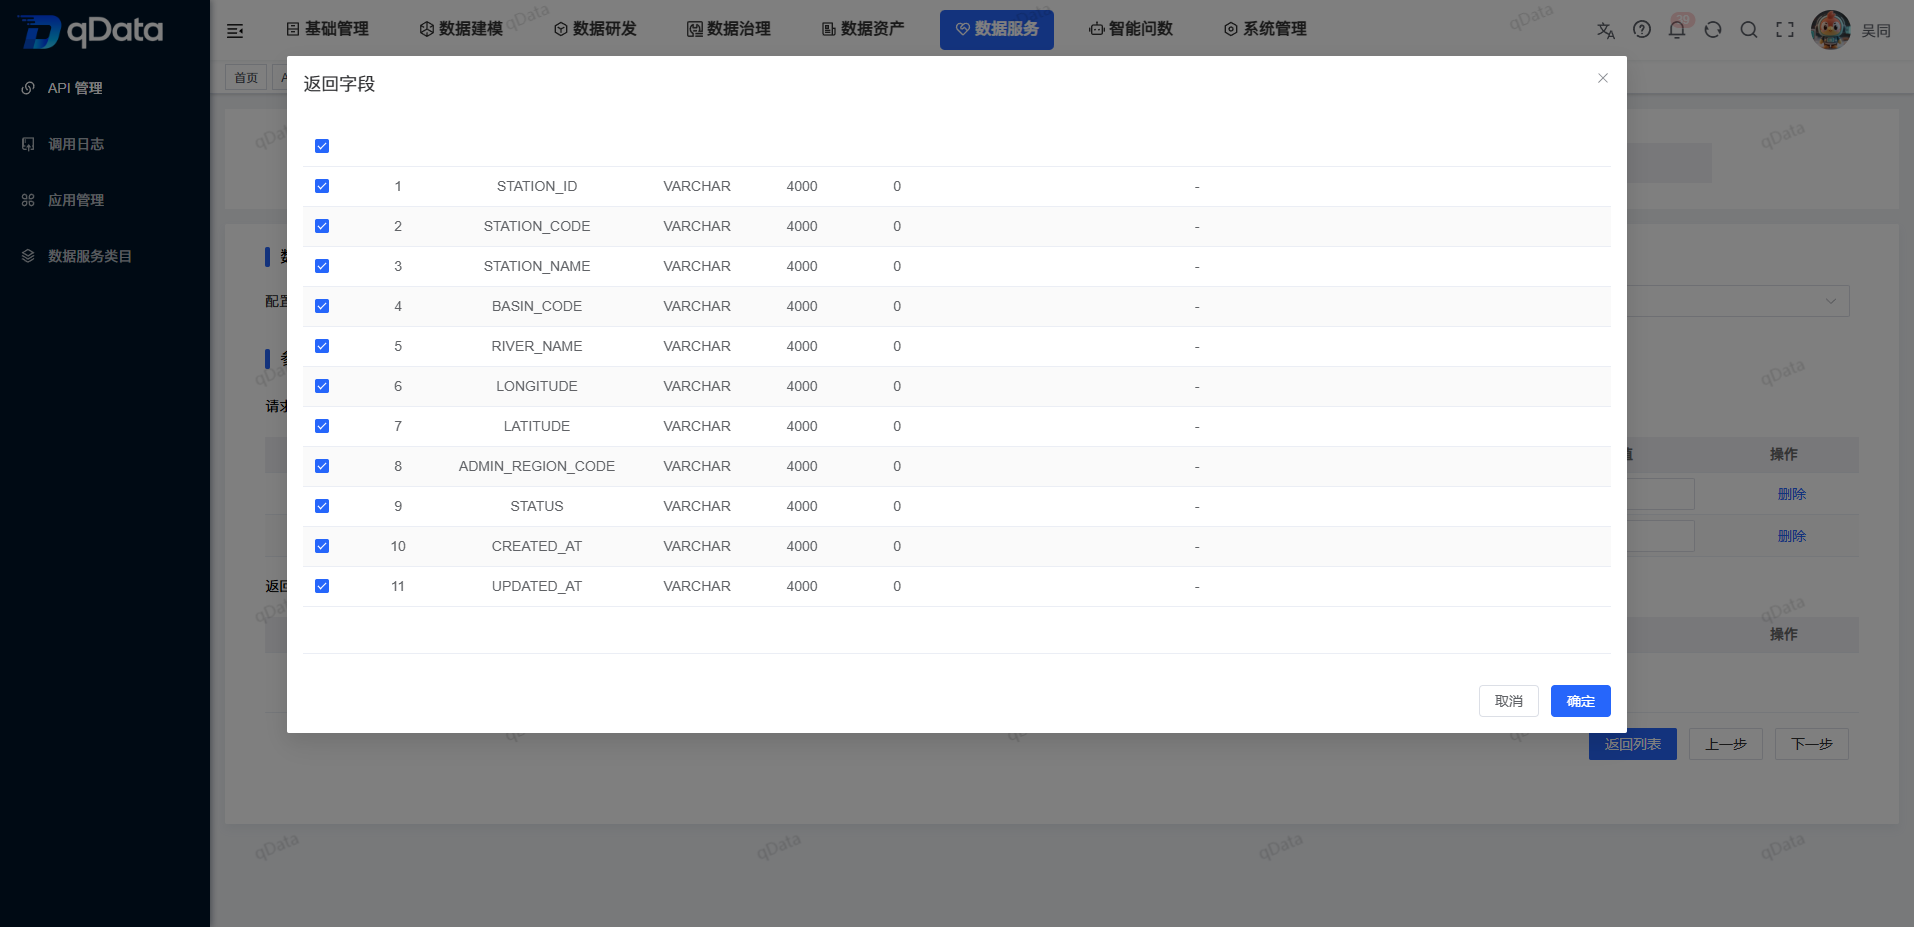
- Click [OK].
- Check the returned field names formed by the system.
- Fill in the description in the return fields table.
- Select the data type in the Return Fields table.
- When the data type is time, set the time format.
- Fill in the return fields table with sample values.
- Click [Next].
Request parameter fields
| Field Name | Description | Required or not |
|---|---|---|
| parameter name | The name of the calling parameter formed from field selection or parsing results. | System Formation |
| Whether it is allowed to be empty | Set whether this parameter can not be filled in when calling. | Page is undefined |
| Description | Fill in the business meaning of the parameters. | Page is undefined |
| Parameter Type | Select the parameter data type. | Page is undefined |
| Example value | Fill in the parameter example. | Page is undefined |
| Default value | Fill in the default content used when no value is passed. | Page is undefined |
Return field
| Field Name | Description | Required or not |
|---|---|---|
| Chinese name | Returned field name formed from field selection or parsing results. | System Formation |
| Description | Fill in the business meaning of the return field. | Page is undefined |
| Data Type | Select the return field data type. | Page is undefined |
| Time format | Set the display format when the data type is time. | Page is undefined |
| Sample value | Fill in the return field example. | Page is undefined |
Use SQL scripting
- Select "SQL script" in "Configuration method".
- Select the target data source in Data Source.
- Enter the query script in the SQL editing area.
- Click [SQL Analysis].
- View the parsed request parameter area.
- View the parsed return field area.
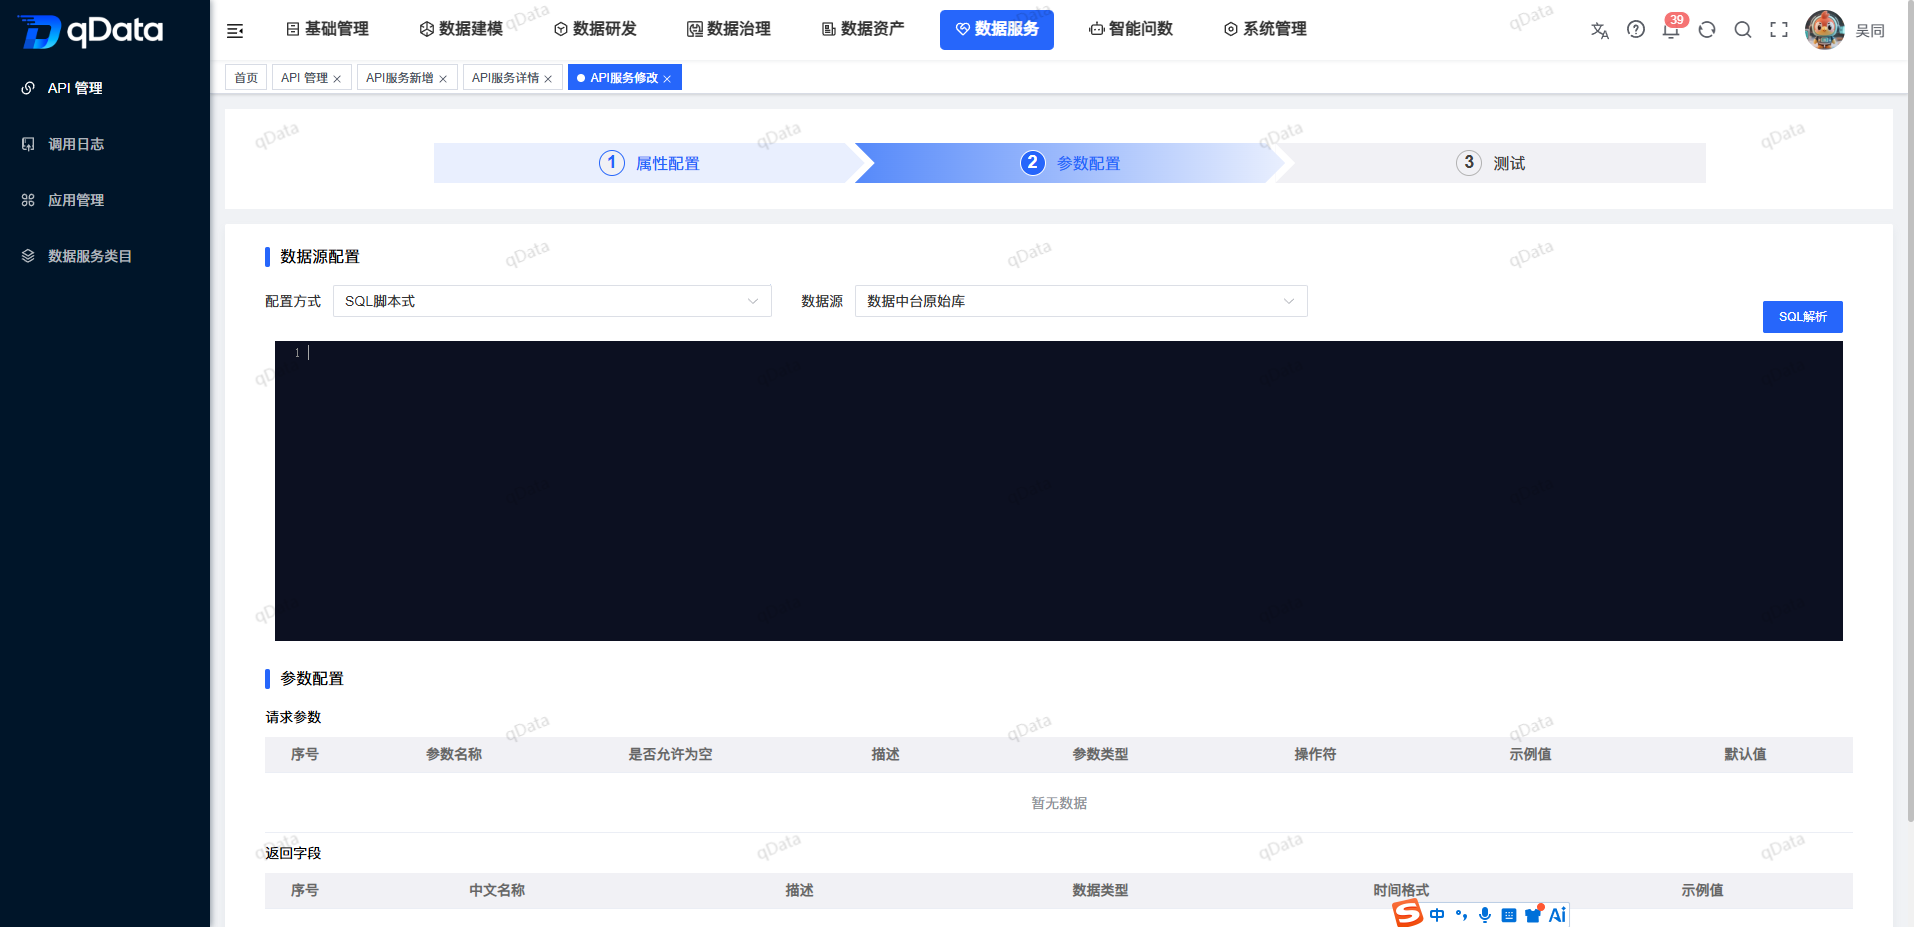
This page only describes the SQL script data source, SQL editing area and parsing entrance. It does not explain the complete saving rules, SQL syntax support range or parsing failure classification.
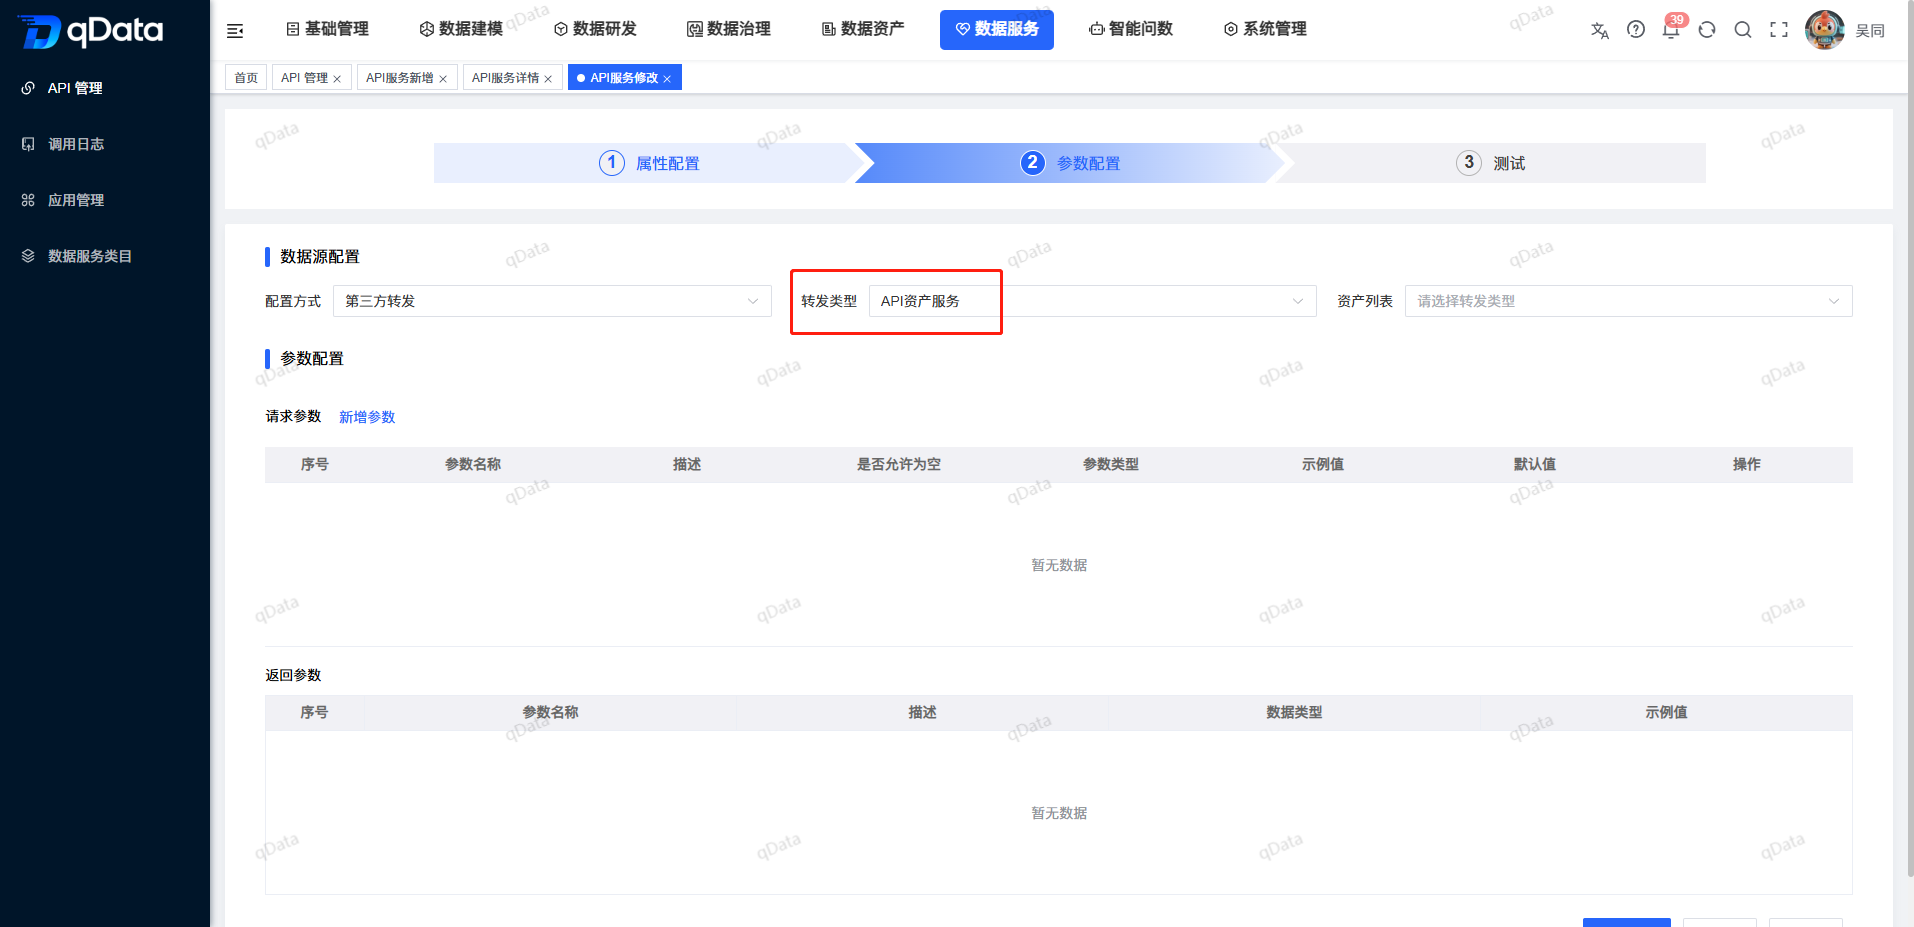
Use third-party forwarding
- Select "Third Party Forwarding" in "Configuration Method".
- Select "API Asset Service" or "Geospatial Data" in "Forwarding Type".
- Select the target asset in the Asset List.
- View the request parameter area.
- View the return parameter area.
Step 3: Test the API
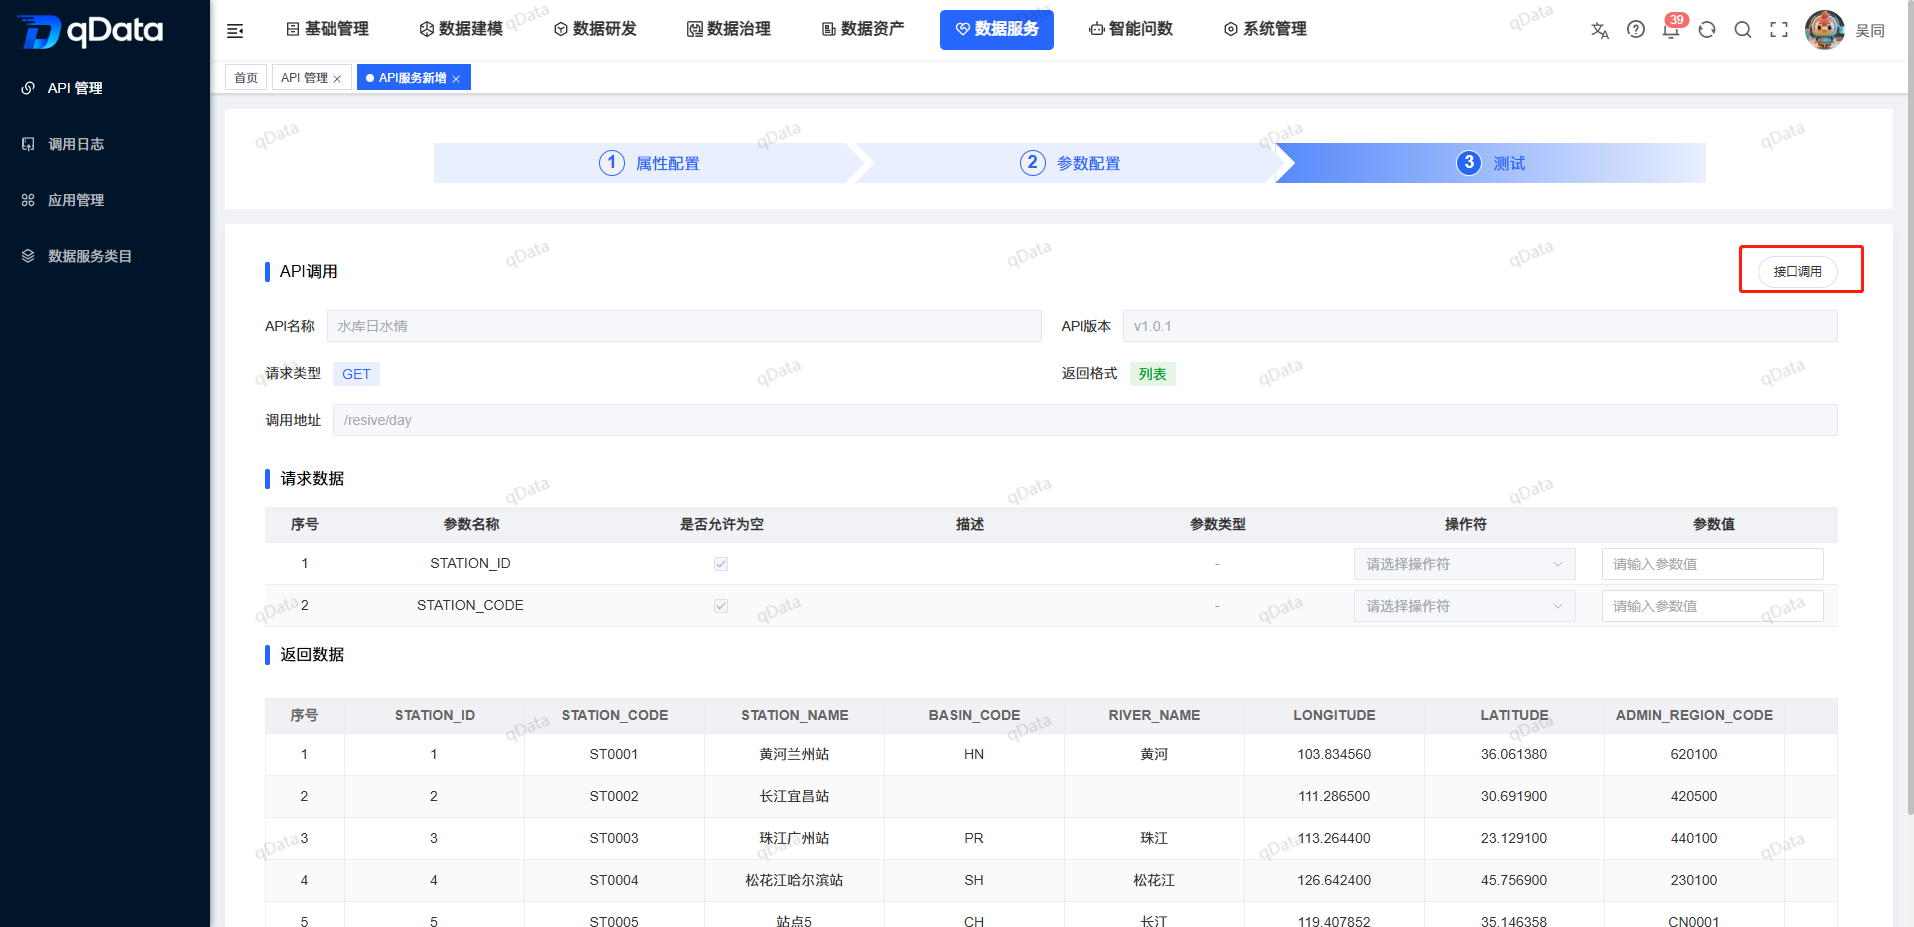
Initiate interface call
- Check the API name, API version, request type, return format and calling address on the test page.
- Fill in the parameter values in the "Request Data" table.
- Click [Interface Call].
- View the call results in the "Return Data" area.
Complete configuration
- After completing the parameter configuration, click [Next] to enter the test step.
- After confirming the test content, click [Confirm and Test].
- View the records after completing the configuration in the API list.
After completing the test, the page returns to the API list.
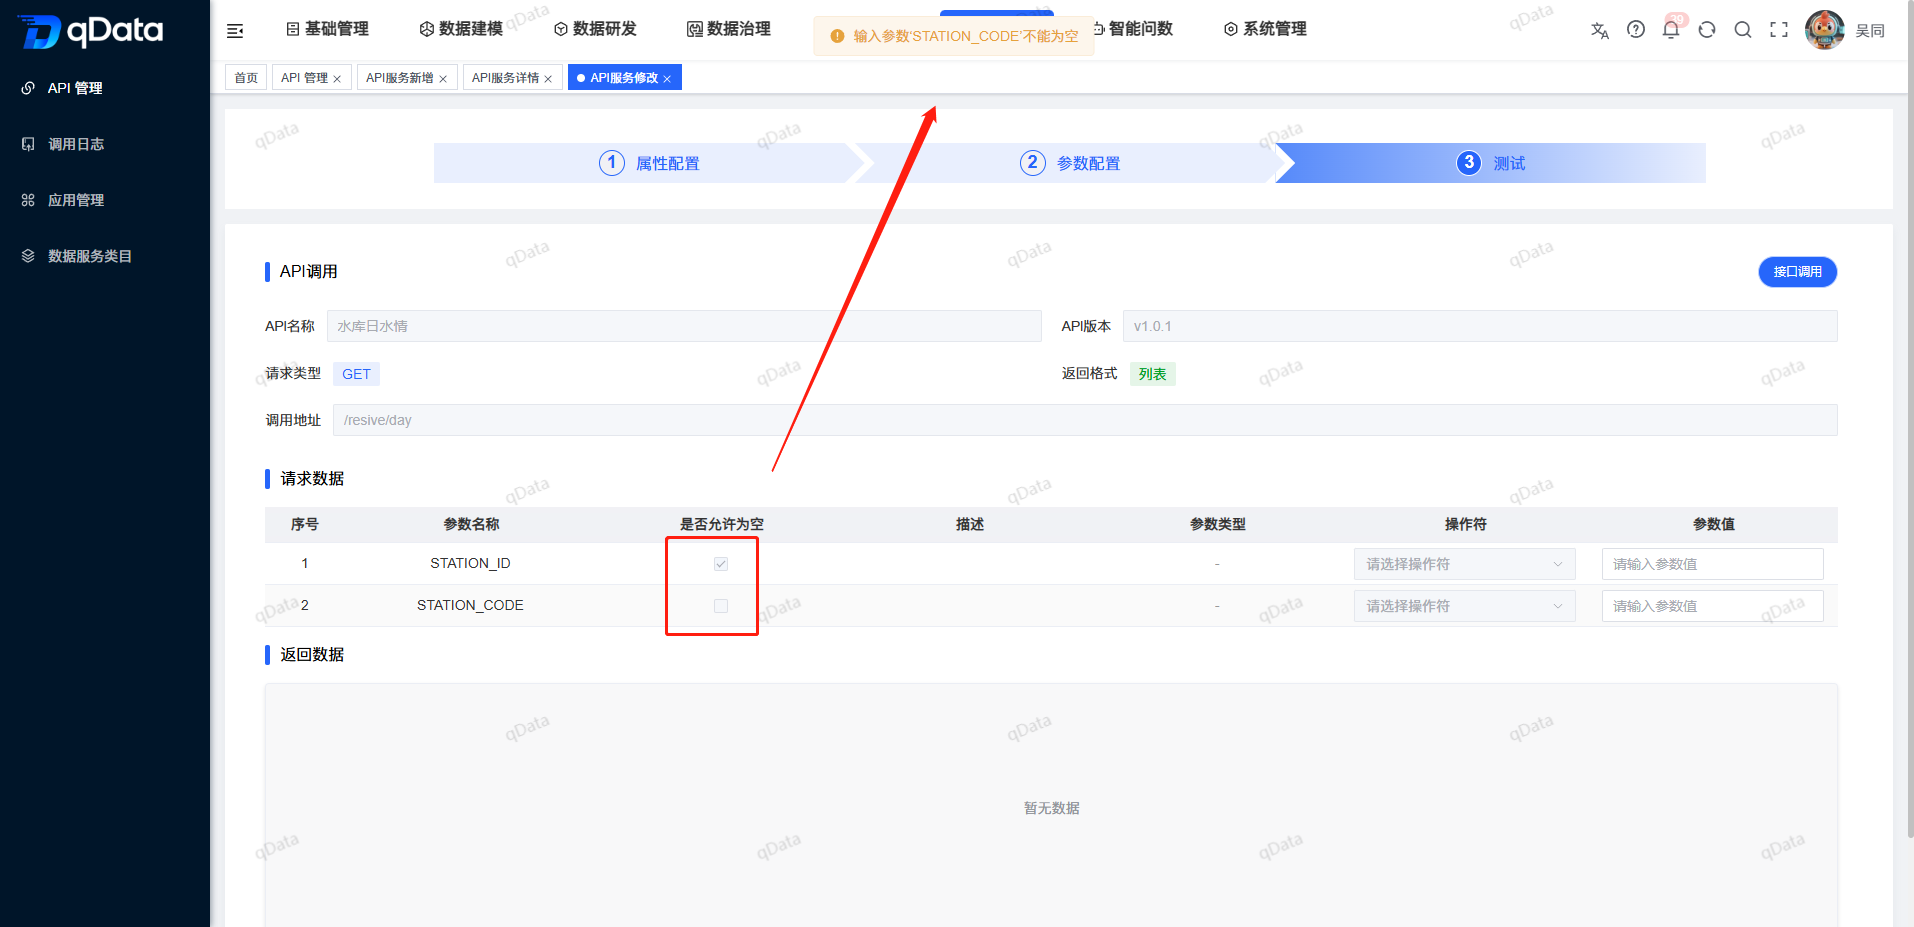
Required parameter verification
When parameters that are not allowed to be empty are not filled in, the page will prompt that the specific parameters cannot be empty. Current page examples include "Input parameter station_code cannot be empty" and "Input parameter id cannot be empty."
View call results
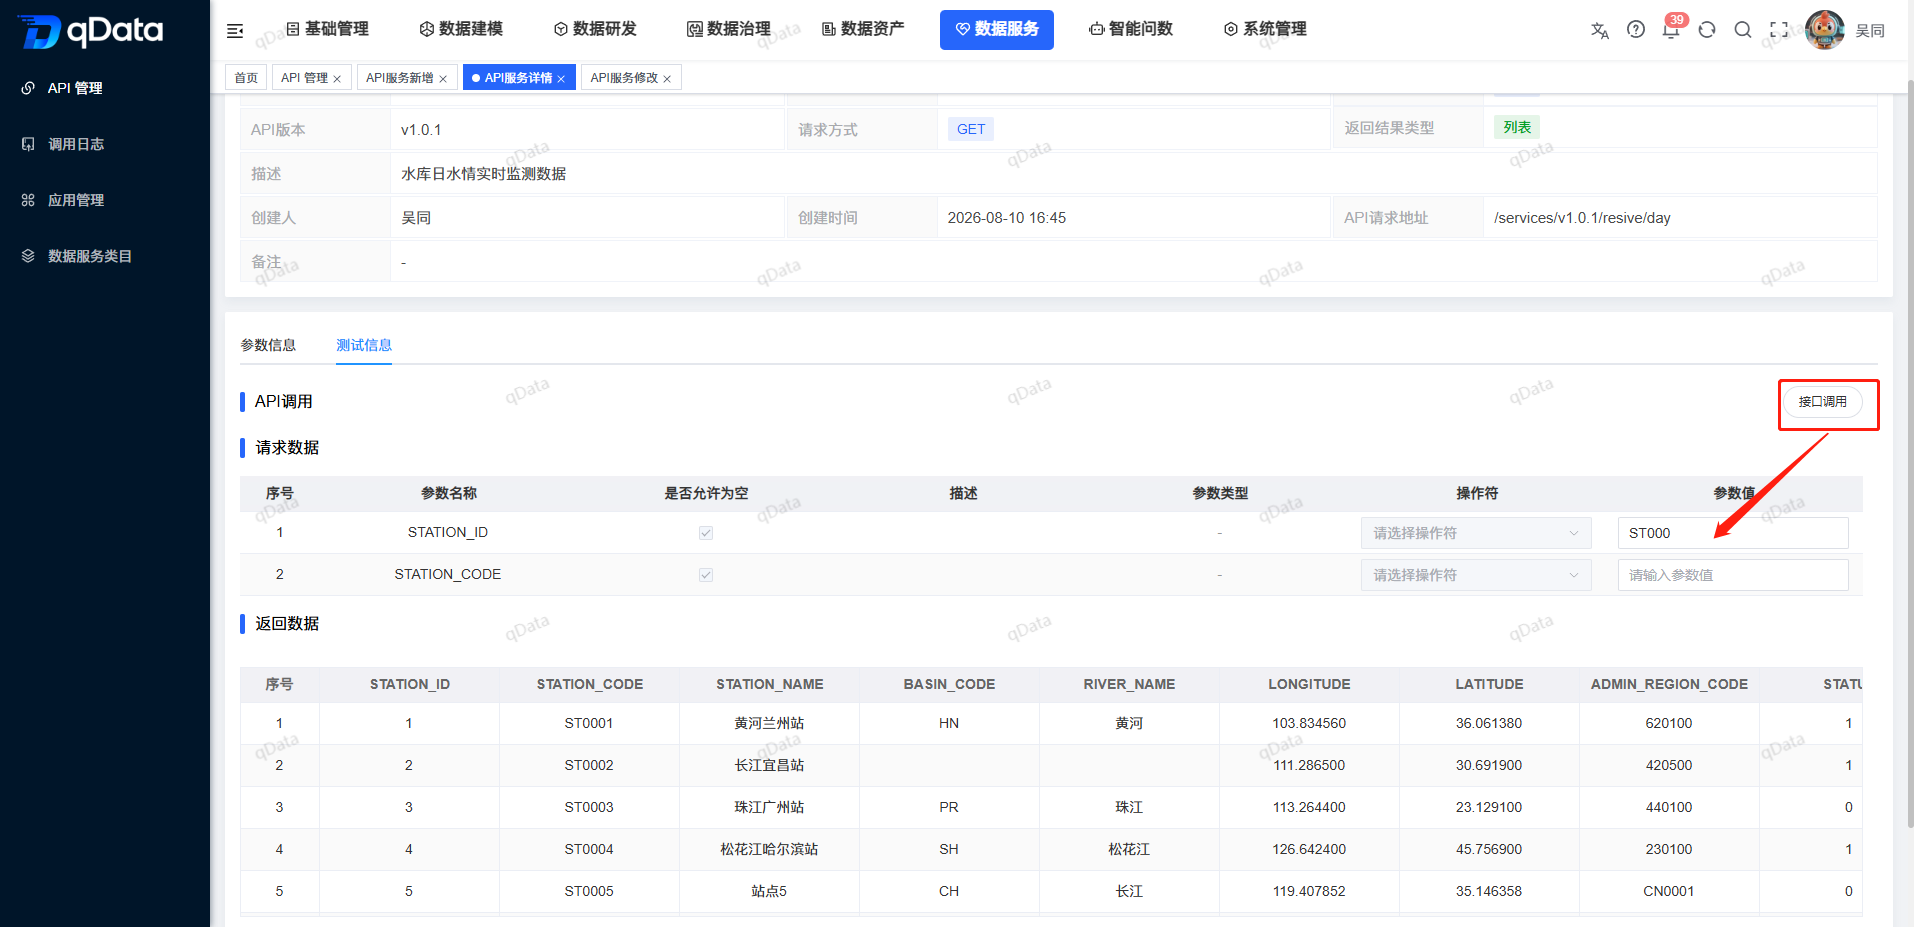
- When the call fails, the page displays "API call query result error".
- When the call is successful, the page displays "Interface call successful" and fields and values are displayed in the returned data table.
View API details and test again
Enter the details page
Return the API list and locate the target API.
- Click [Details] on the right side of the target record.
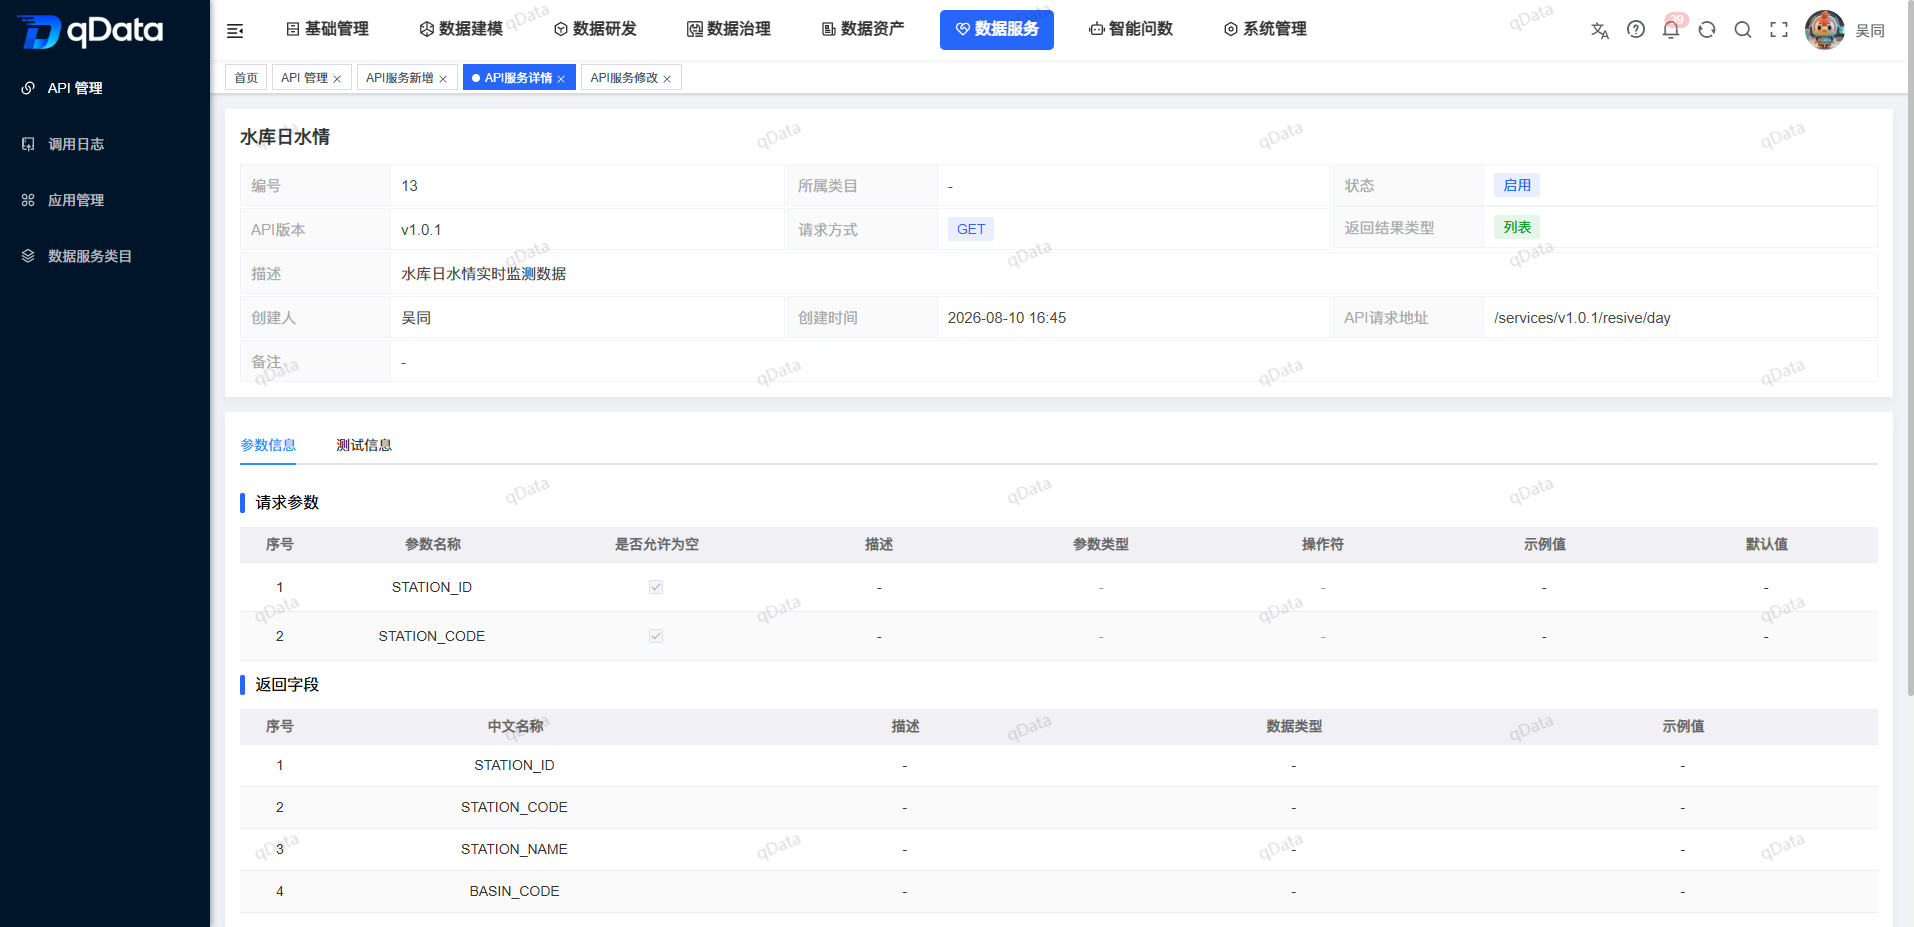
The details page displays basic information such as API description, creator, creation time, update time, and remarks, and displays the [Parameter Information] [Test Information] [Details] tab.
Test the API on the detail page
- Click the [Test Information] tab.
- Fill in the parameter values in the request parameters.
- Click [Interface Call].
- View the call results in the return data area.
- View the [Details] tab entry.
- After the operation is completed, click [Return].
View the existing API maintenance entrance
| Entrance | Description |
|---|---|
| [Modify] | Enter the three-step configuration page to adjust the existing API. |
| [Details] | Enter the API details page to view information and test entrance. |
| Status switch | View the current API status; this page does not explain the switching results. |
| [Delete] | View the deletion entry; this page does not explain deletion confirmation and deletion results. |
Service Access and Authentication Guidelines
After the API is configured and page tested, the application identity and API authorization relationship need to be established for the actual caller. The current version of the [Application Management] page has confirmed that you can view the "Application Number" and "Application Key", and you can add API authorization, set permanent validity, or specify a validity period for the application. For details on the Token acquisition interface and parameters, please refer to [v1.0.0 API Management Instructions](../../v1.0.0/Data Service/1, API Management.md), but it must be reviewed according to the current deployment environment before use.
Authentication preparation process
- Enter Application Management and create or select an application for calling the API.
- Enter the application details and check the application number and application key.
- Switch to the [API Authorization] tab and add target API service authorization for the application.
- Set permanent validity or specify the authorization validity period according to actual needs.
- Check the target API and validity period configuration in the authorization list.
- Obtain the access token through the application authentication interface provided by the current deployment environment.
- Bring a valid Token when calling the business API, and use the request method, calling path and request parameters confirmed on the API management page.
Confirmed scope of current version
The current version of the material has confirmed the application identity, application key, API authorization and authorization validity period configuration. The Token interface address, credential parameter name, request submission format, Token carrying position and refresh method are not shown in the current video and PRD. The API documentation of the current environment or the information provided by the administrator should prevail.
Token Get Reference
The application authentication interface recorded in the user manual is as follows:
- Request method:
POST - Historical interface path:
http://<address>:<port>/prod-api/oauth2/client_token - Purpose: Use the application ID and application key to obtain the access token.
Request parameters:
| Parameter name | Type | Is it required | v1.0.0 Description |
|---|---|---|---|
grant_type | string | Yes | Fixed value is client_credentials. |
client_id | string | Yes | Application ID. |
client_secret | string | Yes | The application key. |
scope | string | No | Used to limit interface access scope. |
Main return fields:
| Field name | Type | v1.0.0 Description |
|---|---|---|
code | integer | Status code. In the history description, 200 means success and 500 means failure. |
msg | string | Return message. |
token_type | string | Token type, historical description is generally bearer. |
client_token | string | Access Token used when calling business API. |
expires_in | integer | Token validity period, unit is seconds. |
client_id | string | The returned application ID. |
scope | string | Scope corresponding to Token. |
Carrying Token to call business API
- Use
client_tokenreturned by the authentication interface as the access credential. - According to the current environment API document requirements, put the Token into the specified request header, query parameter or request body location.
- Use the API path, request method and parameter structure displayed on the API management page to initiate a call.
- If the request is rejected, check whether the Token has expired, whether the application has obtained the target API authorization, the authorization validity period, API status, IP blacklist and current limiting configuration.
- If further positioning is required, check the corresponding call results in [Call Record].
FAQ
When testing, it prompts that the input parameters cannot be empty. How to deal with it?
Return to the "Request Data" area, fill in the parameter values for the parameters in the prompt, and then click [Interface Call].After calling the API, "API call query result error" is displayed. How to deal with it?
This prompt indicates that this call failed. The page does not provide a more detailed error classification, and this page does not expand fixed troubleshooting paths.Can the independent [Interface Test] page test the API?
’s current independent [Interface Test] page displays “Function Under Construction”. When you need to test the configured API, use the "Test" step of the API Management Configuration Wizard or the [Test Information] tab of the API details page.After the API configuration and testing are completed, can the business system call it directly?
also needs to prepare to call the application in [Application Management], configure the target API authorization and validity period, and obtain and carry the access token according to the authentication interface of the current environment.
Summarize
[API Management] is used to query, configure and test APIs, and view API details. When using it, focus on checking the API category, calling path, request parameters, return fields, application authorization, access credentials and test results ; the v1.0.0 Token interface is only used as a historical access reference, and the current deployment parameters still need to be confirmed according to the actual environment.