
Application Management
Feature overview
Functional positioning
Application Management is used to maintain the application identity, calling credentials and API authorization relationship of API callers. Users can create an application first, then enter the application details to select callable APIs and authorization validity periods to establish controlled access scope for third-party systems or internal business systems.
Simple understanding: The application is equivalent to the "identity profile" of the API caller. The application secret key is the calling credential of the application. The API authorization determines which services it can call and within what time range it is valid.
Usage suggestions
When accessing for the first time, it is recommended to follow the sequence of to add an application -> check application information and secret key -> enter [API Authorization] -> select API and validity period -> submit and check the authorization list .
Main features
- Application Maintenance: Add basic application information, or modify the name, type, icon, public status, description and remarks of the current application.
- Certificate View: View the application number, application key, icon, type and description in the details.
- API authorization: Select the callable API for the application, and set it to be permanently valid or within a specified date range.
- View existing authorization: Open the modification pop-up window for existing authorization and check the current API and validity period configuration.
Scope
[Application Management] is used to maintain application identities, calling credentials and API authorization relationships that connect to third-party systems or internal business systems. API services are provided by [API Management]; real API calls, interception after authorization expiration, and call records are not within the scope of this page.
Preliminary steps
Preconditions
- Logged in to the qData platform.
- The current account can access the [Data Service] module and [Application Management] menu.
- If you need to add API authorization, the target API already exists in [API Management] and can be selected.
- The application name and application type have been prepared; if you need to upload an icon, prepare an image file that meets the page prompts.
Navigation path
Data Service > Application Management
Page overview
After entering [Application Management], you can see the page description, query area, application list, paging and [New] above the list. The query area includes "Application Name", "Application Type" and "Is it Public"; each record provides [Modify] [Details] [More].
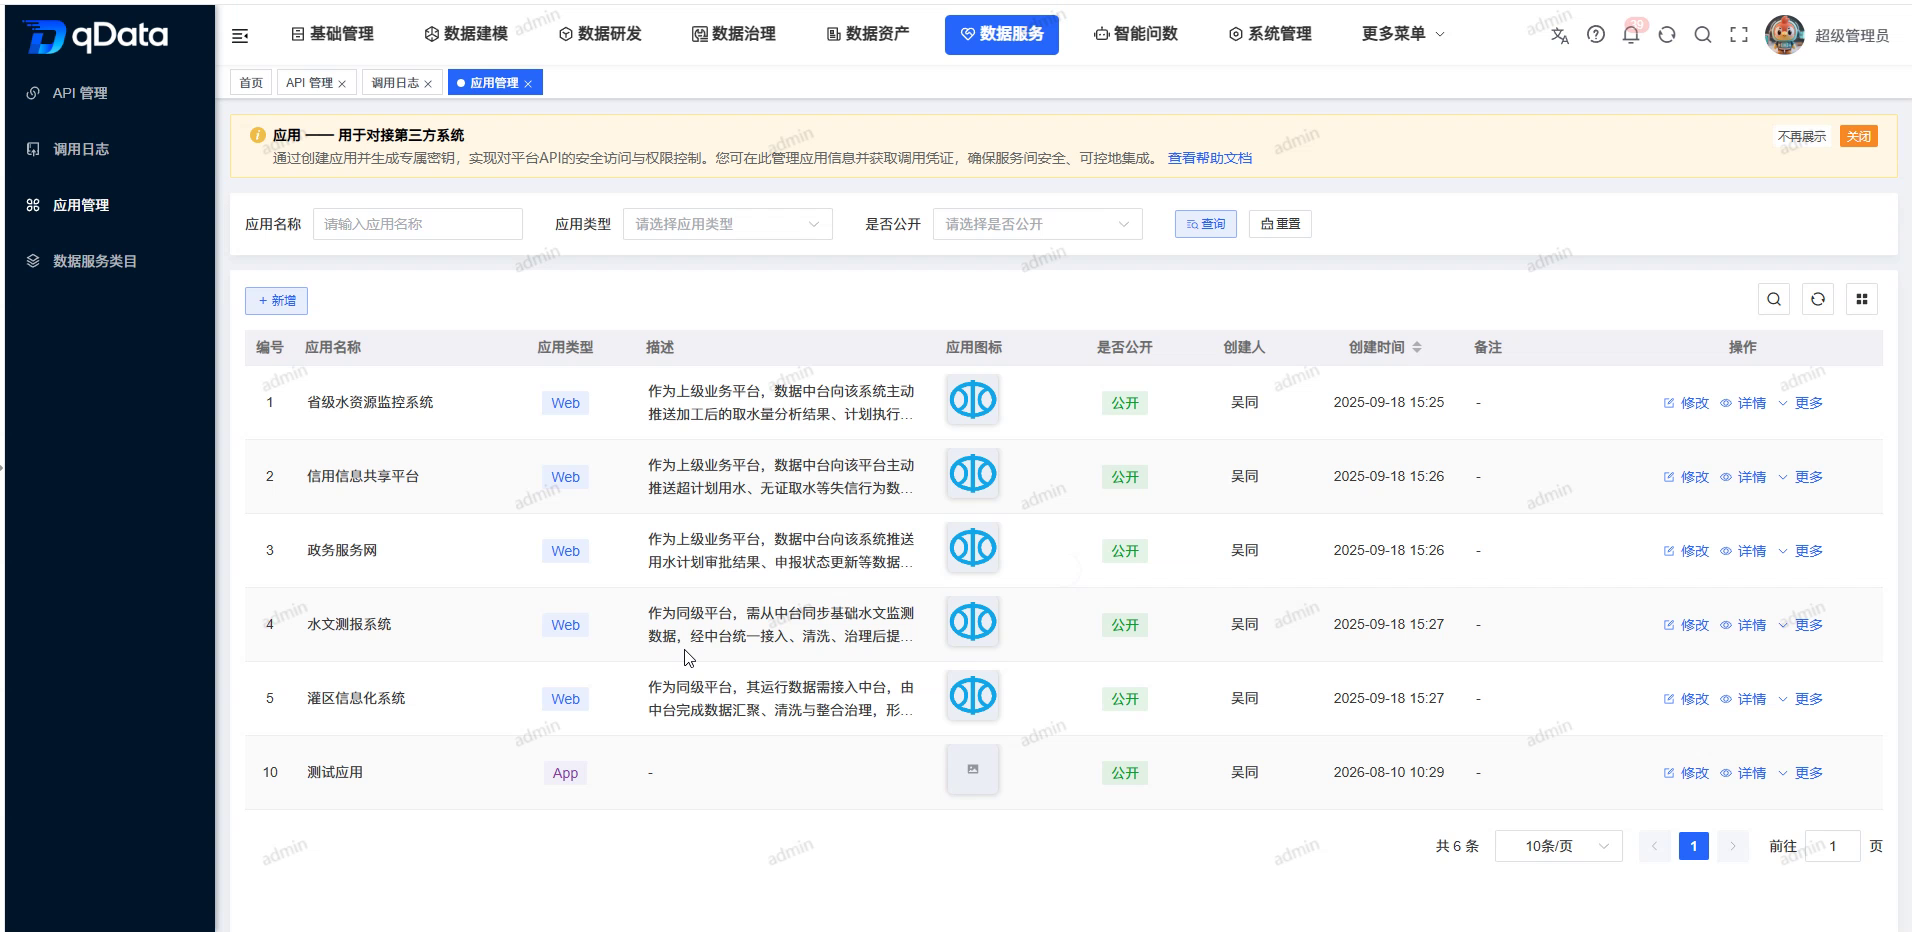
Application list fields
| Field Name | Description | Required or not |
|---|---|---|
| Number | The system number of the current application record. | Not applicable (system display) |
| Application name | Application name. | Not applicable (system display) |
| Description | Application usage description, list can be truncated. | Not applicable (system display) |
| Application type | Application form tags, such as Web, App. | Not applicable (system display) |
| Application icon | Application display icon. | Not applicable (system display) |
| Is it public? | App public status. | Not applicable (system display) |
| Creator | Create the account for the application. | Not applicable (system display) |
| Creation time | Application creation time. | Not applicable (system display) |
| Operation | Display the [Modify] [Details] [More] entrance. | Not applicable (system display) |
Recommended operating procedures
Create and authorize the application: Enter [Application Management] -> Click [New] to create an application -> Open the application details -> Enter [API Authorization] -> Click [Add] -> Select API and validity period -> Check the successful addition and authorization list.
Maintain application information: Query applications by name, type or public status -> Click [Modify] -> Adjust the current application fields -> Click [OK] and check the current application data.
Check the calling credentials: Enter [Details] to view the application secret key; if you need to use [Reset Secret Key], first read the confirmation prompt and evaluate the caller's subsequent arrangements for using the new secret key.
Functional operation instructions
Query application
- Fill in the name keyword in the "Application Name" input box.
- Select the target type in the "Application Type" drop-down box.
- Select the public status in the "Public or not" drop-down box.
- Click [Query].
- View the returned application records in the application list.
- When you need to clear the query conditions, click [Reset].
Add new application
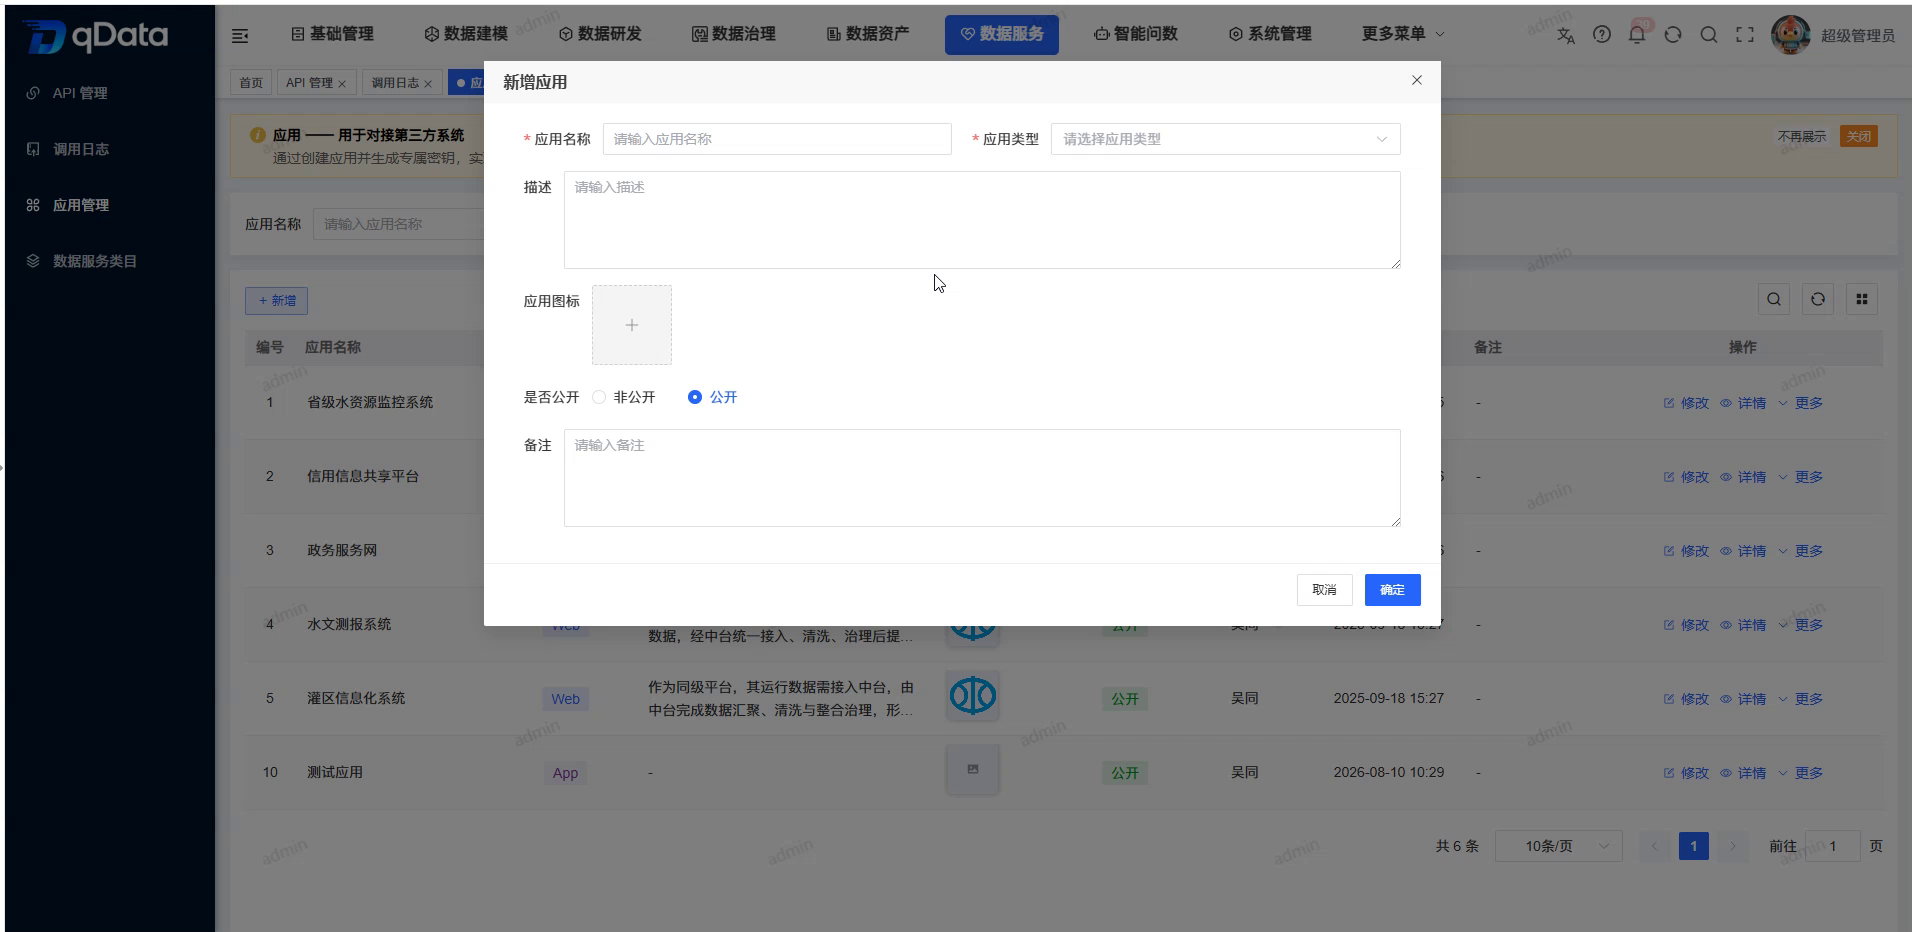
- Click Add above the list.
- Fill in the application name in "Application Name".
- Select the application type in Application Type.
- Upload the icon file in the "Application Icon" area (if you need to set an icon).
- Select "Private" or "Public" in "Public or not".
- Fill in the application purpose in "Description".
- Fill in the supplementary explanation in "Remarks".
- Click [OK].
- Confirm that the system has added a new piece of application data.
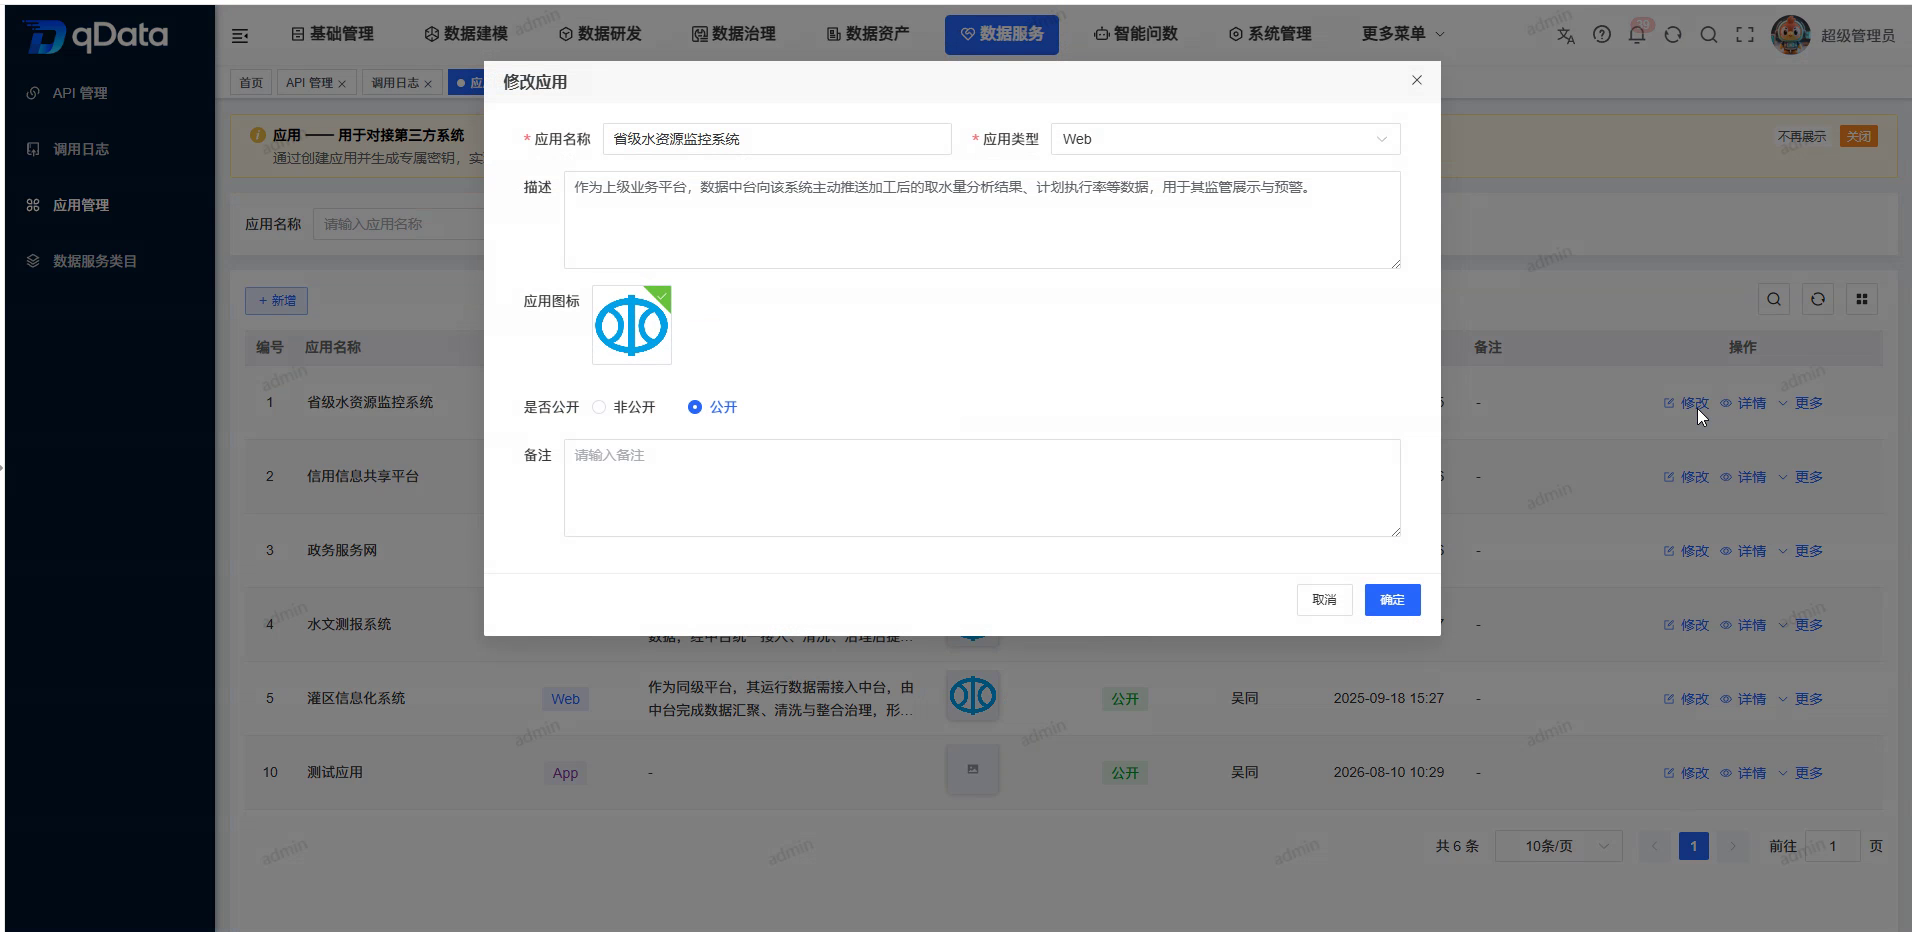
Modify current application
- Locate the target record in the application list.
- Click [Modify] in the operation column of the target record.
- Check the backfilled application information in the "Modify Application" pop-up window.
- Modify the fields that need to be adjusted.
- Click [OK].
- Confirm that the current application data is updated.
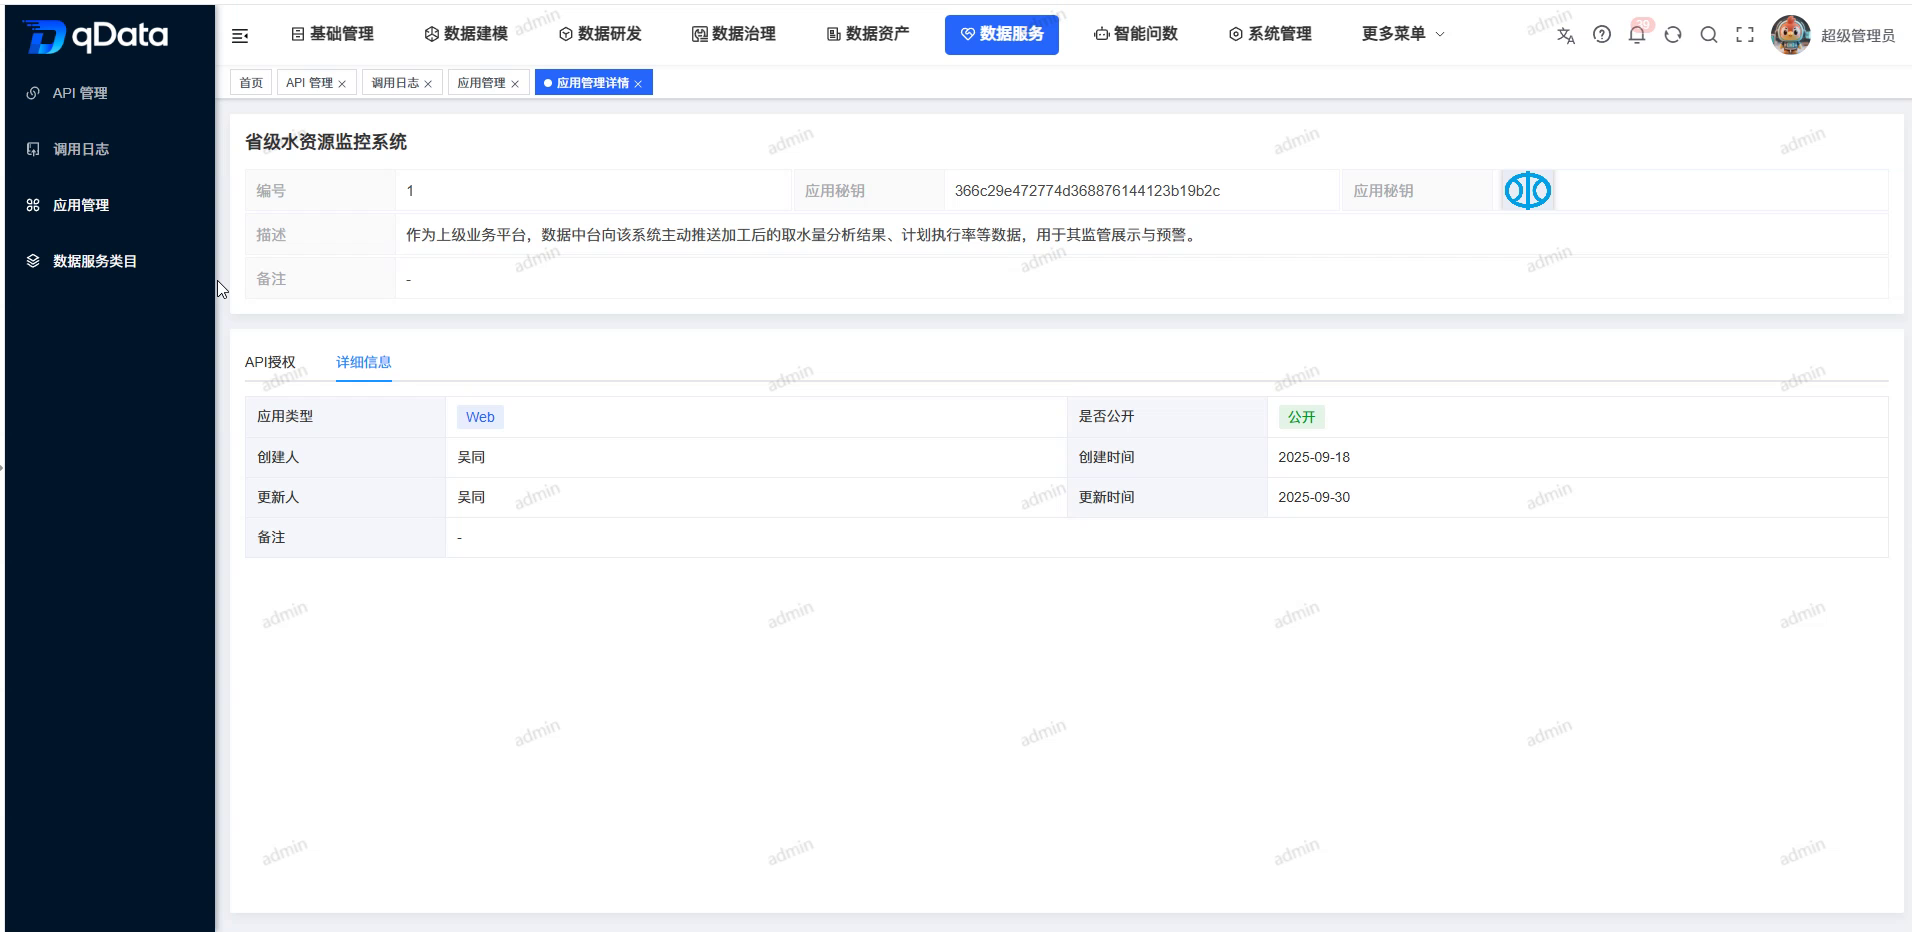
View app details
- Locate the target record in the application list.
- Click [Details] in the target record operation column.
- Check the app number, app name, and public status at the top of the details.
- View the application key, application icon, application type and description in the basic information.
- View the [API Authorization] and [Details] tab entries.
- When you need to return to the list, click [Return] in the upper right corner.
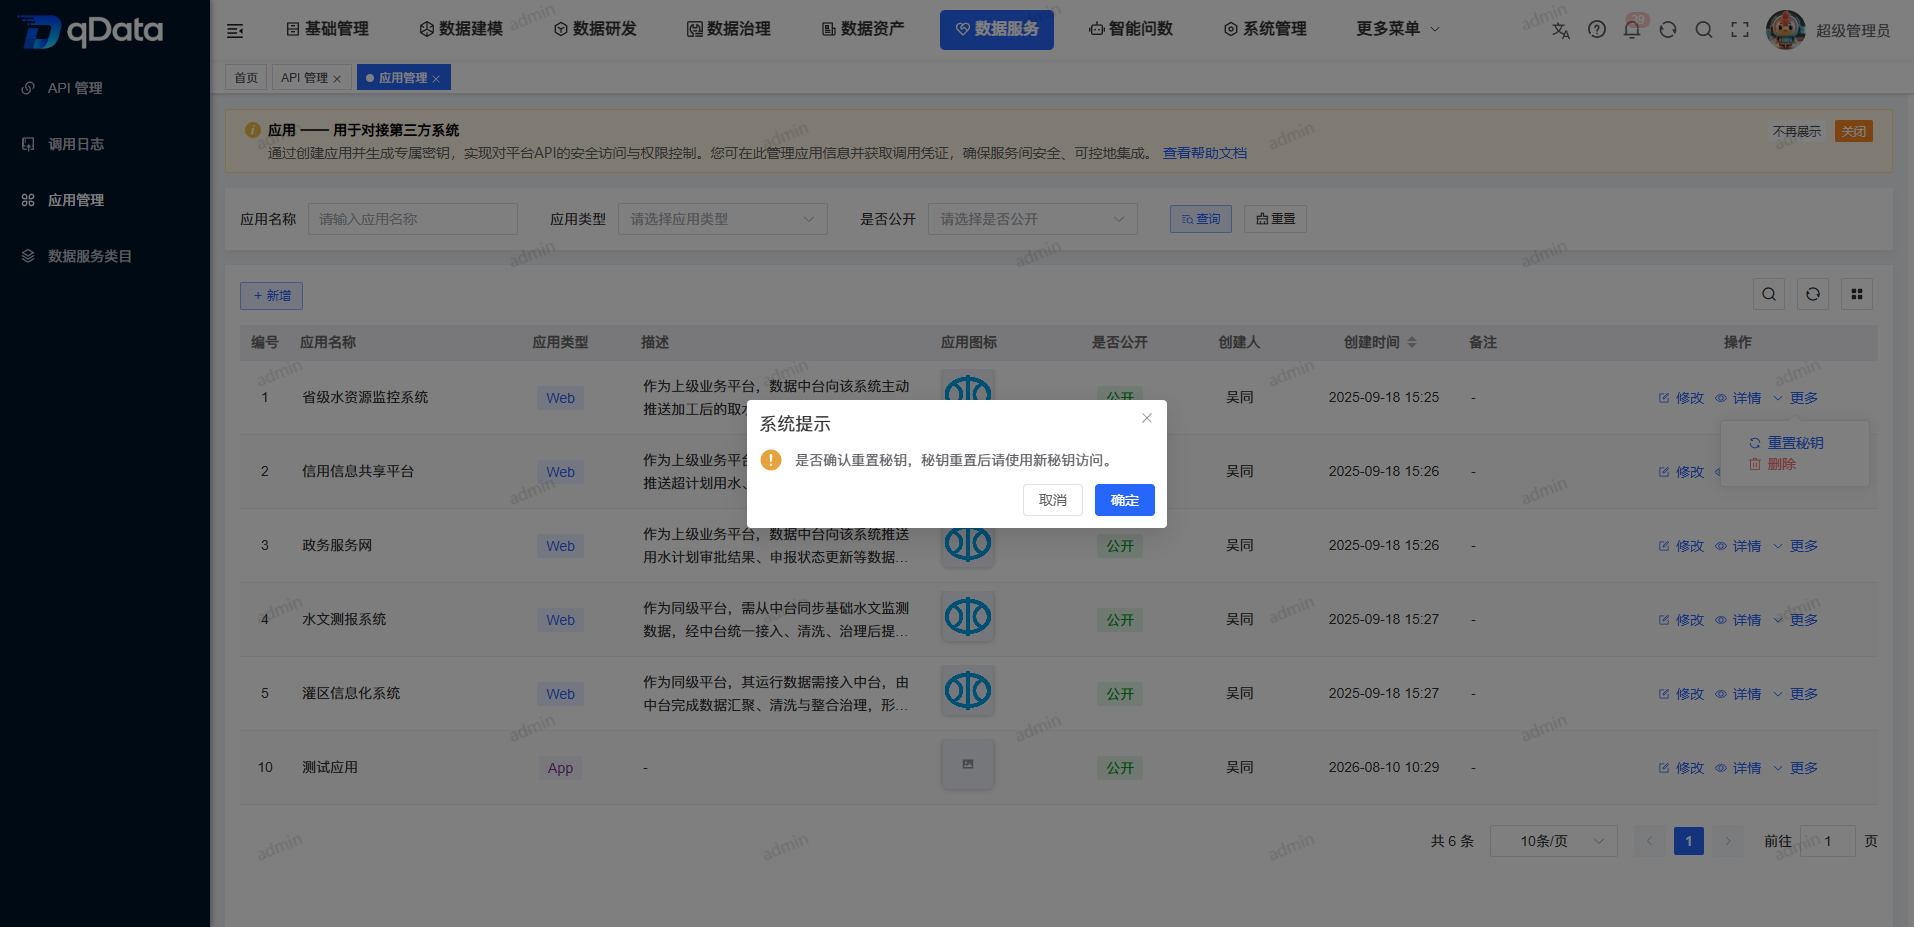
View more operations and reset key confirmation
- Locate the target record in the application list.
- Click [More] in the target record operation column.
- Check the [Reset Key] and [Delete] entries in the menu.
- Click [Reset Key].
- Check the "System Prompt" confirmation box.
- Read "Are you sure to reset the secret key? Please use the new key to access after the secret key is reset.".
- If you do not want to continue the reset, click [Cancel].
View API authorization status and list
- Enter the target application details.
- Click the [API Authorization] tab.
- If there is no authorization record, check "No Record" and the total number is 0.
- Check the [New] entry in the authorized area.
- When there is an authorization record, check the authorization list field and operation entry.
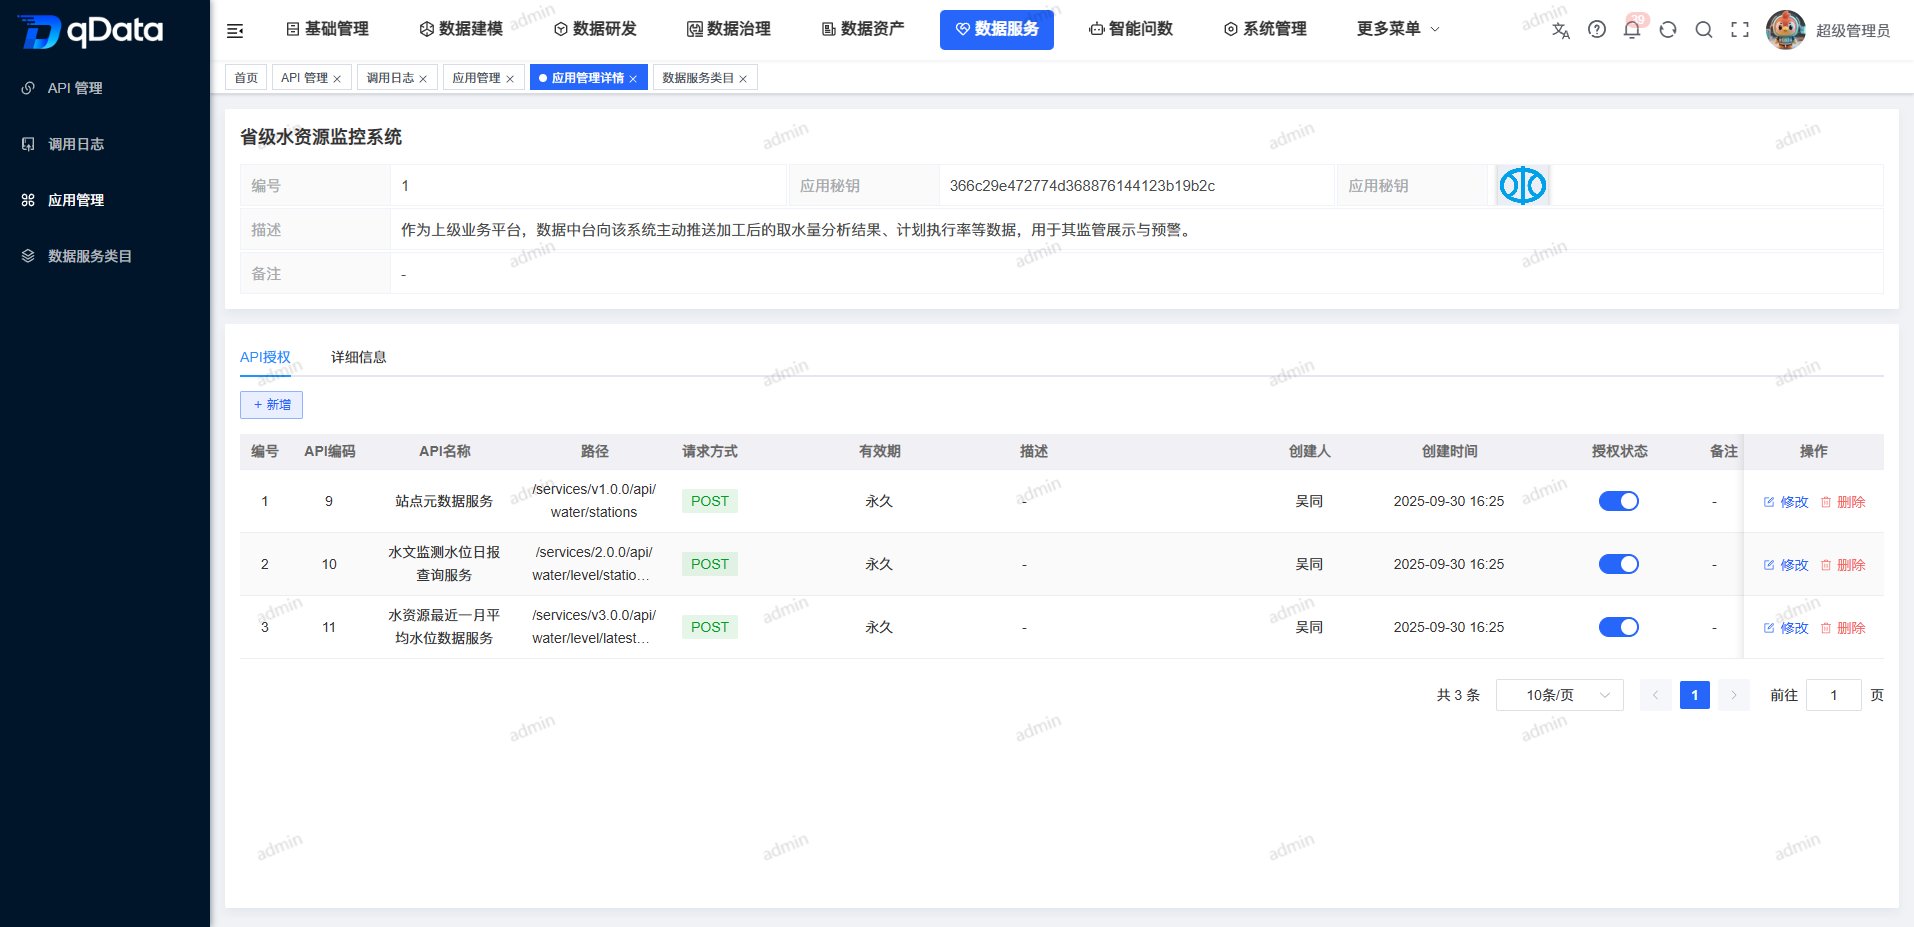
| Field Name | Description | Required or not |
|---|---|---|
| API number | The number of the authorized API. | Not applicable (system display) |
| API name | The name of the authorized API. | Not applicable (system display) |
| Description | API service description. | Not applicable (system display) |
| Path | API call path. | Not applicable (system display) |
| Request method | API call method, such as GET. | Not applicable (system display) |
| Validity Period | Authorization validity date or permanent validity status. | Not applicable (system display) |
| Authorization status | Current authorization status switch. | Not applicable (system display) |
| Creator | The account that created the authorization record. | Not applicable (system display) |
| Creation time | Authorization record creation time. | Not applicable (system display) |
| Operation | Display the [Modify] [Delete] entry. | Not applicable (system display) |
Add API authorization
- Click [Add] on the [API Authorization] tab.
- Select the target API service in "API Service".
- Select "Yes" or "No" in "Whether it is valid permanently".
- When selecting "No", fill in the start date in "Validity Period".
- Fill in the end date in "Validity Period".
- Fill in the authorization description (if any) in "Description".
- Fill in the supplementary explanation (if any) in "Remarks".
- Click [OK].
- View the page prompting "Add successfully".
- Check the newly added record in the authorization list.
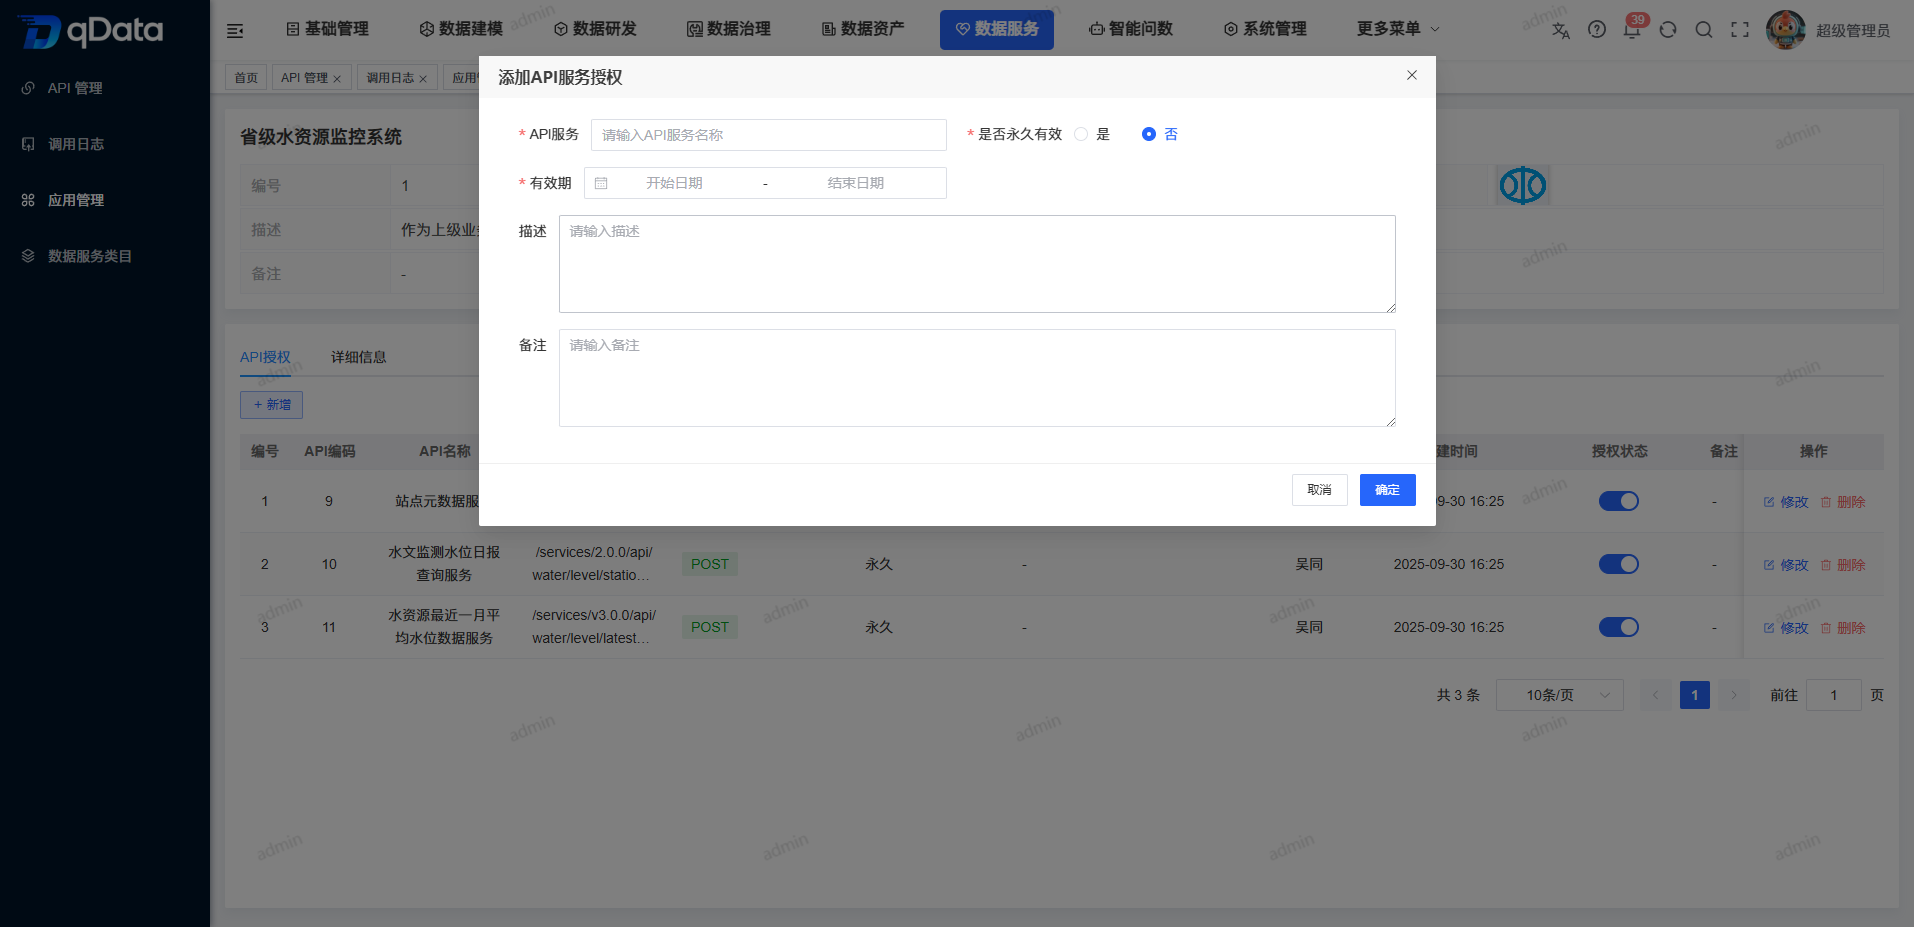
The authorization form fields are described as follows:
- API service: Select the API authorized to the current application, required.
- Whether it is permanently valid: Select "Yes" or "No", required.
- Validity period: Fill in the start date and end date when selecting "No", required.
- Description: Fill in the authorization description, up to 500 characters.
- Note: Fill in the authorization supplementary description, up to 500 characters.
Check the successful result of adding API authorization
After submitting the new authorization, "Add successfully" is displayed at the top of the page, and 1 record appears in the authorization list. The sample record can check API number 7, API name "Water Map Data Forwarding Service", request method GET, validity period 2026-07-14 to 2026-07-23, authorization status is open, creator is "super administrator" and creation time 2026-07-14 13:52.
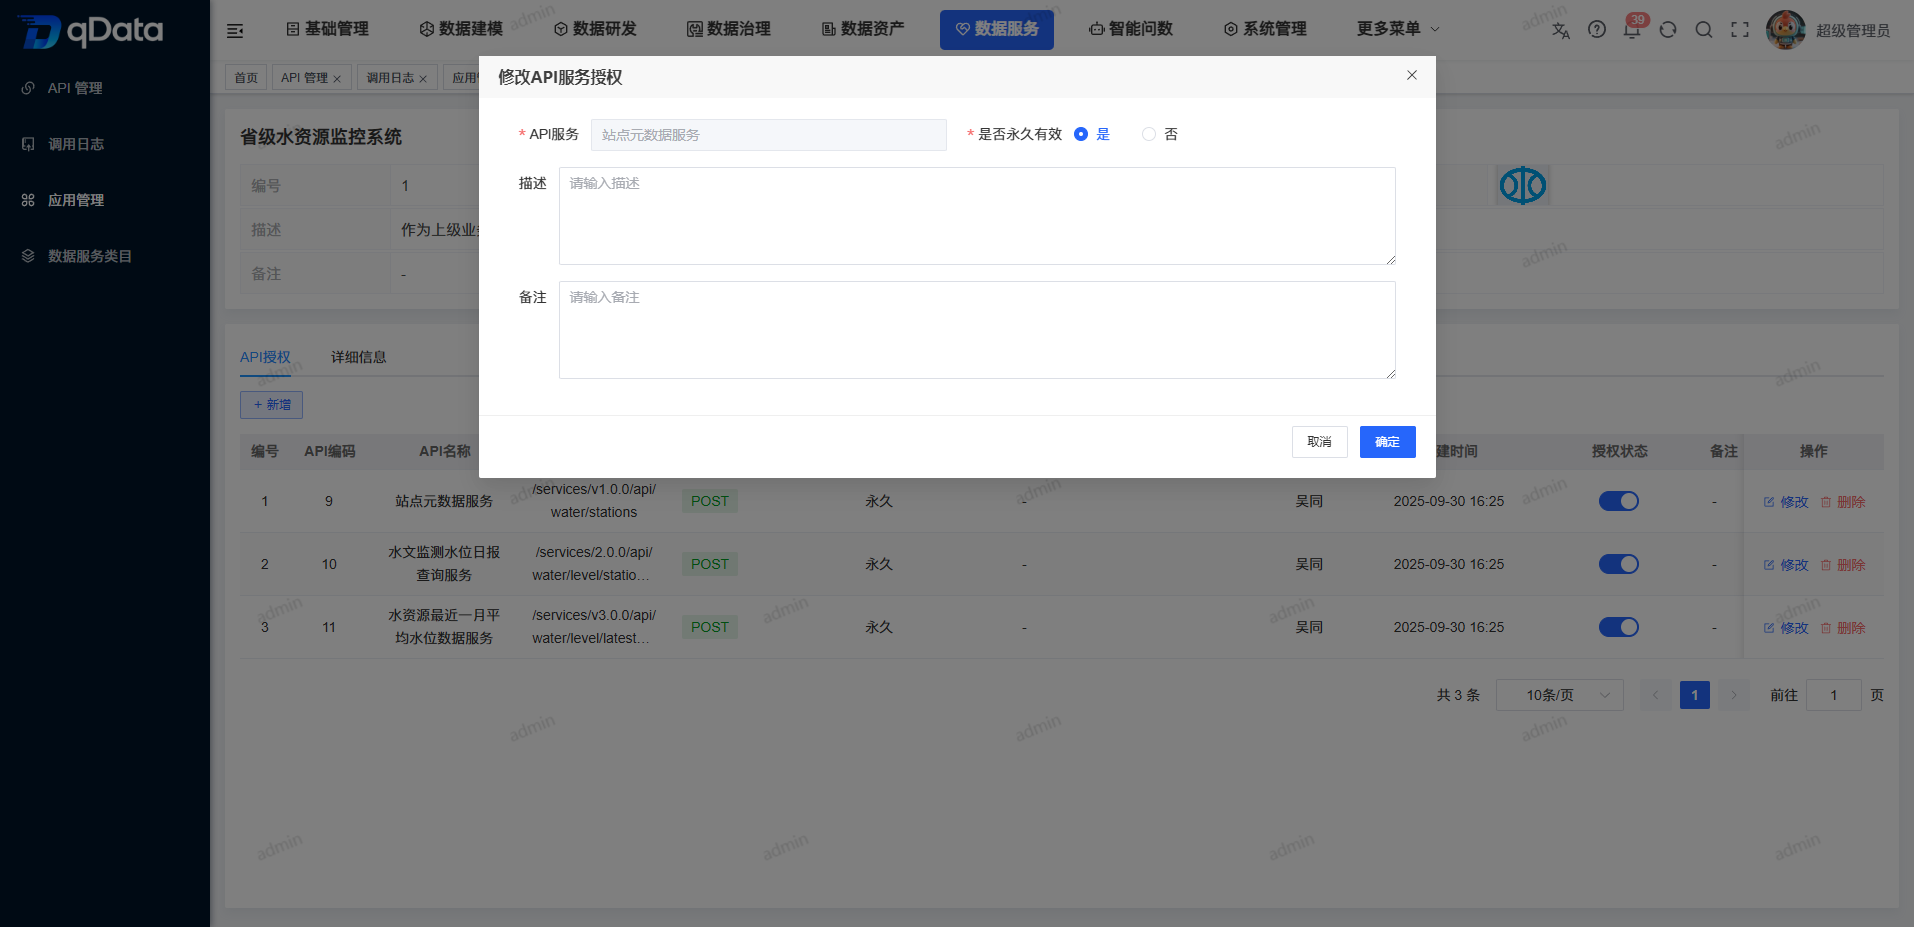
Open the modification API authorization portal
- Locate the target authorization record in the authorization list.
- Click [Modify] in the operation column.
- Check the "Modify API Service Authorization" pop-up window.
- Check the backfilled API service, whether it is permanently valid and its validity period.
- If you do not want to continue making changes, click [Cancel].
View other authorized portals
- The authorization list displays authorization status switches.
- The authorization list displays the [Delete] entry.
- The current page does not explain status switching or deletion authorization results.
FAQ
- What do I need to fill in for non-permanent authorization?
Select "Is it permanently valid" as "No", and then fill in the authorization start date and end date. The example date range is 2026-07-14 to 2026-07-23.
Summarize
[Application Management] is used to query and maintain basic application information, view application keys, and configure API authorization in application details. When accessing, focus on checking application identity, application key, authorization API, authorization validity period and authorization status ; the specific results of resetting the secret key, deletion, authorization status switching, authorization deletion and [Details] tab are not expanded on this page.