
Data warehouse layering
Feature overview
Functional positioning
Data warehouse layering is used to maintain data warehouse naming rules according to the source layer, public layer, application layer and its sub-levels. It is the basic configuration page before the logical model generates a complete table name.
Simple understanding: first stipulates how tables at different data warehouse levels should be named, and then allows subsequent models to generate table names according to the same set of rules.
Main features
- Hierarchical browsing: View the corresponding rules according to the source layer, public layer, application layer and its sub-levels.
- Rule Query: Hierarchical name, table prefix, business abbreviation and responsible person positioning rules based on data warehouse.
- Rule Maintenance: Add or modify table prefix, business abbreviation, sensitivity, person in charge, status and description.
- Downstream connection: The logical model can use hierarchical nodes and naming rules to generate complete table names.
Scope
This page is suitable for data architects, data modeling administrators, and project members who need to maintain data warehouse naming rules. The page covers hierarchical tree browsing, query, new addition, modification, status, details and deletion entries.
Preliminary steps
Preconditions
- Logged in to the qData platform.
- You have entered the [Data Modeling] module.
- The basic configuration of the data warehouse hierarchical tree has been completed.
- has clarified the table prefix and business English abbreviation used at the current level.
- The person in charge data can be selected normally on the page.
Navigation path
Data modeling > Data warehouse layering
Page overview
The data warehouse hierarchical tree is displayed on the left side of the page, and the rule query area, [New] entry, rule list, and row operations are provided on the right side. After selecting a different hierarchical node, the list displays the table prefix, description, business abbreviation, status, person in charge and other information under the node.
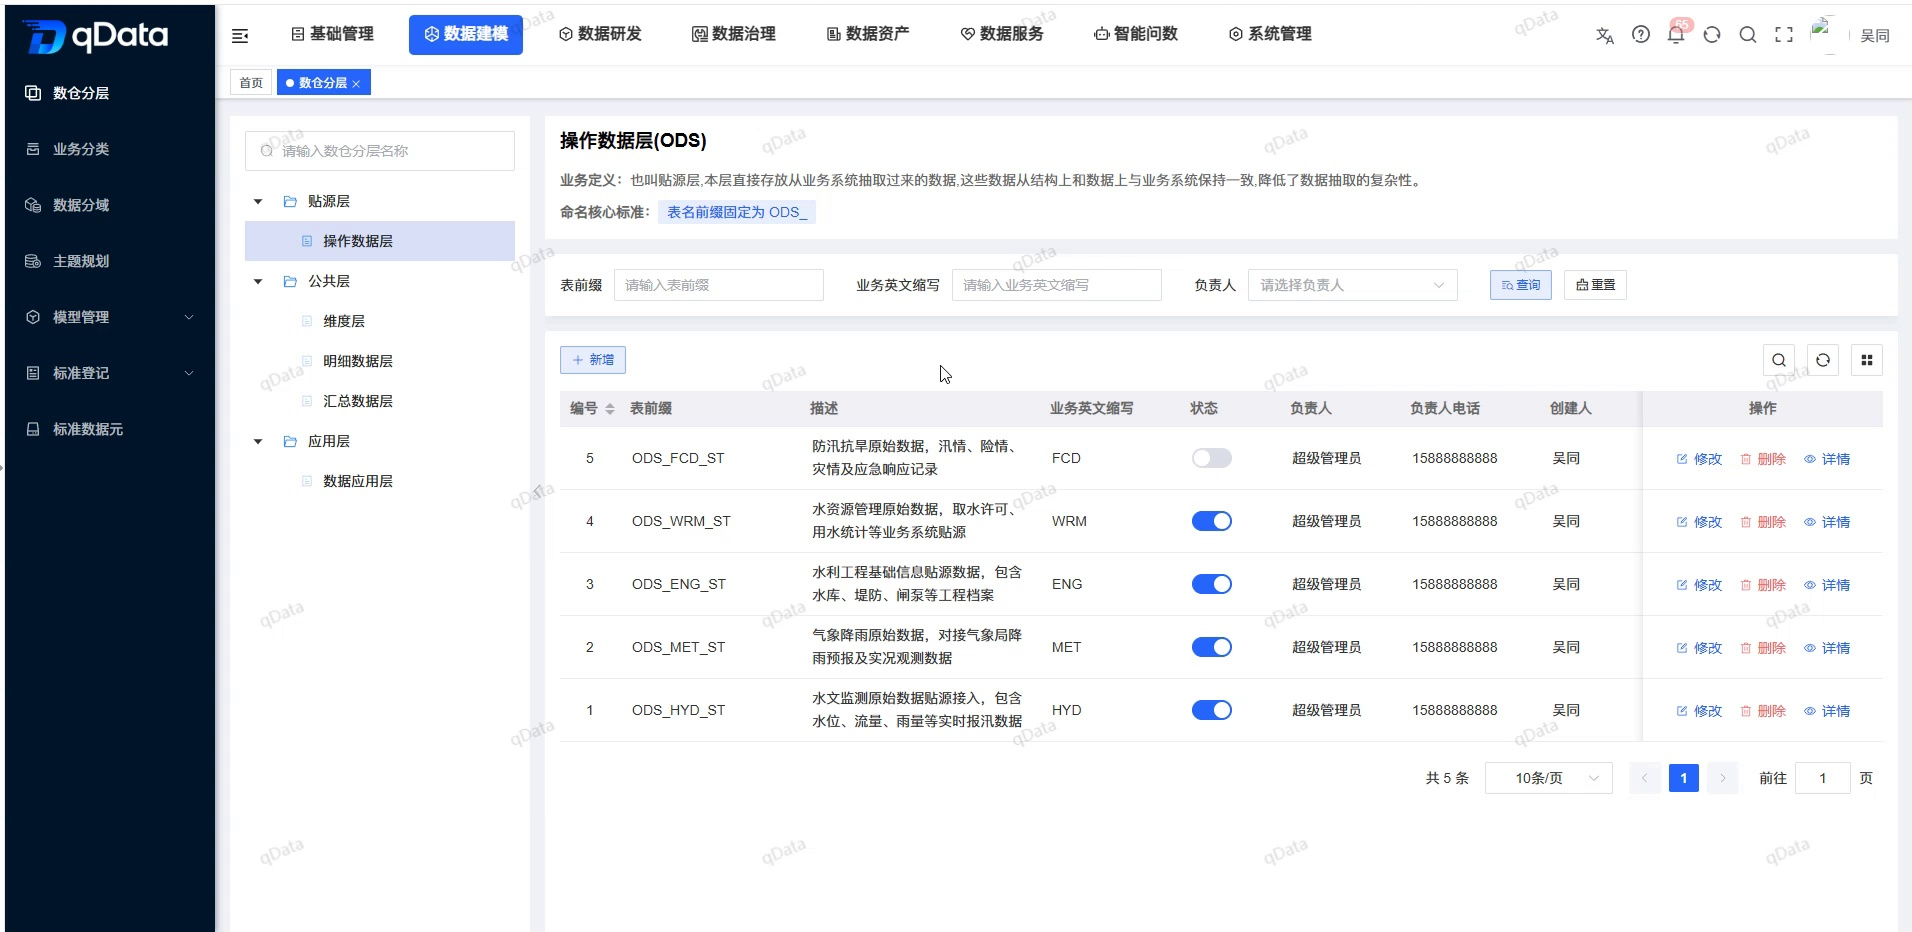
Recommended operating procedures
Typical scenario: Select the hierarchical node -> query or add a rule -> check the named field -> save -> return to the list to confirm the rules and status.
Troubleshooting: Confirm the hierarchical node on the left -> click [Reset] to clear the filter conditions -> check the required verification -> return to the list to check the saved results.
Functional operation instructions
View layering rules
- When you need to quickly locate a node, enter the data warehouse layer name in the search box on the left.
- Select the target node in the hierarchical tree on the left, such as "Operational Data Layer/ODS".
- View the rules under the node in the list on the right.
- Checklist prefix, description, business abbreviation, status and person in charge.
- When you need to view other levels, reselect the node on the left.
Query and reset rules
- Fill in the target prefix in the "Table Prefix" input box.
- Fill in the target abbreviation in the "Business English abbreviation" input box.
- Select the person in charge as needed.
- Click [Query].
- View matching rules.
- When you need to restore the default results, click [Reset].
Add layering rules
- Select the node to which the rule belongs in the hierarchical tree on the left.
- Click [Add].
- Fill in the rule information according to the page fields.
| Field Name | Description | Required or not |
|---|---|---|
| Table prefix | Fill in the prefix used for naming the current level table. | Yes |
| Business English abbreviation | Fill in the English abbreviation of the business scope. | Yes |
| Sensitivity | Set the sensitivity of the current specification. The default value for screen recording is 1. | Yes |
| Responsible person | Select the person responsible for the rule. | Yes |
| Person in charge’s phone number | Displays the contact number corresponding to the selected person in charge. | No |
| Status | Set to normal or disabled, the form defaults to normal. | No (system default) |
| Description | Fill in a description of the purpose of the rule, up to 500 words. | No |
- Click [OK].
- Return to the list and check the new rules.
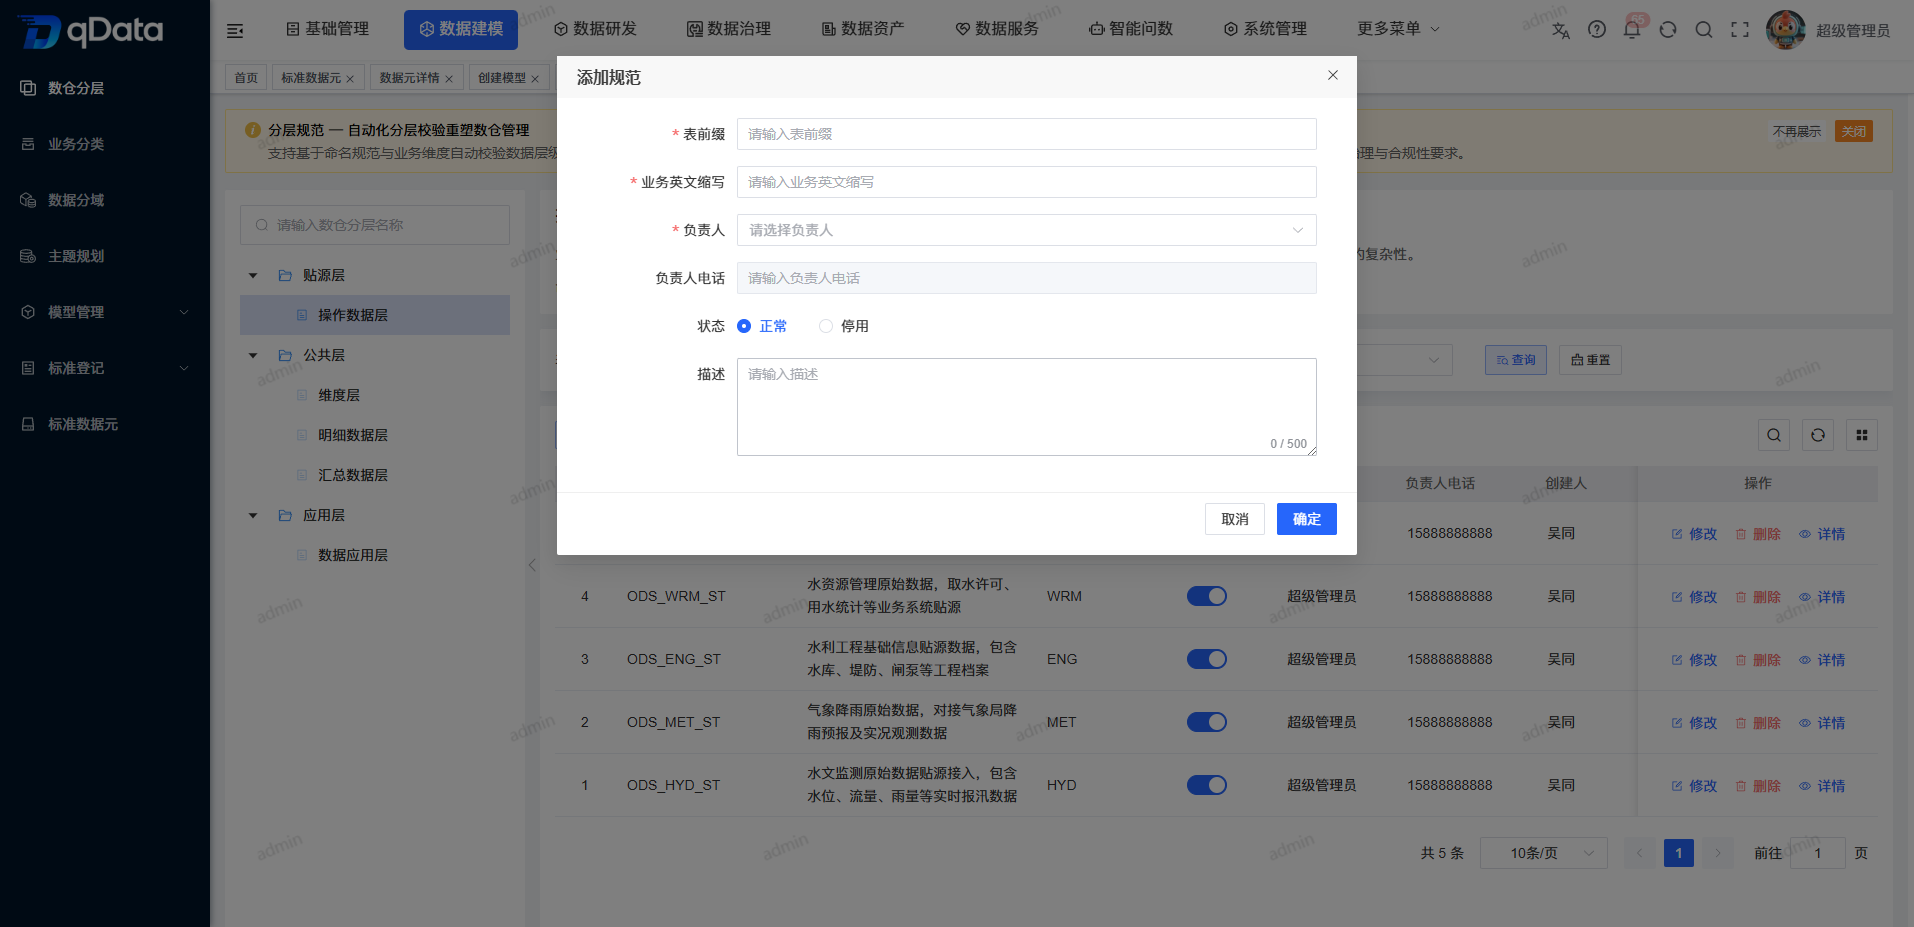
When required fields are not filled in, the page displays a red verification prompt and blocks submission.
Modify layering rules
- Locate the target rule in the list.
- Click [Modify].
- Check the original content brought out by the page.
- Adjust the fields that need to be changed.
- Click [OK].
- Return to the list to check for the latest content.
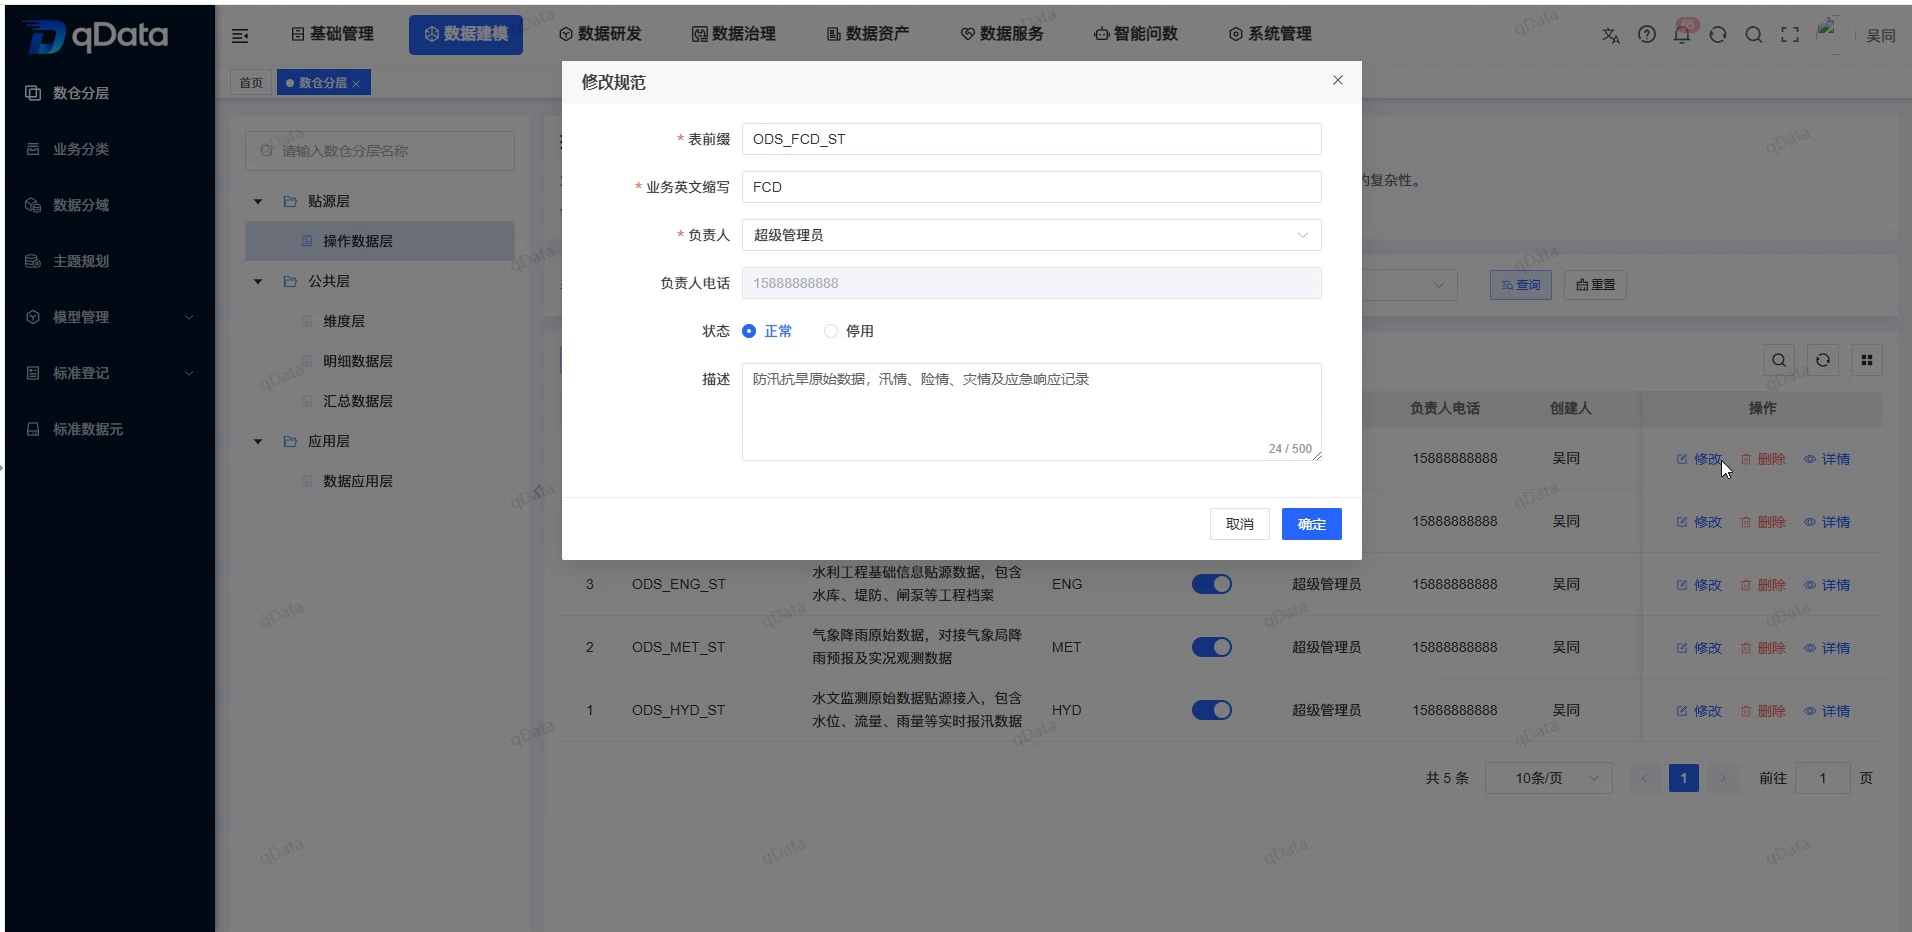
Maintain status, view details, or delete rules
- Check the status switch in the target rule row.
- When you need to adjust the available status, switch to normal or disabled.
- When you need to check complete information, click [Details].
- When you need to delete the rule, click [Delete].
- Continue according to the current prompts on the page.
- Return to the list to check the current results on the page.
Operation tips
Deactivating or deleting a rule may affect subsequent logical model naming. Before executing, you should first confirm whether there are still models using this rule at the current level.
FAQ
- **Why do we need to maintain data warehouse hierarchical rules before creating a logical model?**The complete table name of the
logical model will use the data warehouse hierarchy and naming rules. If the table prefix or business English abbreviation is incorrectly configured, the generated table name will not comply with organizational specifications.
Summarize
The data warehouse hierarchical page is used to maintain naming rules by level. During operation, you should first select the correct hierarchical node, then complete the query or maintenance, and use the table prefix, business English abbreviation and status to check whether the rules meet the requirements for subsequent model use.