
Data Asset Governance in Practice
Application scenarios
- Onboarding a new business system: Connect a business system and its database to establish clear data origins and business ownership.
- Inventorying existing data resources: Identify databases, tables, and fields to build a unified, traceable metadata inventory.
- Governing data assets: Add business categories, data domains, and warehouse layers to metadata and turn data resources into governed assets.
- Validating governance outcomes: Reconcile task instances, run logs, and metadata counts to support project delivery and acceptance.
- Publishing data assets: Register and verify assets so they enter a searchable, understandable, and usable asset catalog.
This guide uses a Docker Compose environment and follows an actual operating workflow. Starting with source-system and data-connection preparation, it walks through task creation, execution, instance inspection, log verification, latest-metadata validation, asset registration, and asset publication.
Prerequisites
Prepare the following two types of data before you begin:
- Source system: identifies the business system to which the data belongs.
- Data connection (data source): tells the platform where to read technical metadata.
The complete preparation and validation sequence is:
Source system
→ Data connection (data source)
→ Collection task
→ Run instance
→ Run log
→ Latest metadata
Step 1: Source System
A source system is a business record. It identifies the business system to which metadata belongs and stores reusable governance information such as owners and contacts.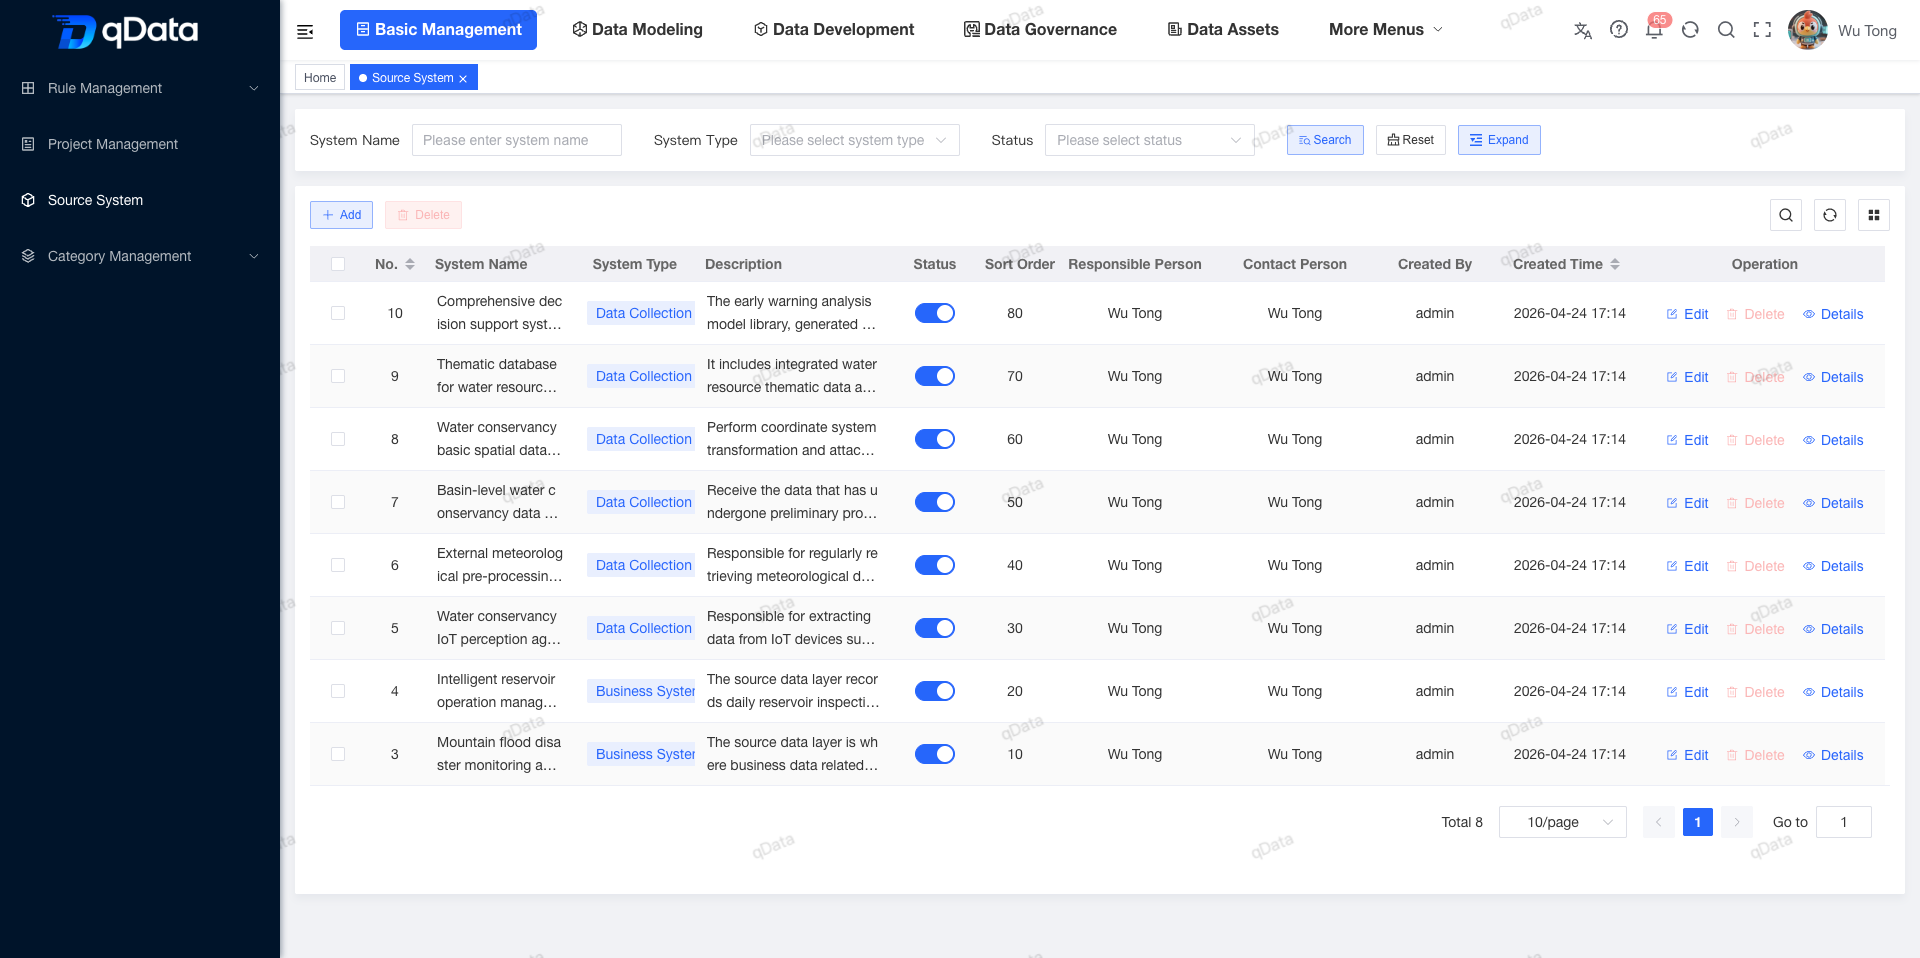
1.1 Create a source system
Basic Management
→ Source Systems
  → Click "Add"
    → Enter "Smart Reservoir Operations Management System"
      → Select "Business System" as the system type
      → Select the owner, contact, and status
      → Enter the display order, description, and remarks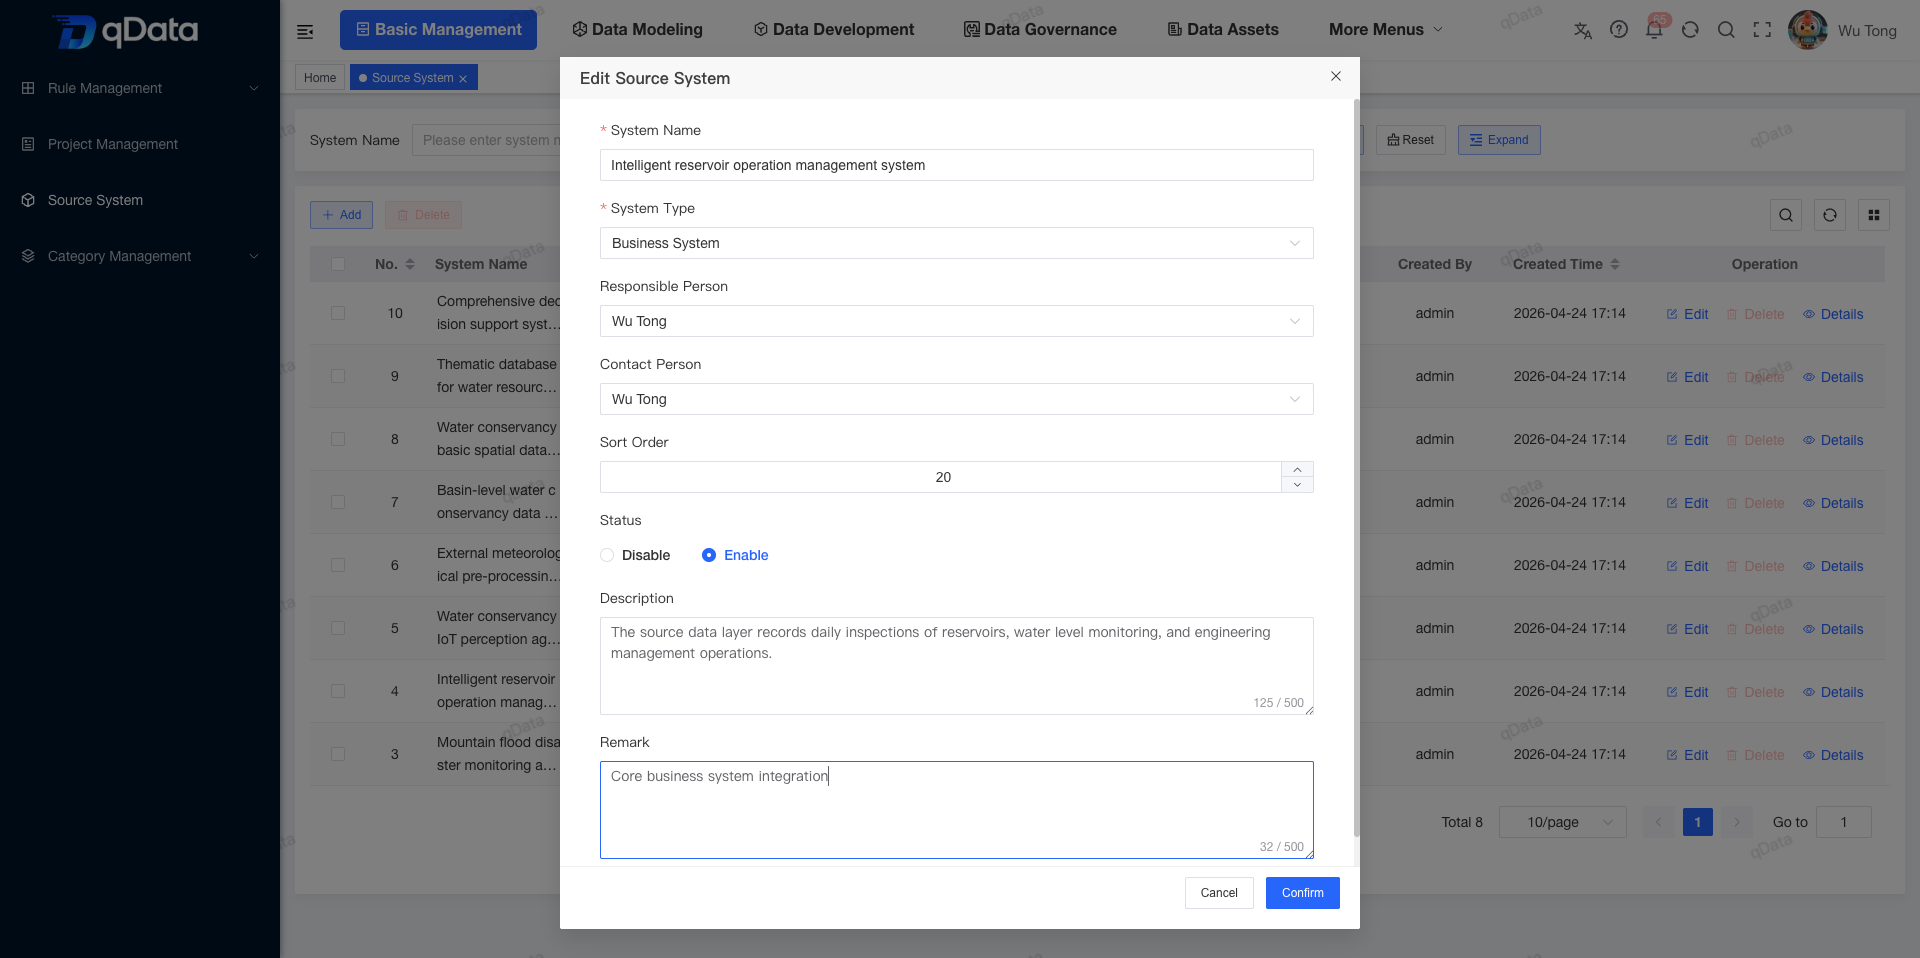
Field descriptions:
- System name: the stable, recognizable official name used when assigning business ownership to a collection task.
- System type: distinguishes business systems, collection layers, processing layers, application layers, and other source roles.
- Owner: assumes governance responsibility.
- Contact: coordinates day-to-day work.
- Display order: changes list ordering only; it does not affect collection logic.
- Status: indicates whether the source-system record is currently valid.
- Description: defines the business scope.
- Remarks: records access methods or maintenance notes for future follow-up.
1.3 Enable the source system
After saving, return to the list and verify that Smart Reservoir Operations Management System is enabled.
Note: Enabling a source system does not start that system. It declares the business record valid. A disabled record remains stored but should not be used for new business assignments.
Step 2: Data Connection
A data connection stores the technical parameters qData needs to access a database. It is the entry point through which a collection task reads database, table, and column structures.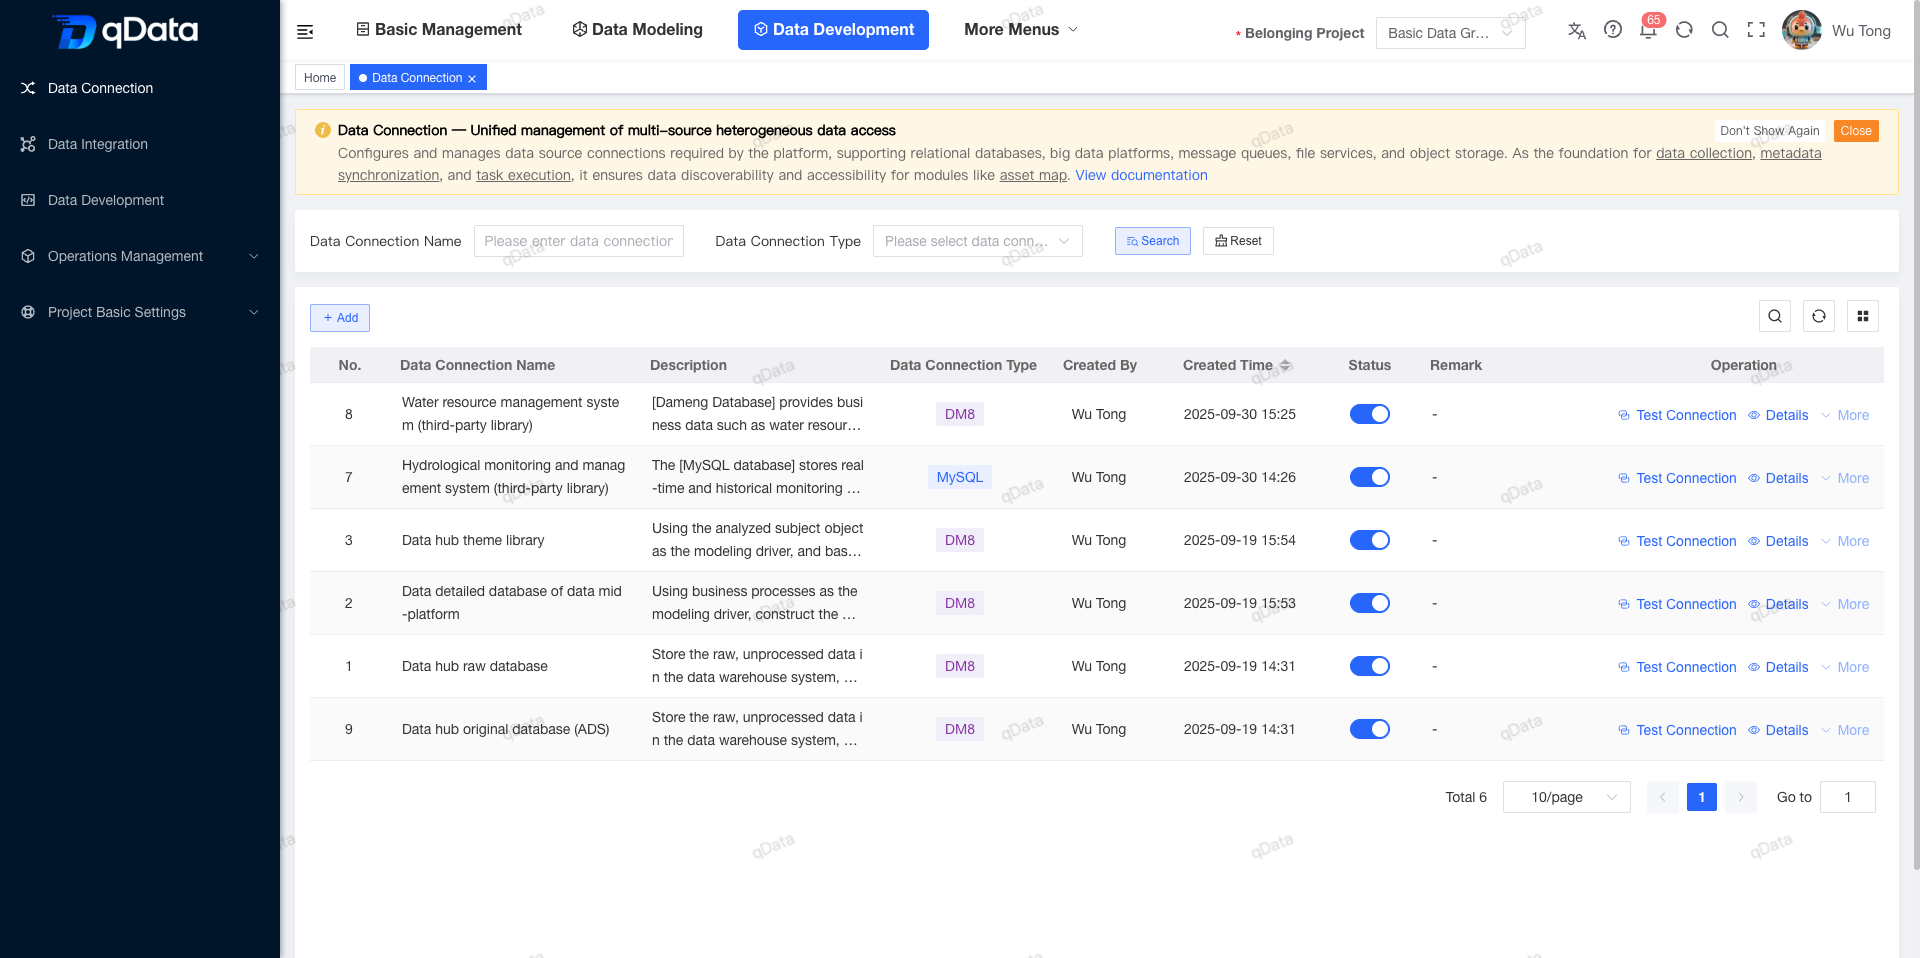
2.1 Create a data connection
Data Development
→ Data Connections
  → Click "Add"
    → Enter "Data Platform Application Database (ADS)"
    → Select "DM8"
    → Enter host "dm8-demo" and port "5236"
    → Enter account "ads" and its password
    → Enter database name "ads"
    → Select "Disabled" initially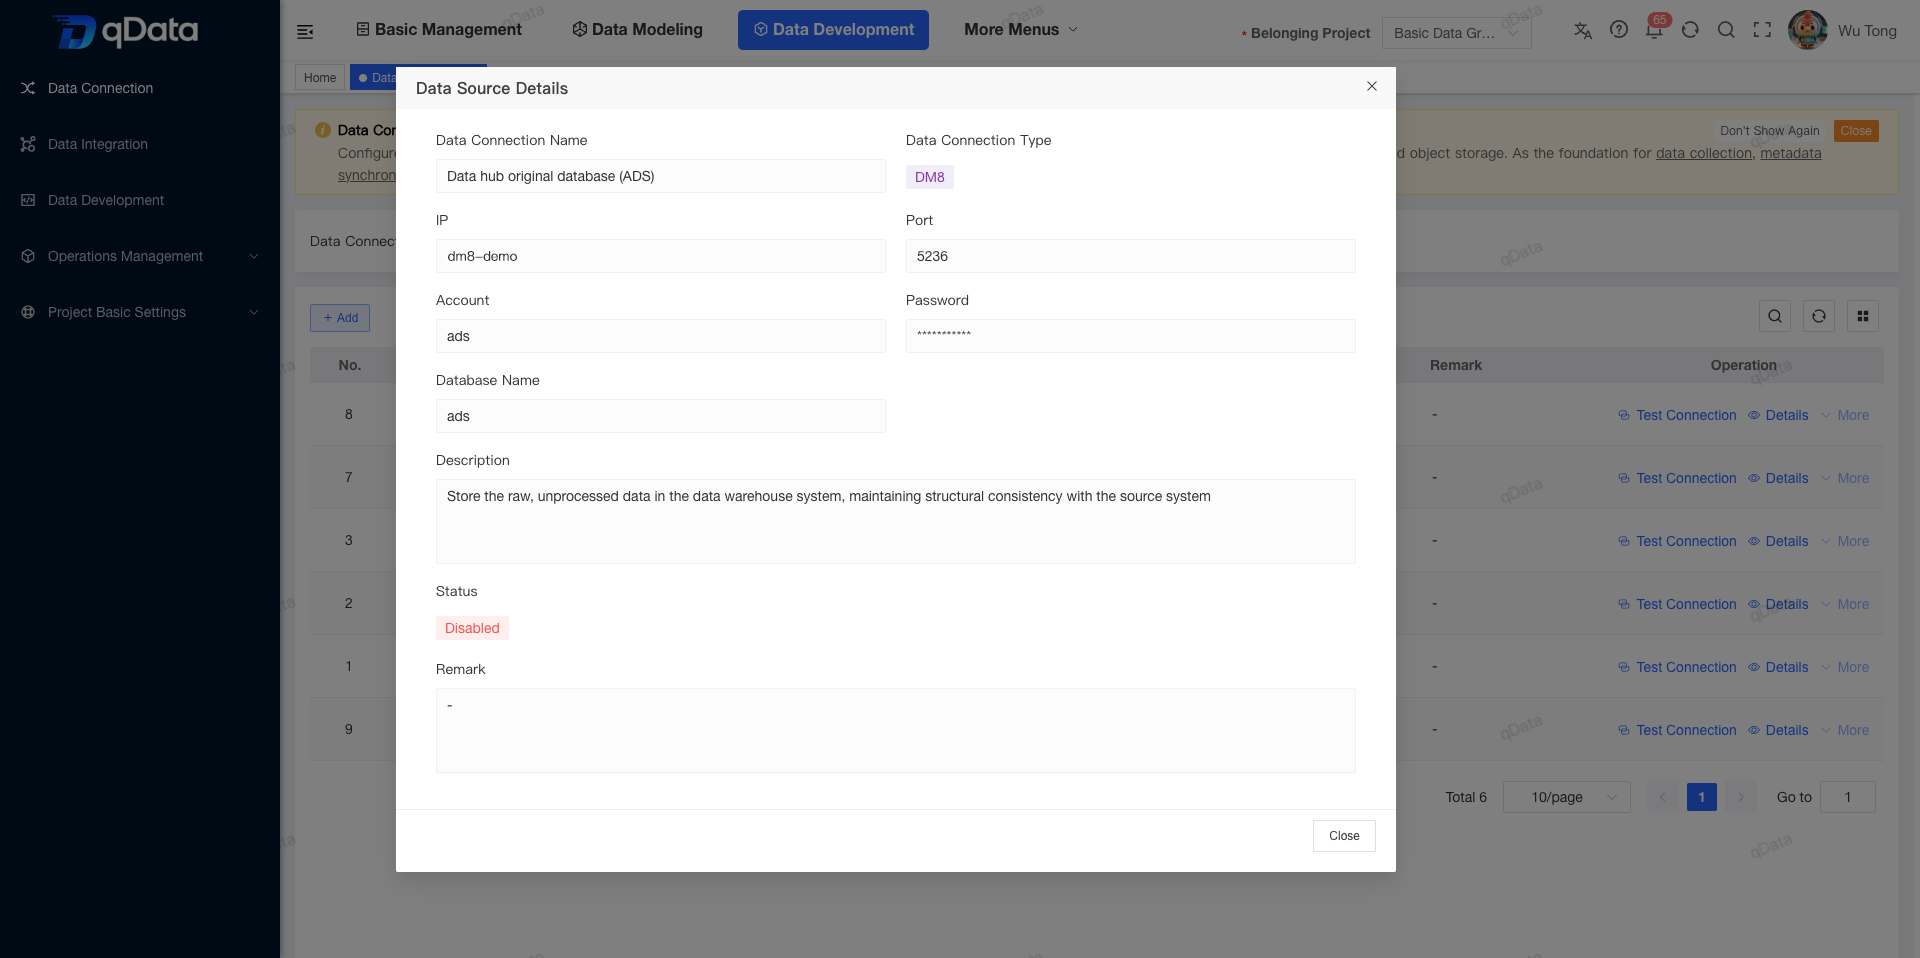
Field descriptions:
- Connection name: should describe its purpose rather than only the database product.
- Database type: determines the driver and database-specific fields loaded by qData.
- IP / port: identifies the network endpoint. A Docker service name can be used inside the same container network.
- Account / password: authenticates with the database; the password is not shown in plain text.
- Database name: identifies the target database or schema.
- Description: explains the connection's role in the data warehouse.
- Status / remarks: controls availability and records maintenance, network, or permission notes.
2.5 Test and enable the connection
Return to the connection list, click Test Connection, and enable the connection only after qData reports a successful test.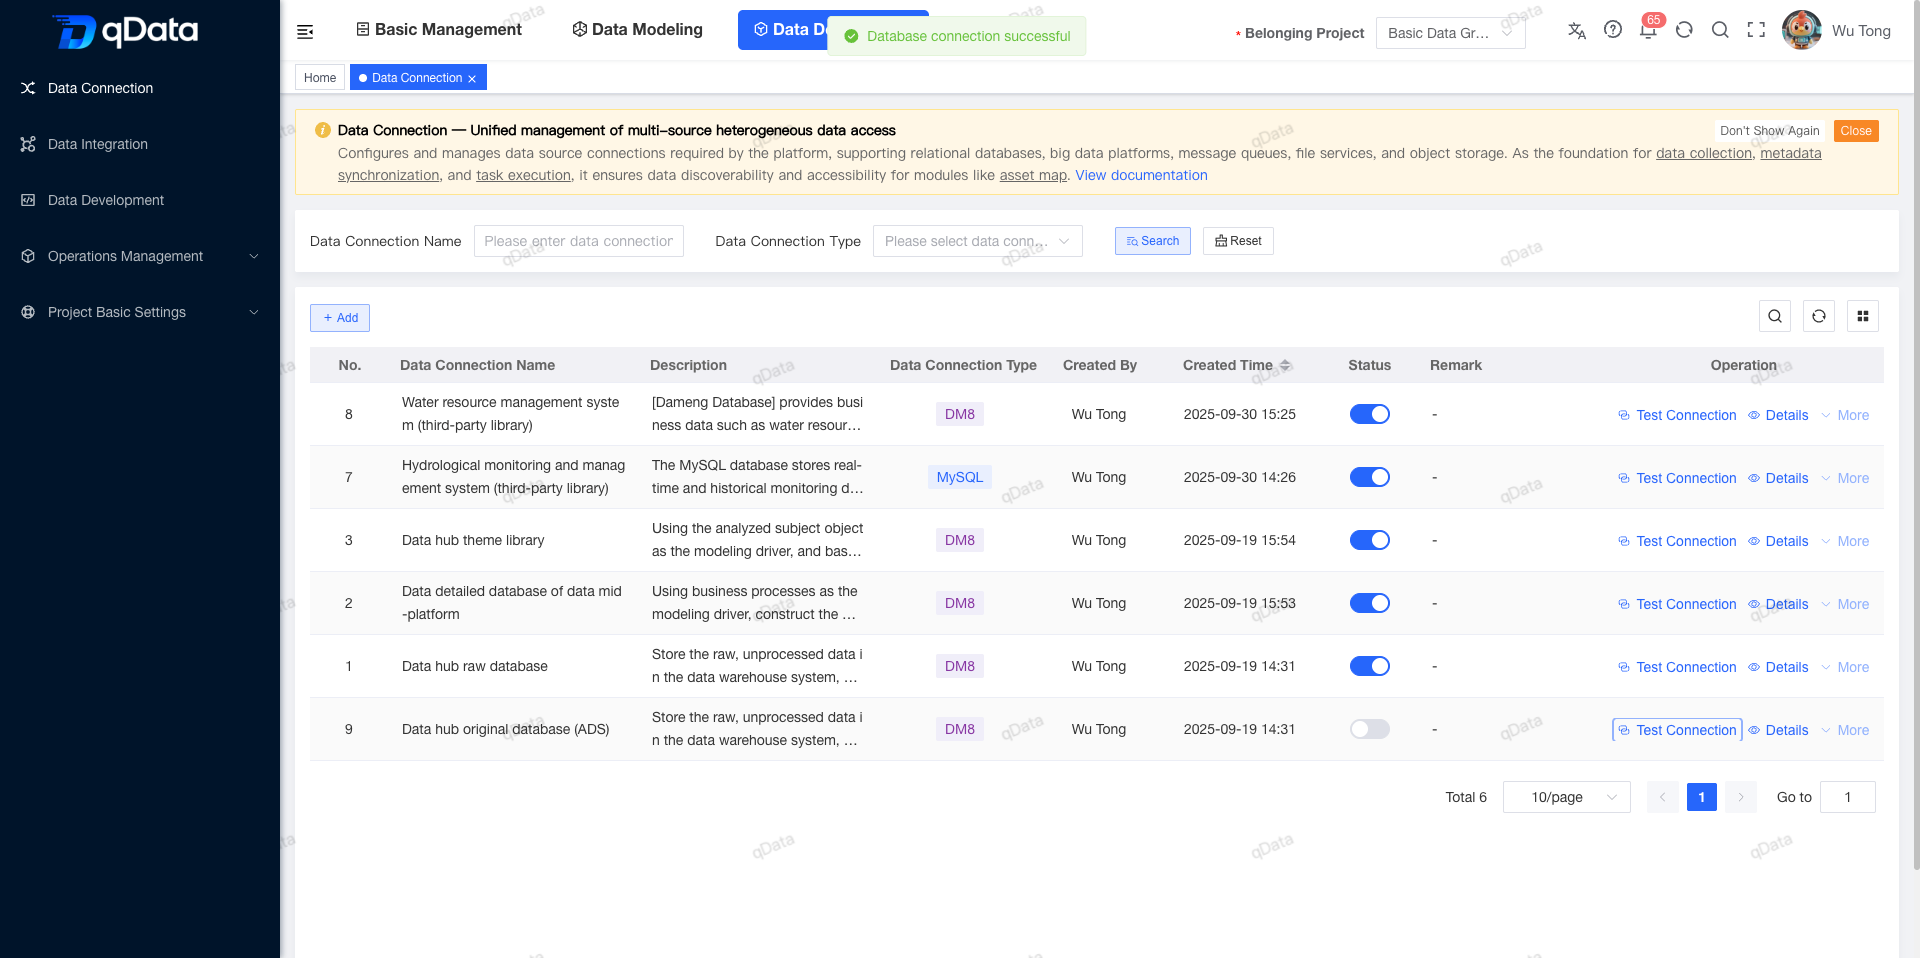
- Test Connection validates the driver, address, port, credentials, and database name together. Saving the parameters does not prove that the collector can reach the database.
- Failure handling: a failed validation may still allow the record to be saved, but the connection is automatically disabled. Correct the parameters and test again.
- Enable status: qData validates the connection again when it is enabled and will not enable an unavailable connection.
Step 3: Metadata Collection
3.1 Create a collection task
Data Governance
→ Collection Tasks
  → Click "Add"
    → Source system: Smart Reservoir Operations Management System
    → Task name: Data Platform Application Database (ADS)
    → Data connection: Data Platform Application Database (ADS)
    → Scheduler: Quartz
    → Configure second = 0 in the schedule dialog
    → Collection scope: Custom Database
      → Move ADS from Available Databases to Selected Databases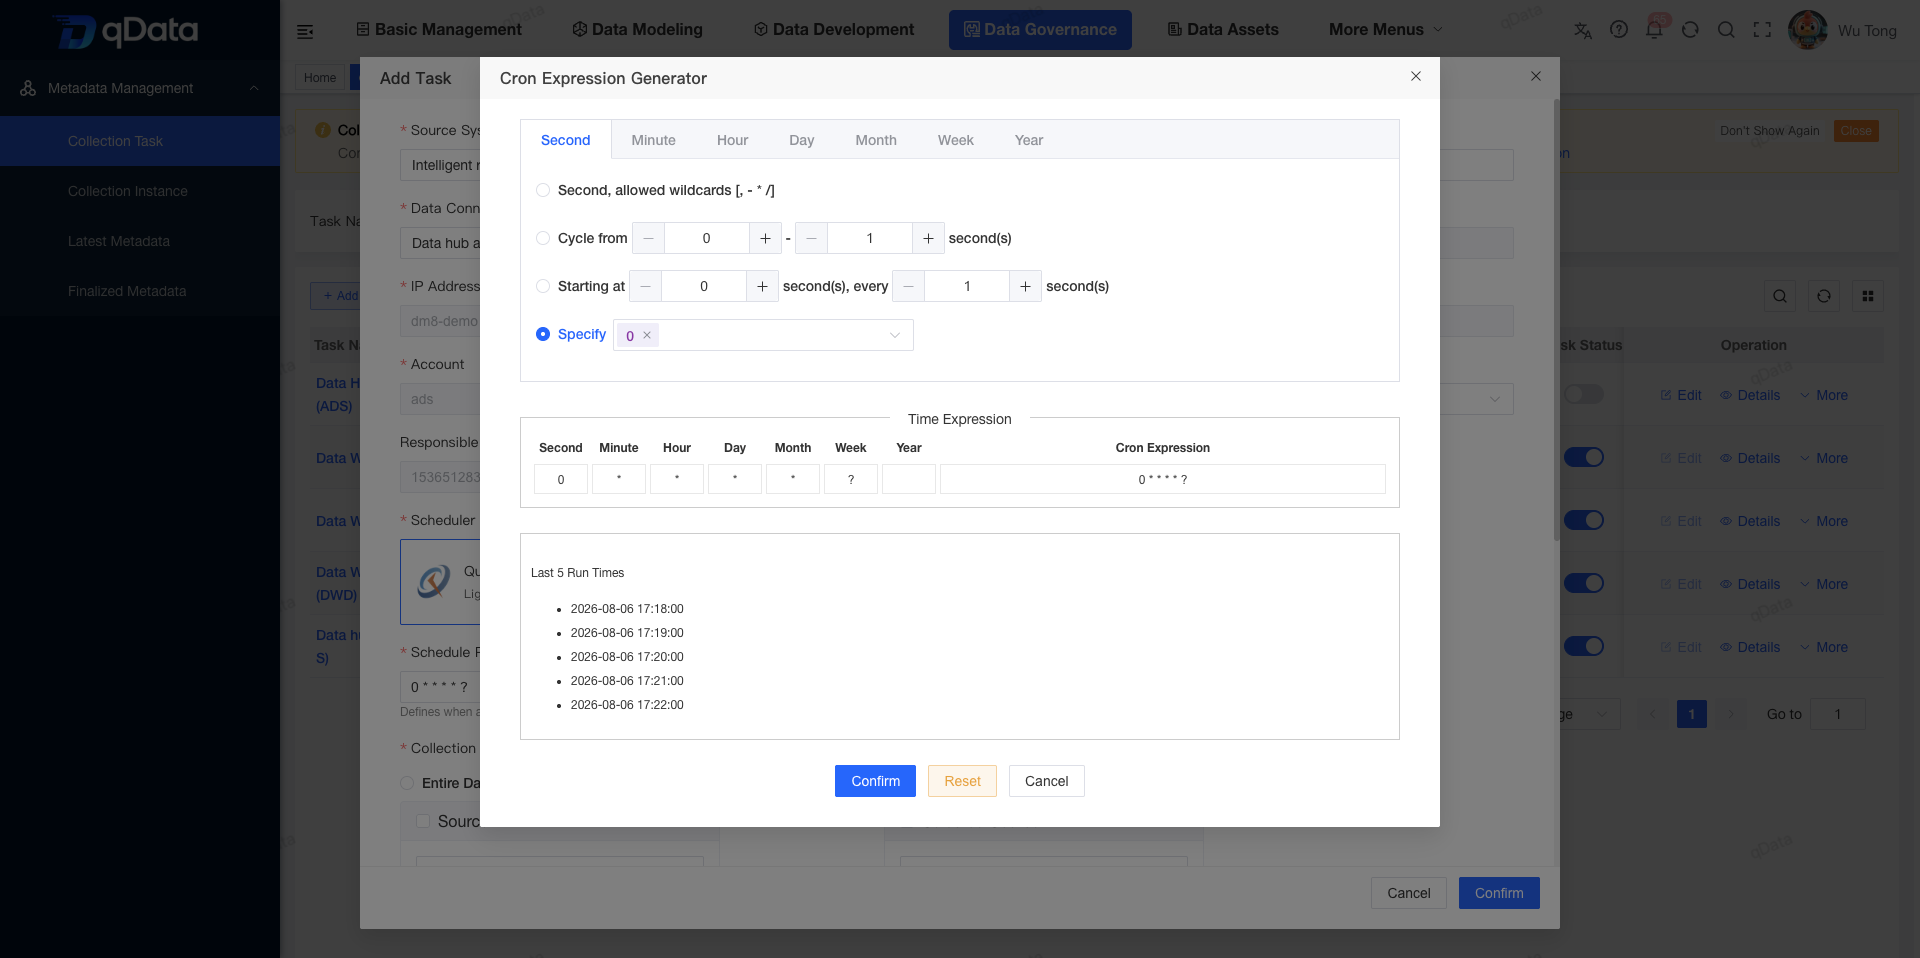
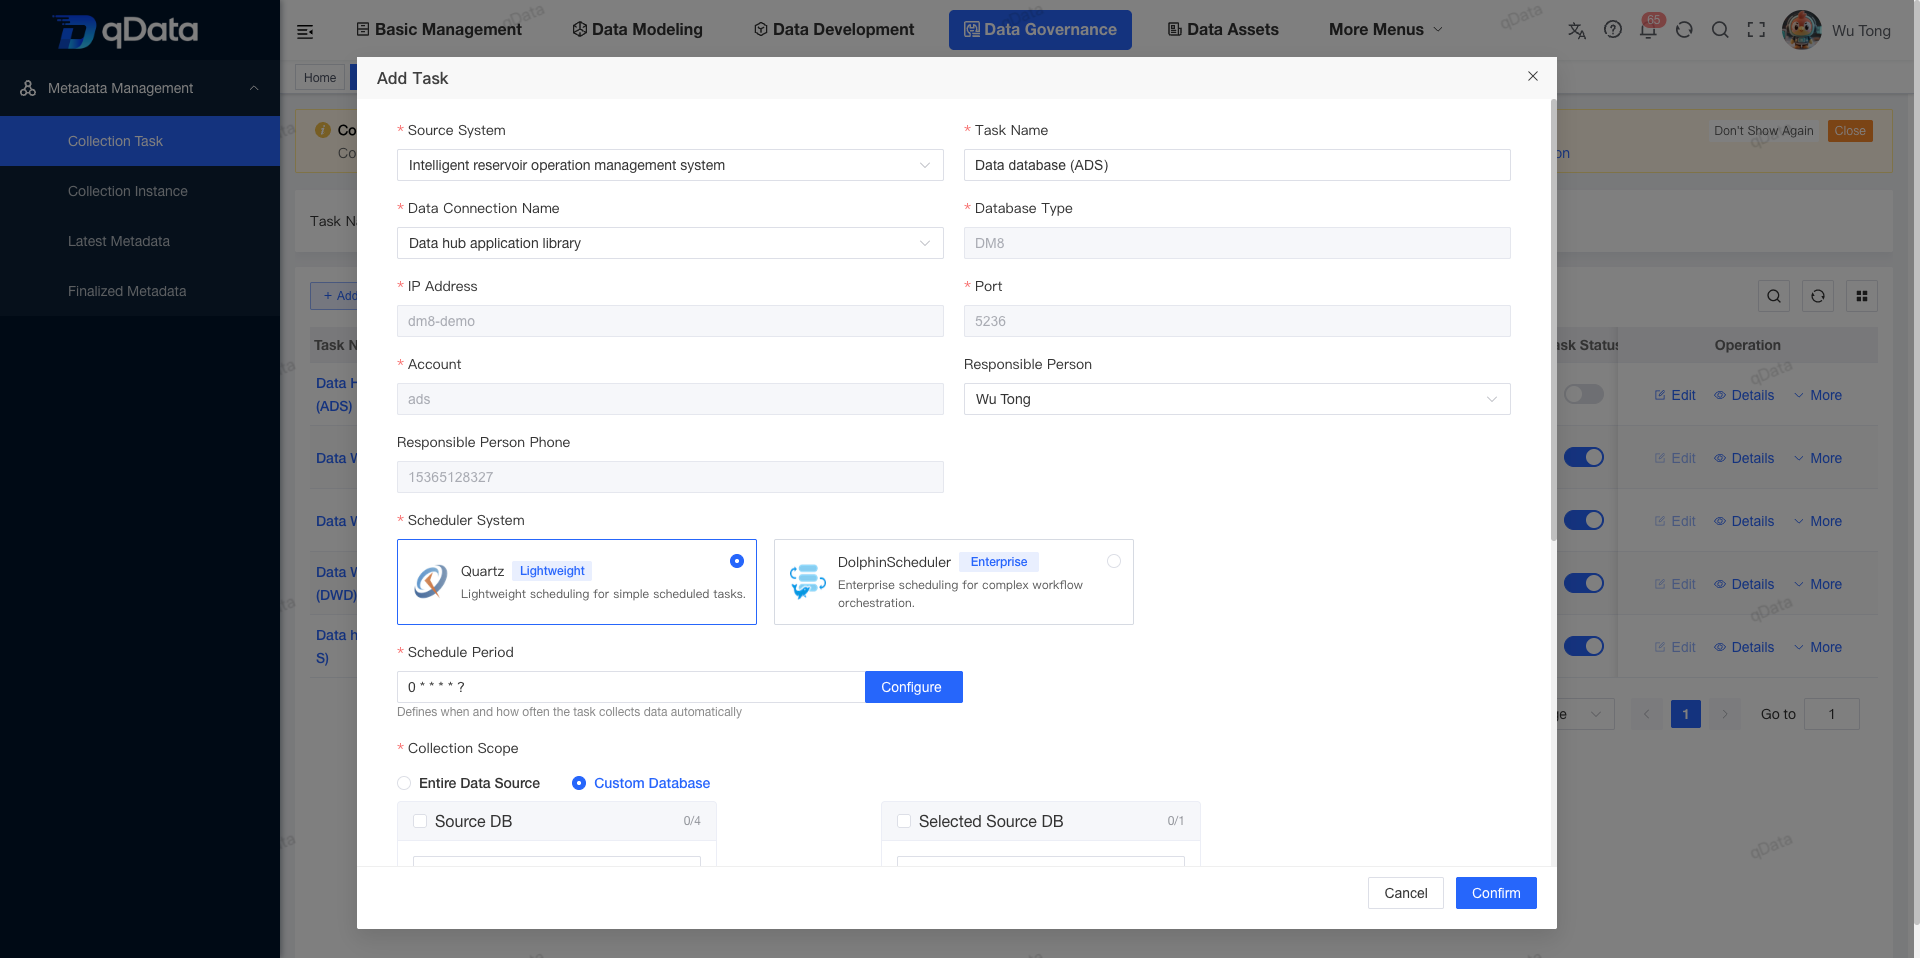
Field descriptions:
- Source system: identifies the business origin of the metadata for ownership, lineage, and asset classification.
- Data connection: selects the source connection. qData fills in the database type, address, port, and account automatically.
- Owner: identifies who handles failures or collection issues. Read-only fields come from existing records.
- Scheduler: determines which scheduling system executes the task.
- Collection scope: specifies which databases or schemas qData scans.
3.4 Enable the task and run it once
Locate the Task Status column and enable the first task.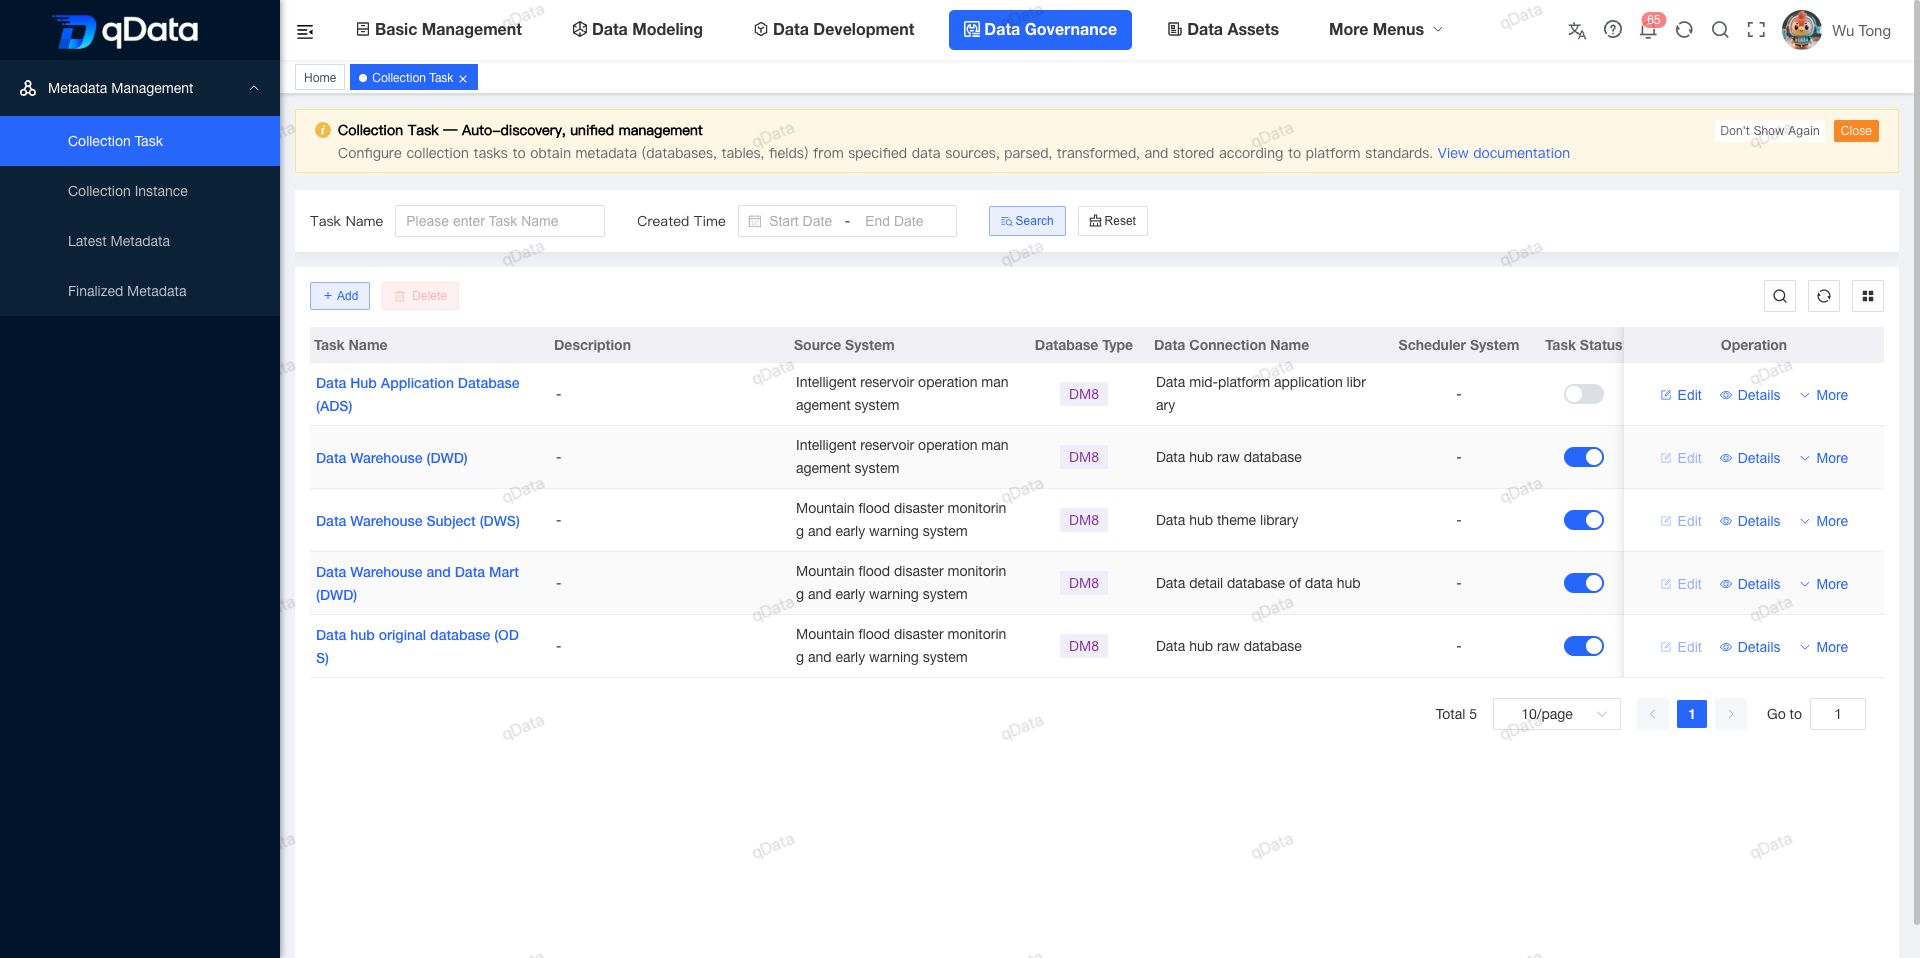
Confirm publication when prompted. The following message appears:
Task published successfullyThen select:
More → Run OnceStep 4: Collection Instance
Collection Instances
→ Data Platform Application Database (ADS)
  → View Log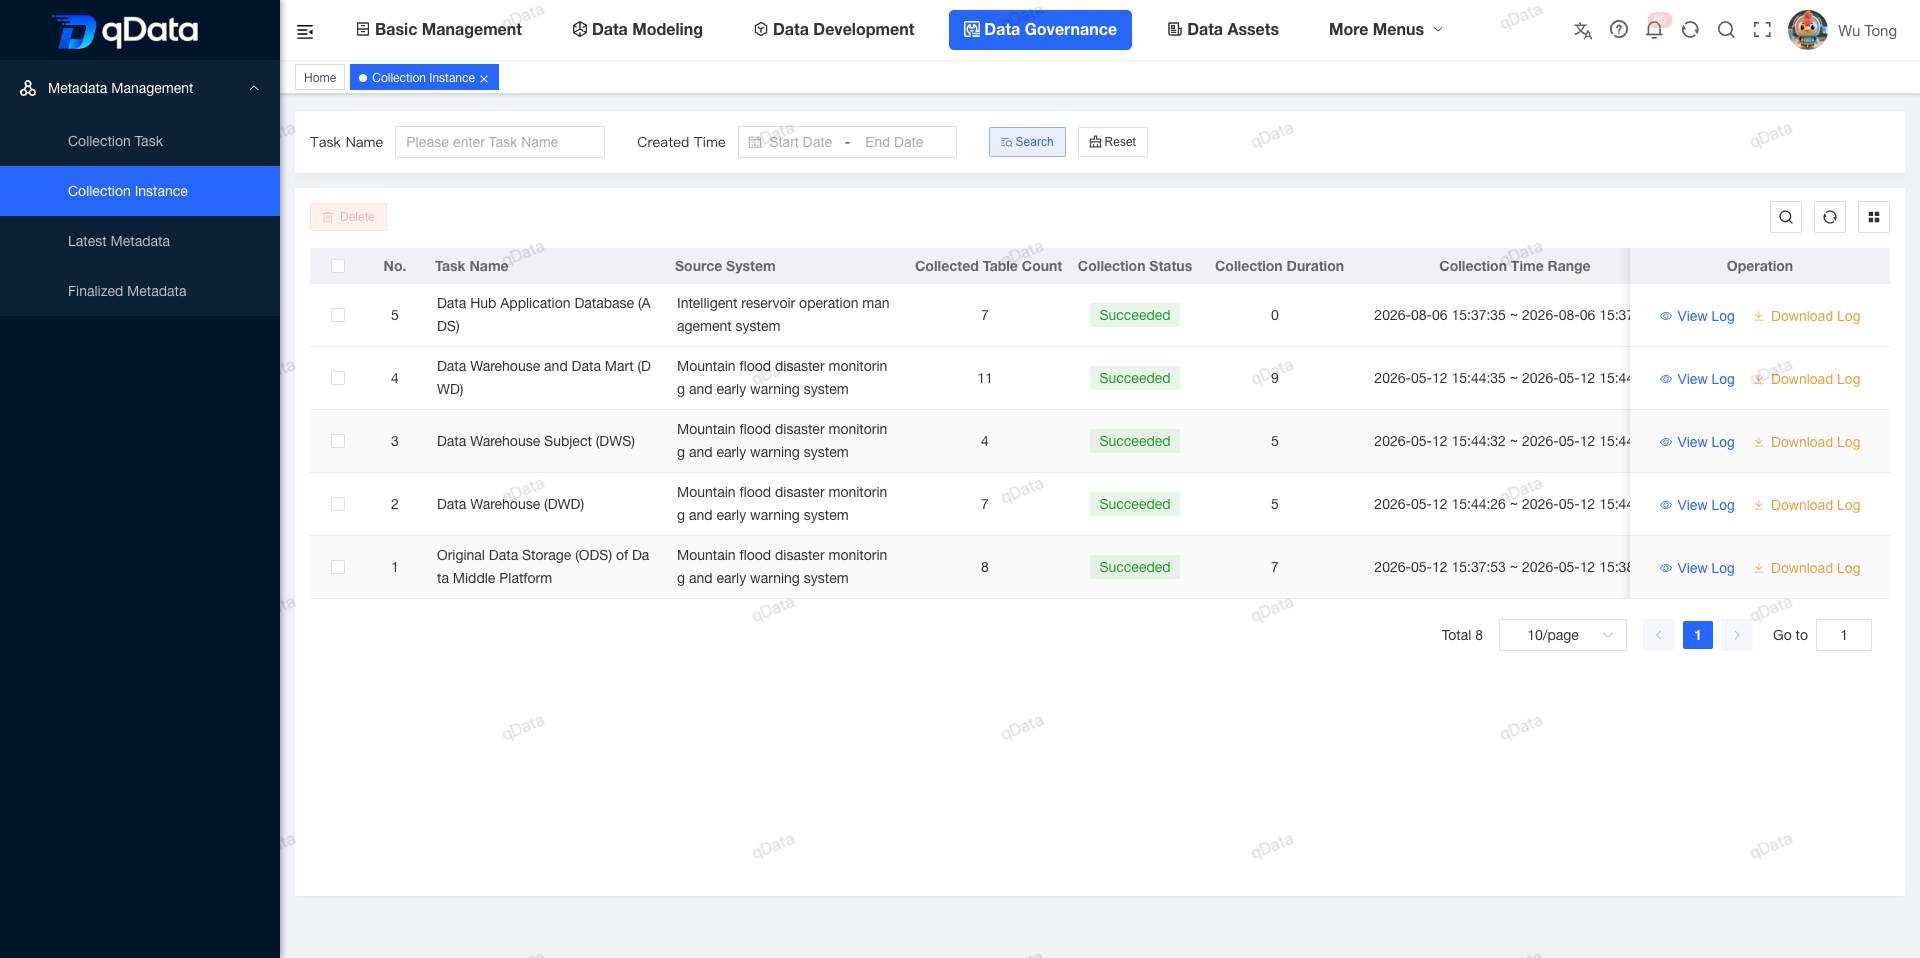
Verify the following values:
Source system: Smart Reservoir Operations Management System
Number of tables: 7
Status: Successful
Use the run log for further confirmation: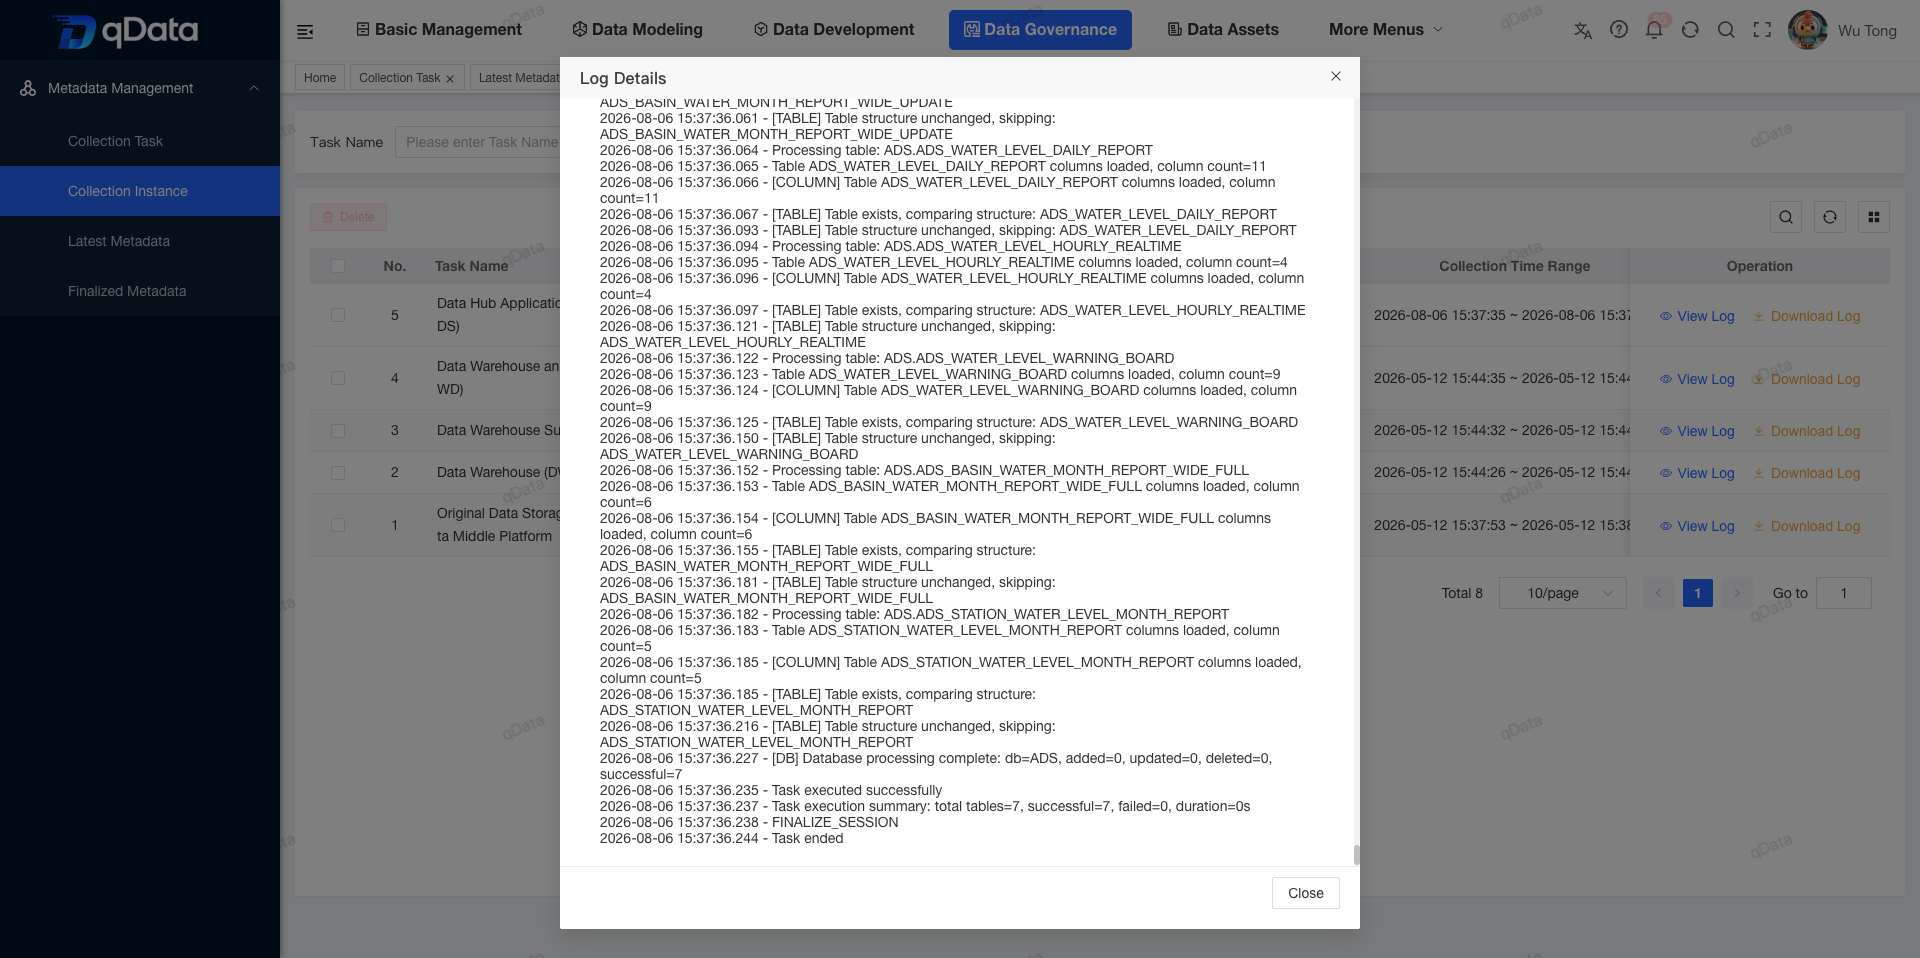
Step 5: Latest Metadata
Latest Metadata
→ Smart Reservoir Operations Management System
  → Data Platform Application Database
    → ADS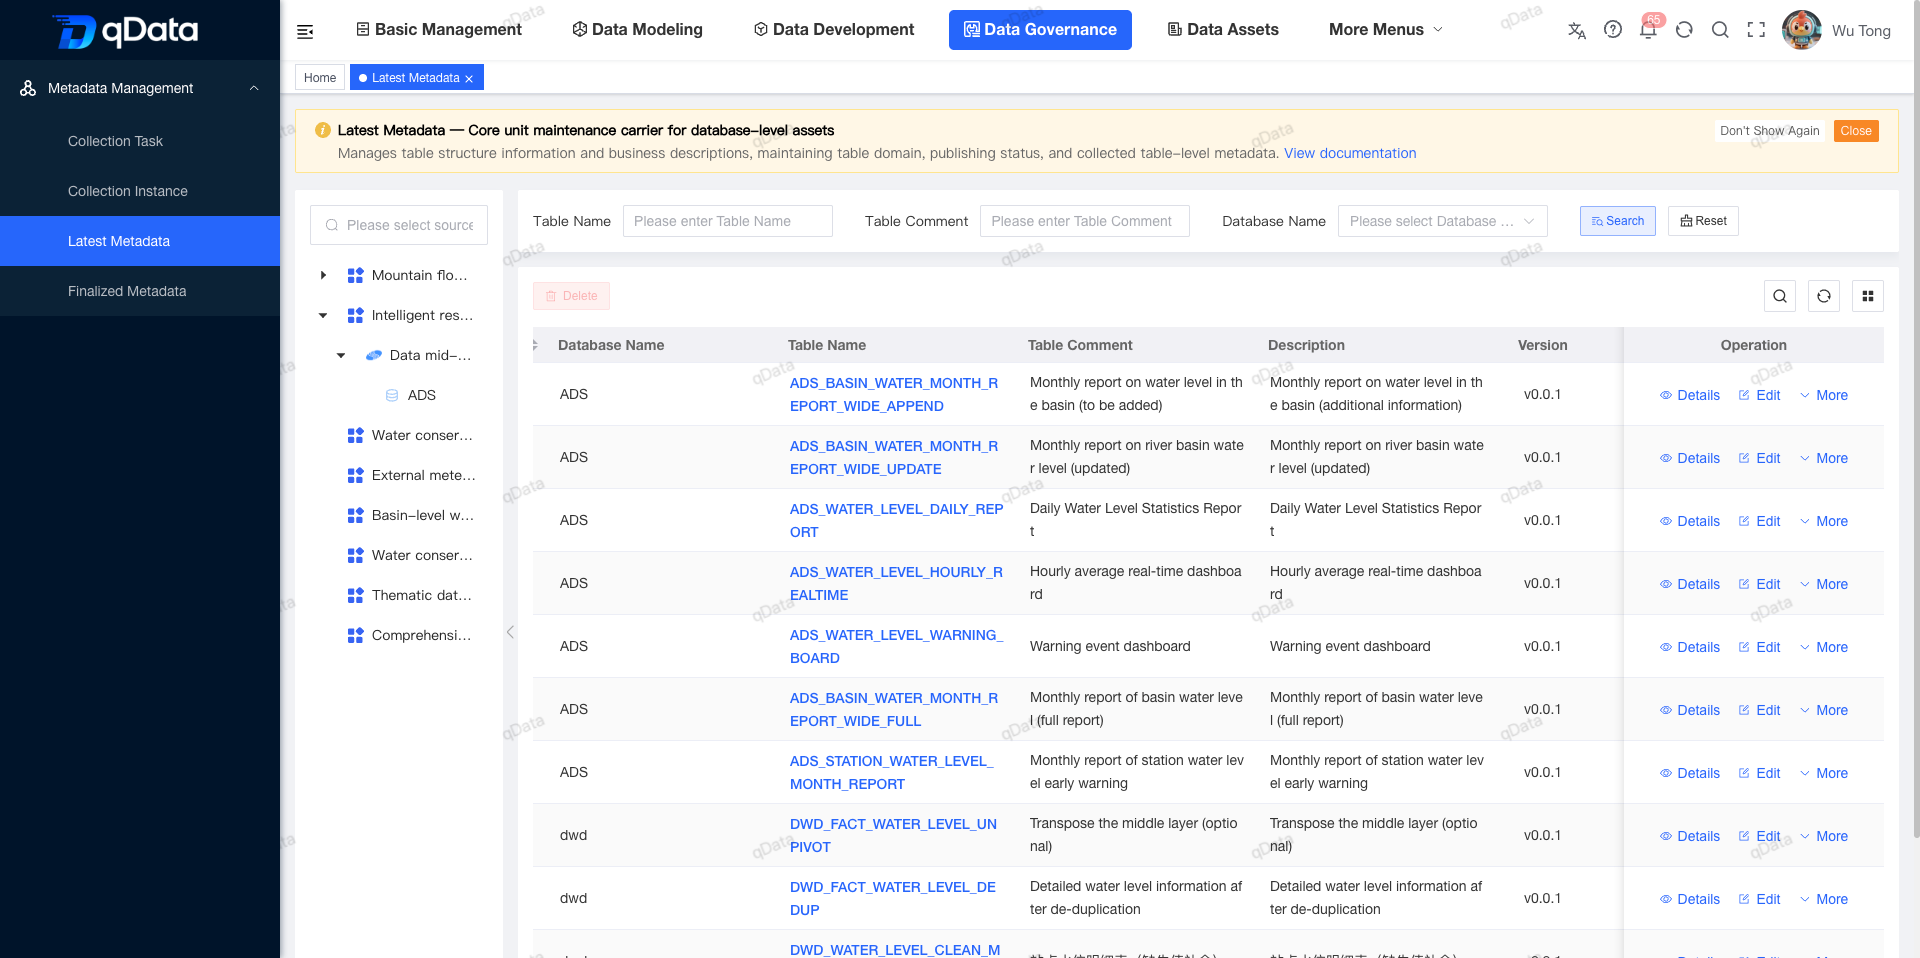
The page shows seven records with the following shared values:
Database: ADS
Source system: Smart Reservoir Operations Management System
Version: v0.0.1
The first collection instance displays:
7 addedLatest Metadata displays:
7 records in totalThe two counts match exactly.
Step 6: Data Assets
After metadata collection, qData can identify database tables and columns, but the result is still primarily technical metadata. Asset registration adds governance attributes such as table type, warehouse layer, business category, and data domain, turning discovered data into assets that are searchable, understandable, governable, and usable.
- Metadata describes which tables and columns exist and where they come from.
- Data assets add business purpose, warehouse placement, usage context, and governance information.
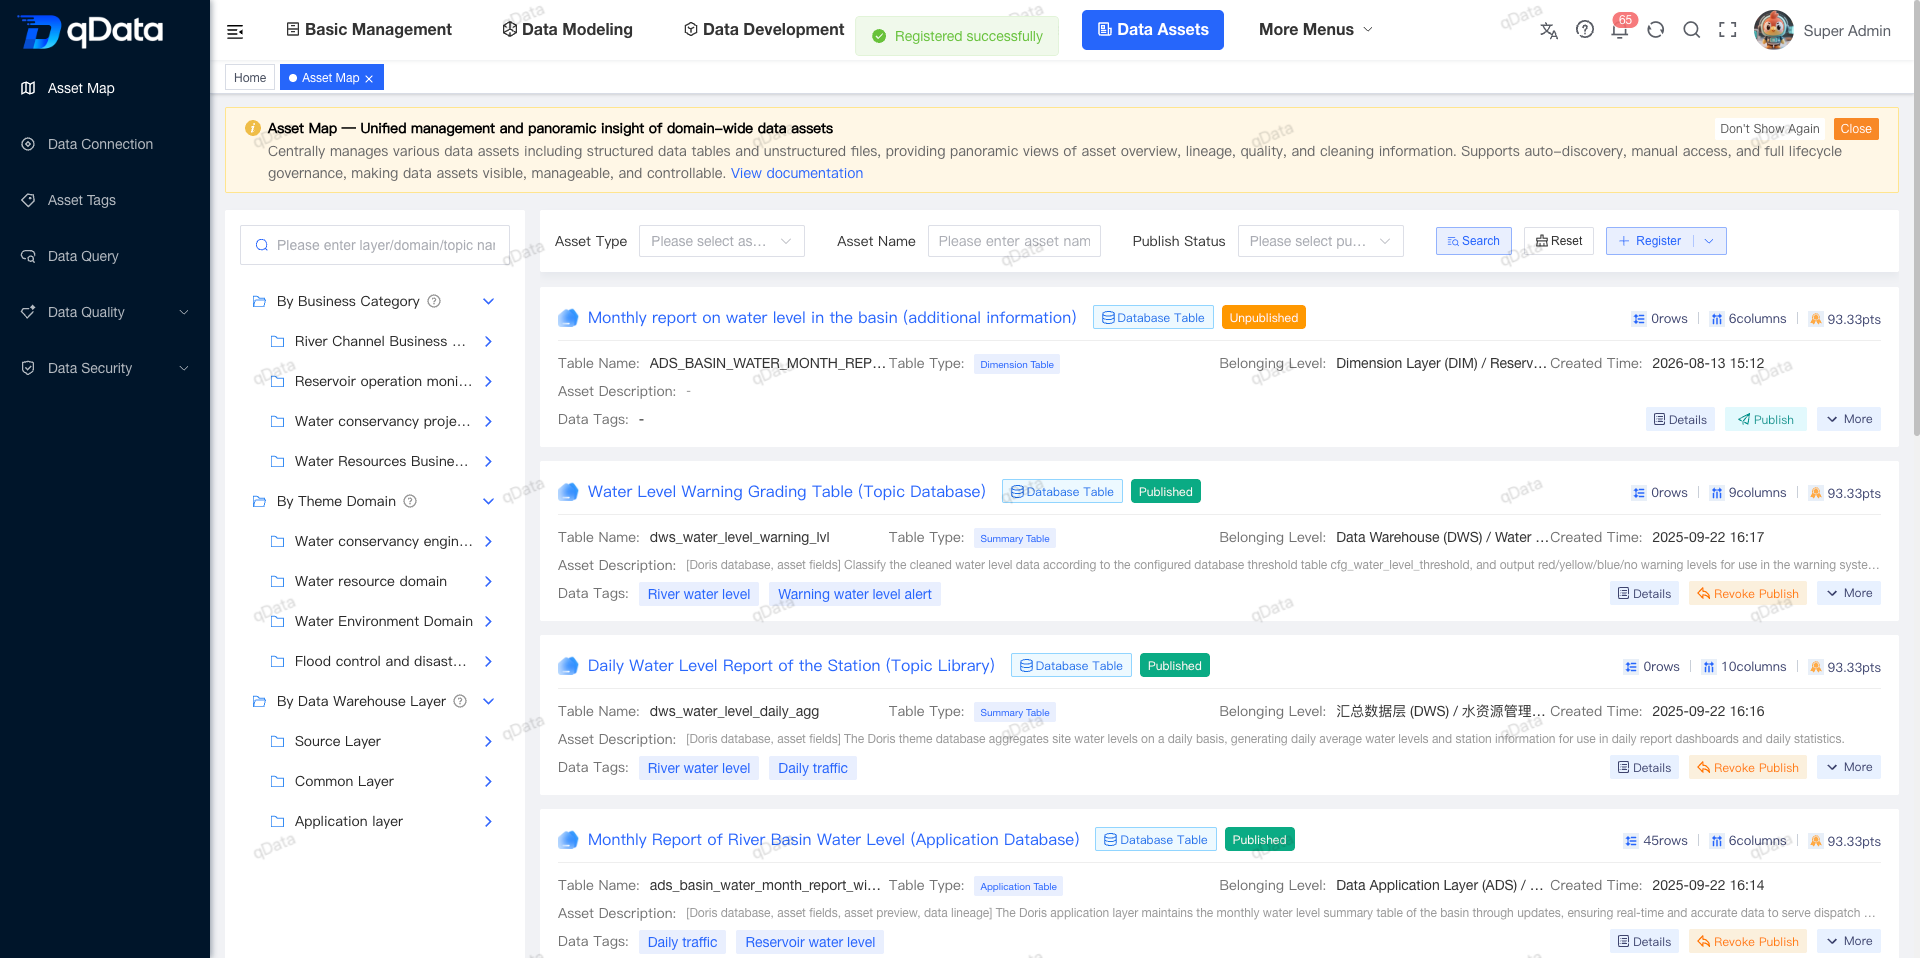
1. Register a database-table asset
Asset Map
→ Click "Register"
  → Select "Database Table"
    → Click "Select Metadata"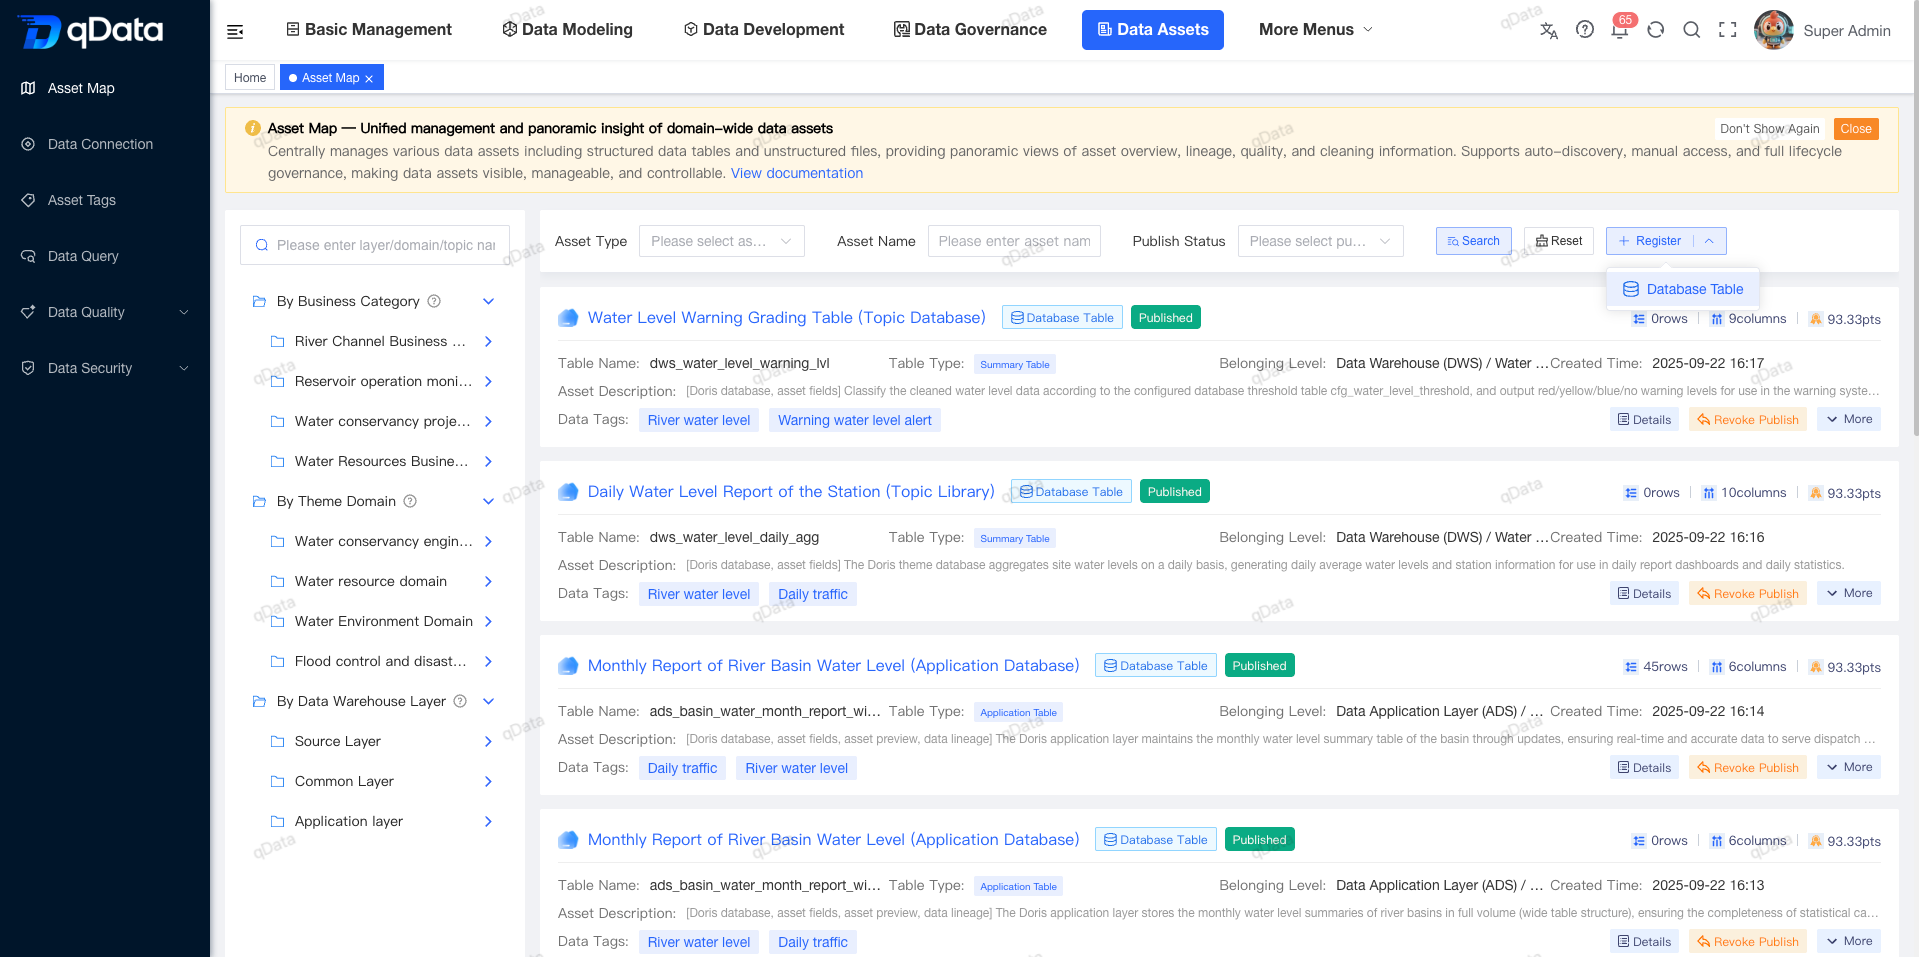
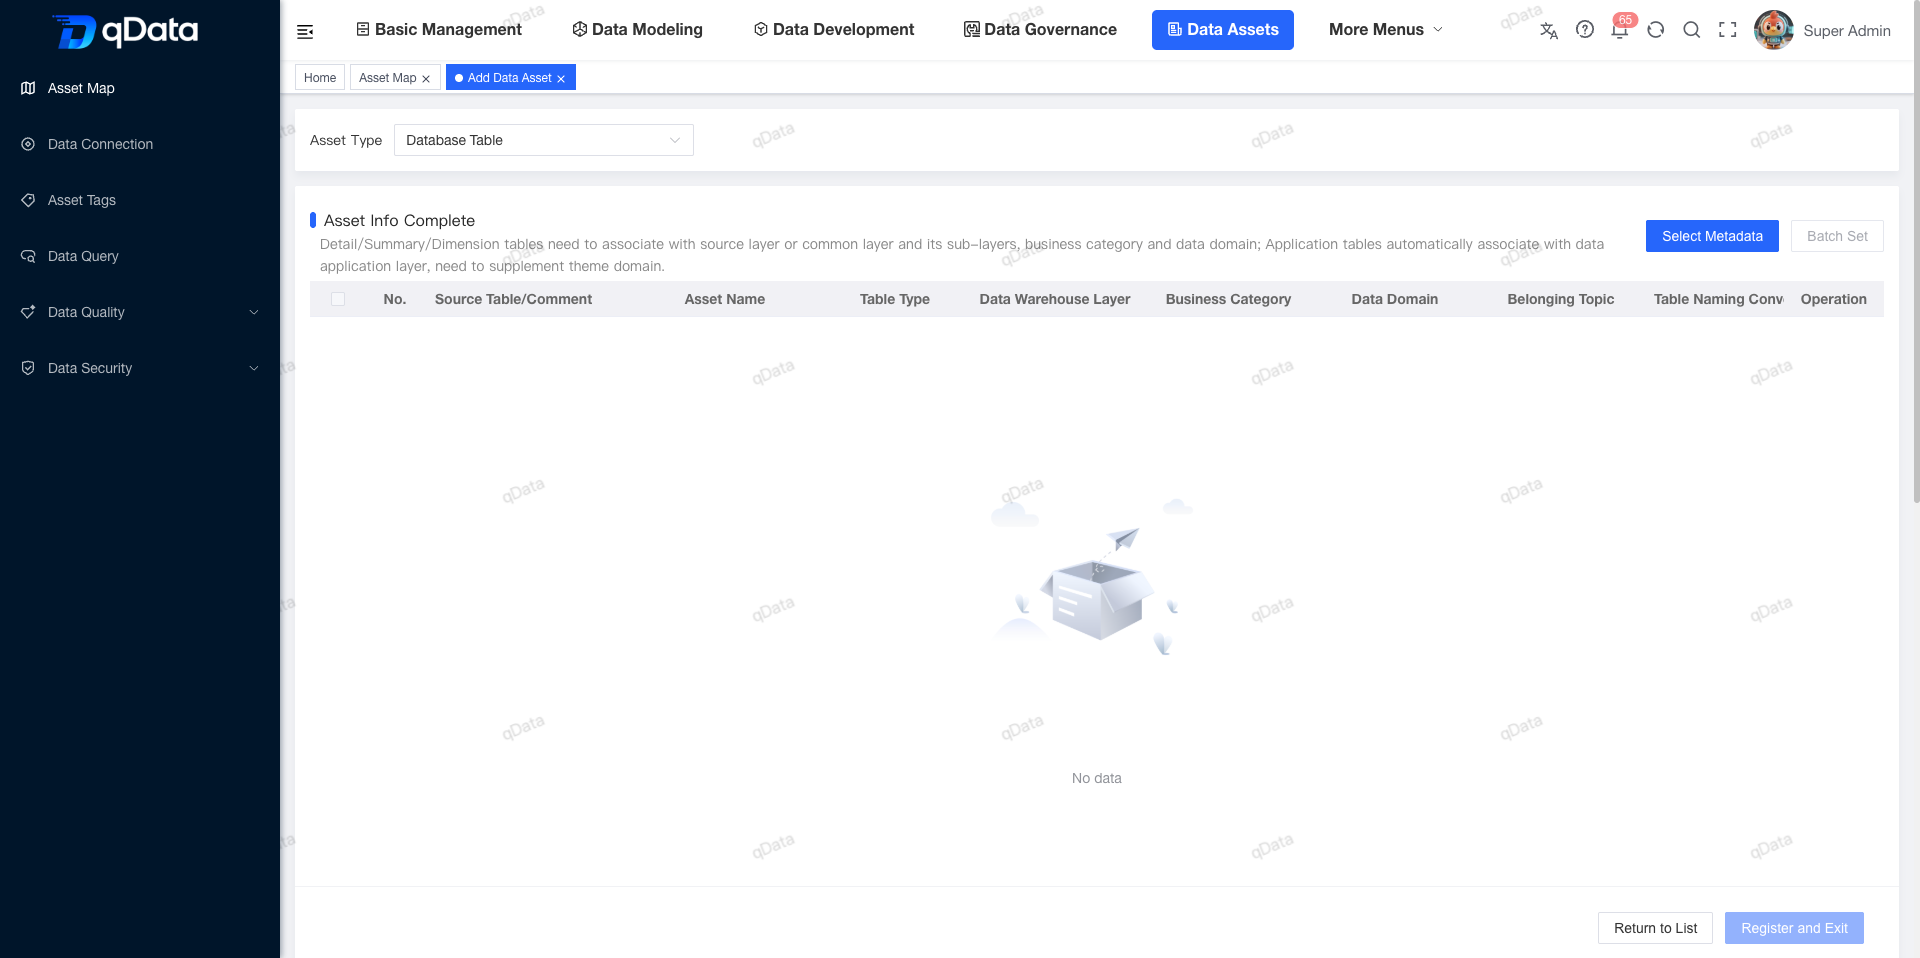
In the metadata tree, select:
Smart Reservoir Operations Management System
→ Data Platform Application Database
  → ADS
    → ADS_BASIN_WATER_MONTH_REPORT_WIDE_APPEND
      → Confirm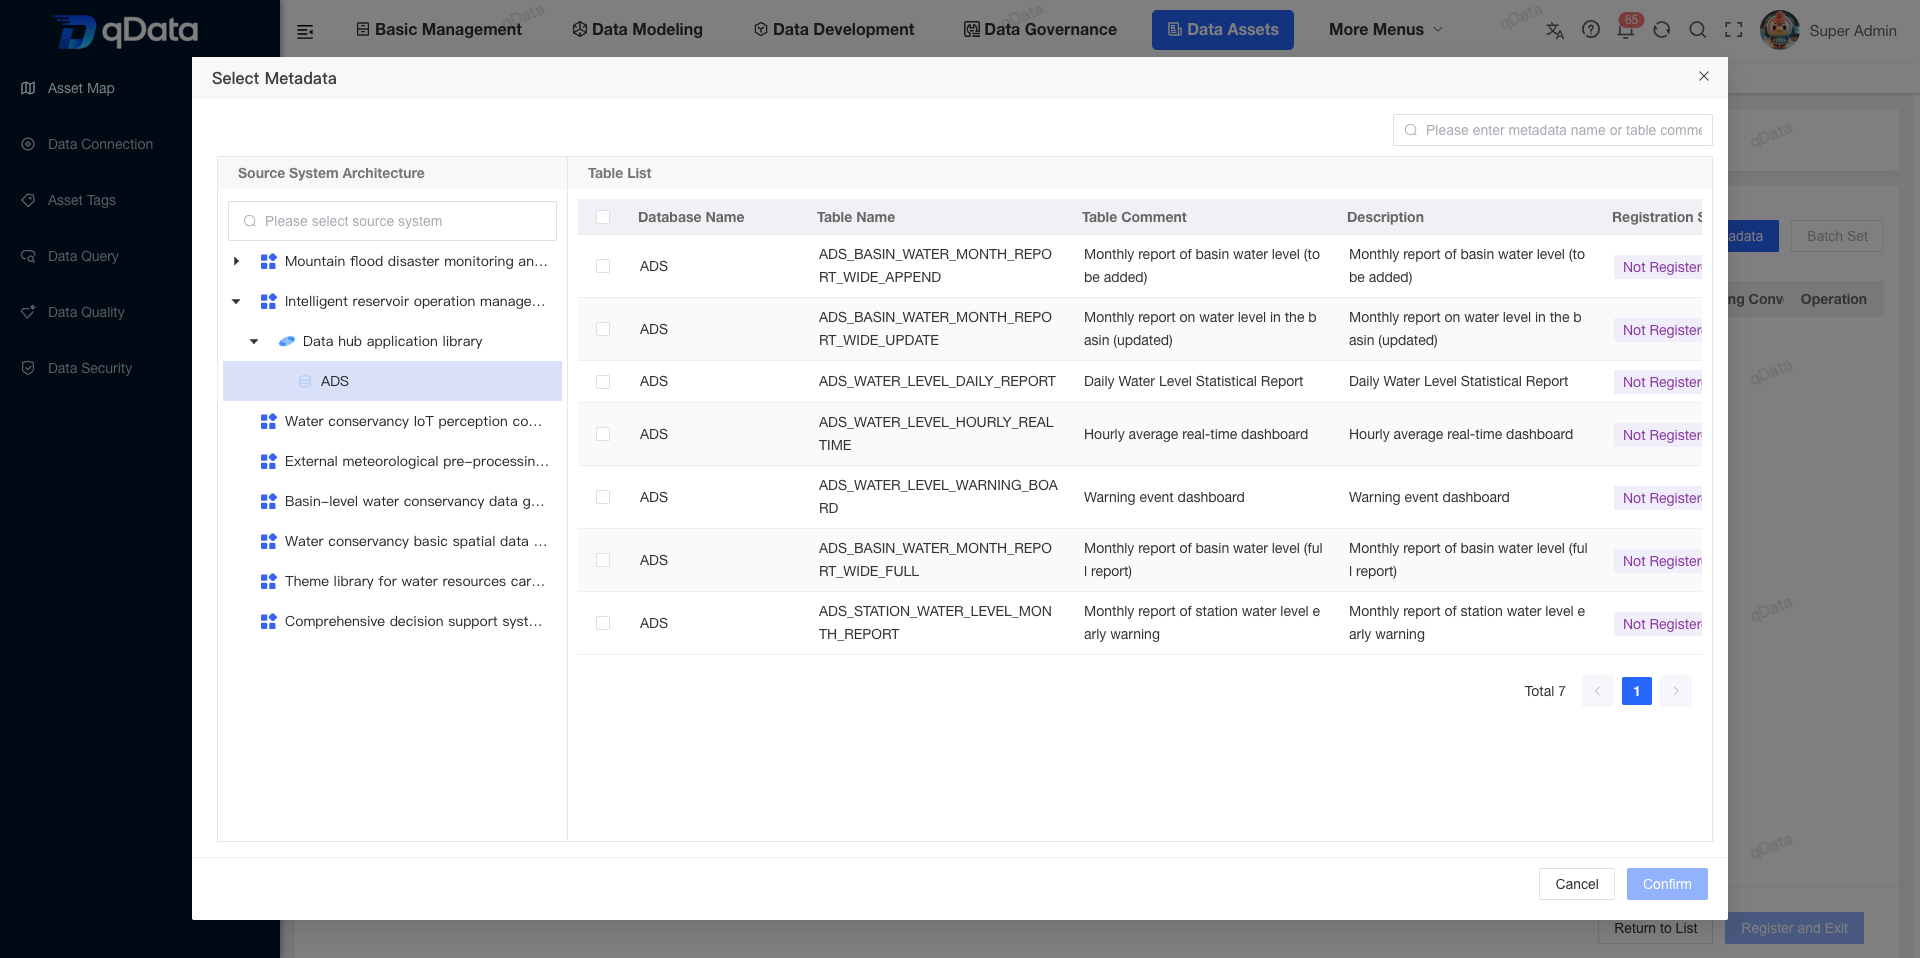
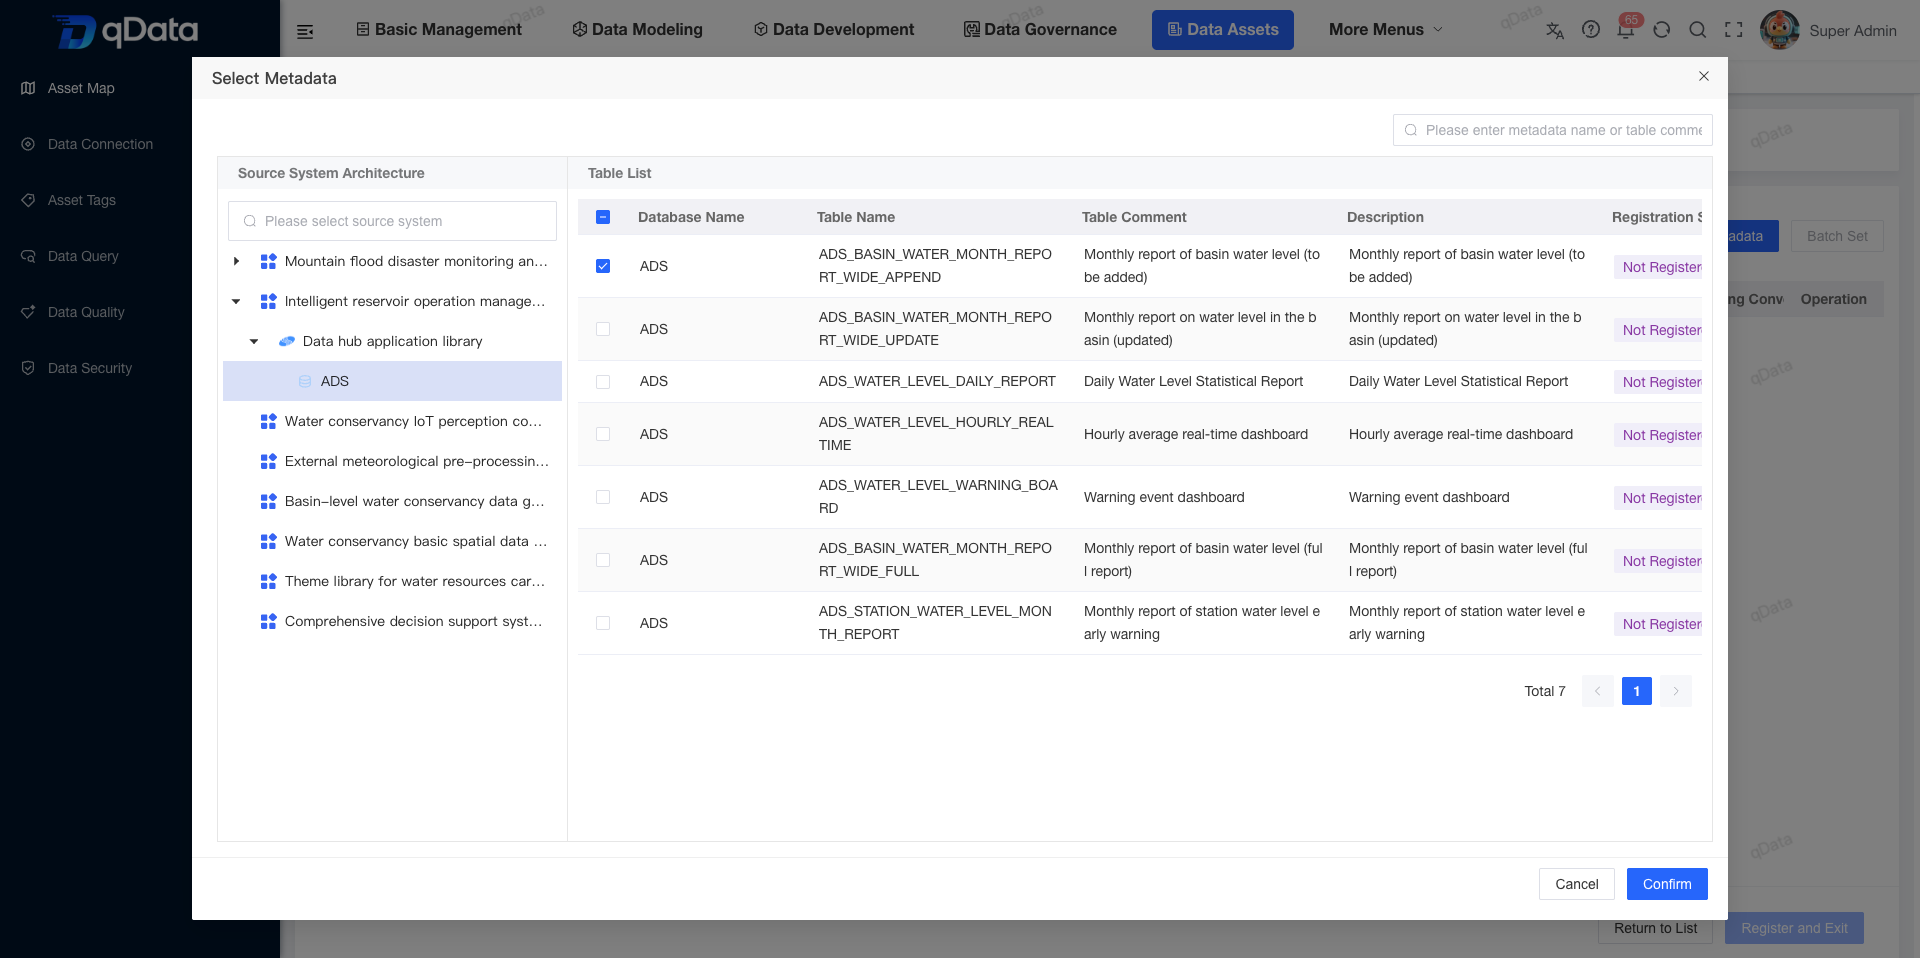
2. Add business governance attributes
Table type: Dimension Table
Warehouse layer: Dimension Layer
Business category: Reservoir Operations Monitoring
Data domain: Hydrological Monitoring
→ Click "Register and Exit"- Table type explains the table's modeling role, such as dimension or fact table.
- Warehouse layer identifies its ODS, DWD, DWS, ADS, or other warehouse layer.
- Business category organizes assets by a concrete business scenario.
- Data domain assigns the asset to an enterprise governance domain.
3. Inspect asset details
Open Details to view four tabs:
Asset Fields → Which fields make up the table?
Asset Preview → What data is stored in the table?
Asset Quality → Is the data complete, accurate, and trustworthy?
Asset Overview → Where does it come from, how large is it, and who maintains it?
3.1 Asset Fields: What is this table made of?
This tab is a table-level data dictionary. It shows Chinese and English field names, descriptions, types, lengths, decimal places, nullability, primary keys, data categories, business terms, code tables, and data elements. Developers and analysts use it to understand structure, while governance teams use it to maintain consistent definitions.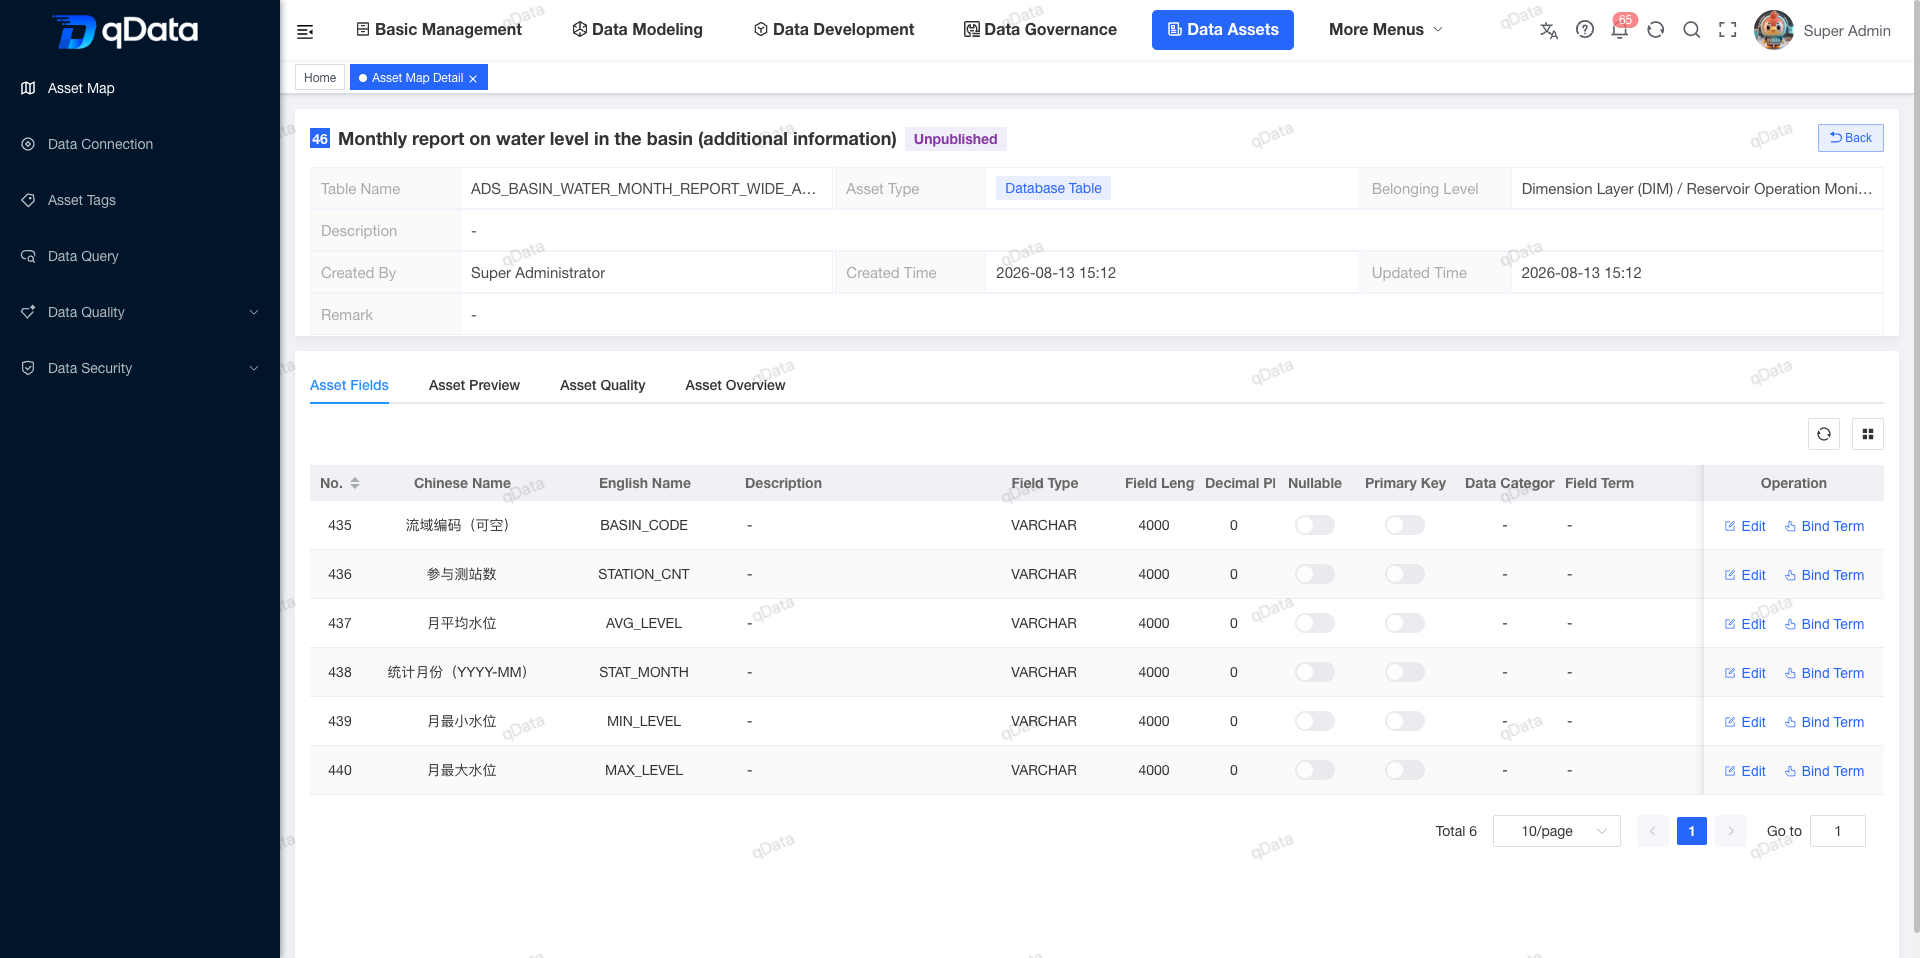
3.2 Asset Preview: What data does the table contain?
This tab displays actual records and supports pagination, sorting, and filters using operators such as =, >, AND, and OR. It helps users compare field definitions with real values and identify nulls, anomalies, or inconsistent codes before analysis.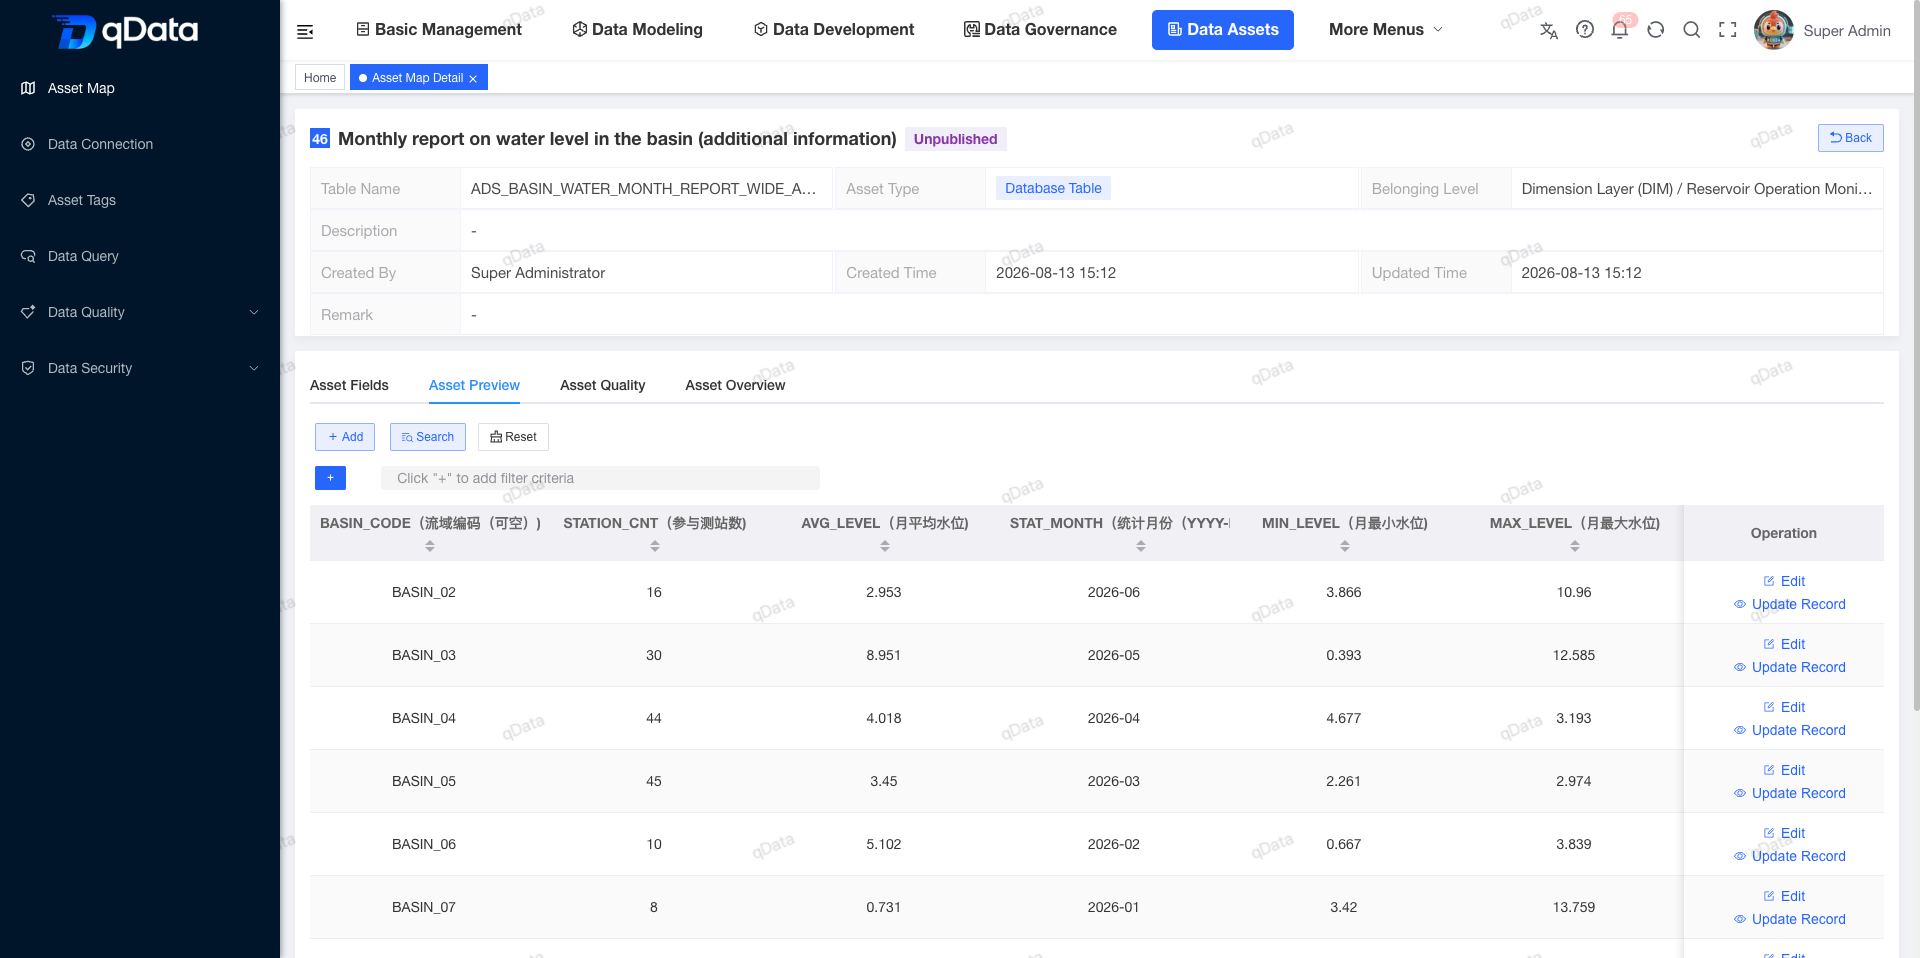
3.3 Asset Quality: Can this data be trusted?
This tab continuously evaluates data with rule-based tasks. It provides quality tasks, schedules, one-time execution, overall scores, quality dimensions, issue ratios, trends, and affected records.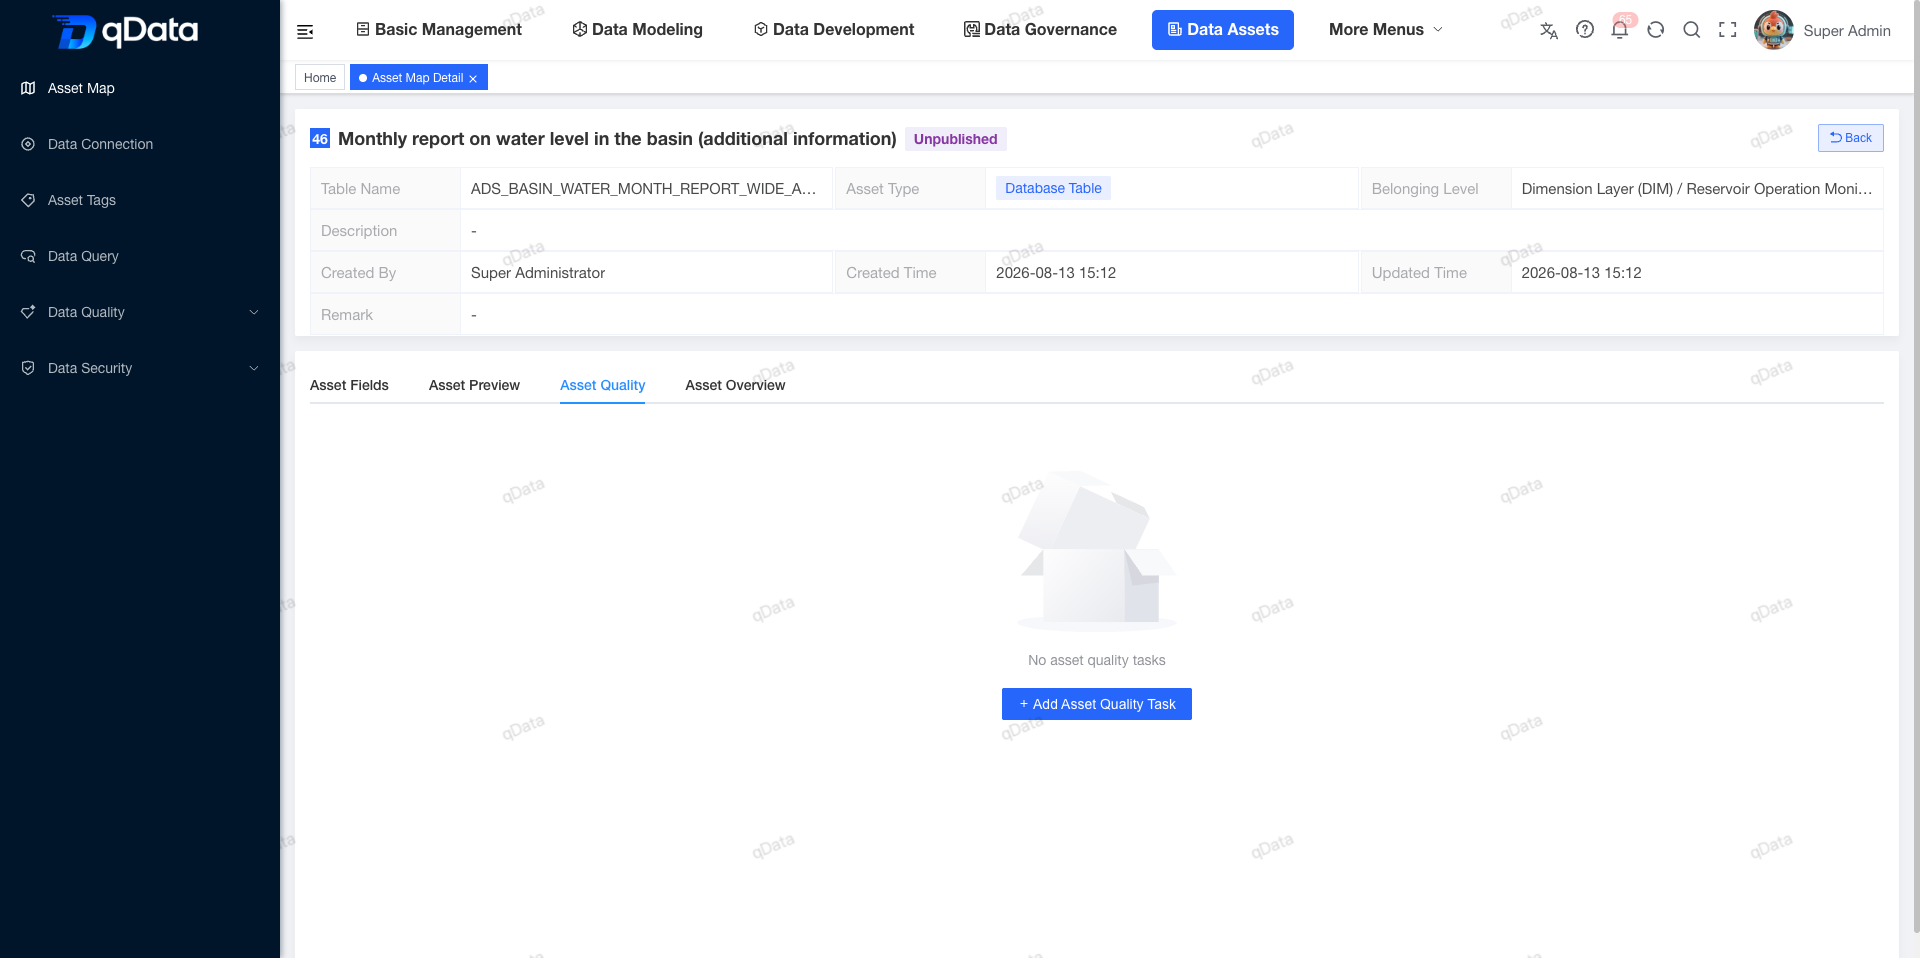
3.4 Asset Overview: Where does the asset come from, and who maintains it?
This tab is the asset's basic profile. For database tables, it usually includes the connection name and type, connection IP, row and field counts, table type, tags, creators, updaters, and contact details. It helps new users assess the source, scale, and ownership before using the asset.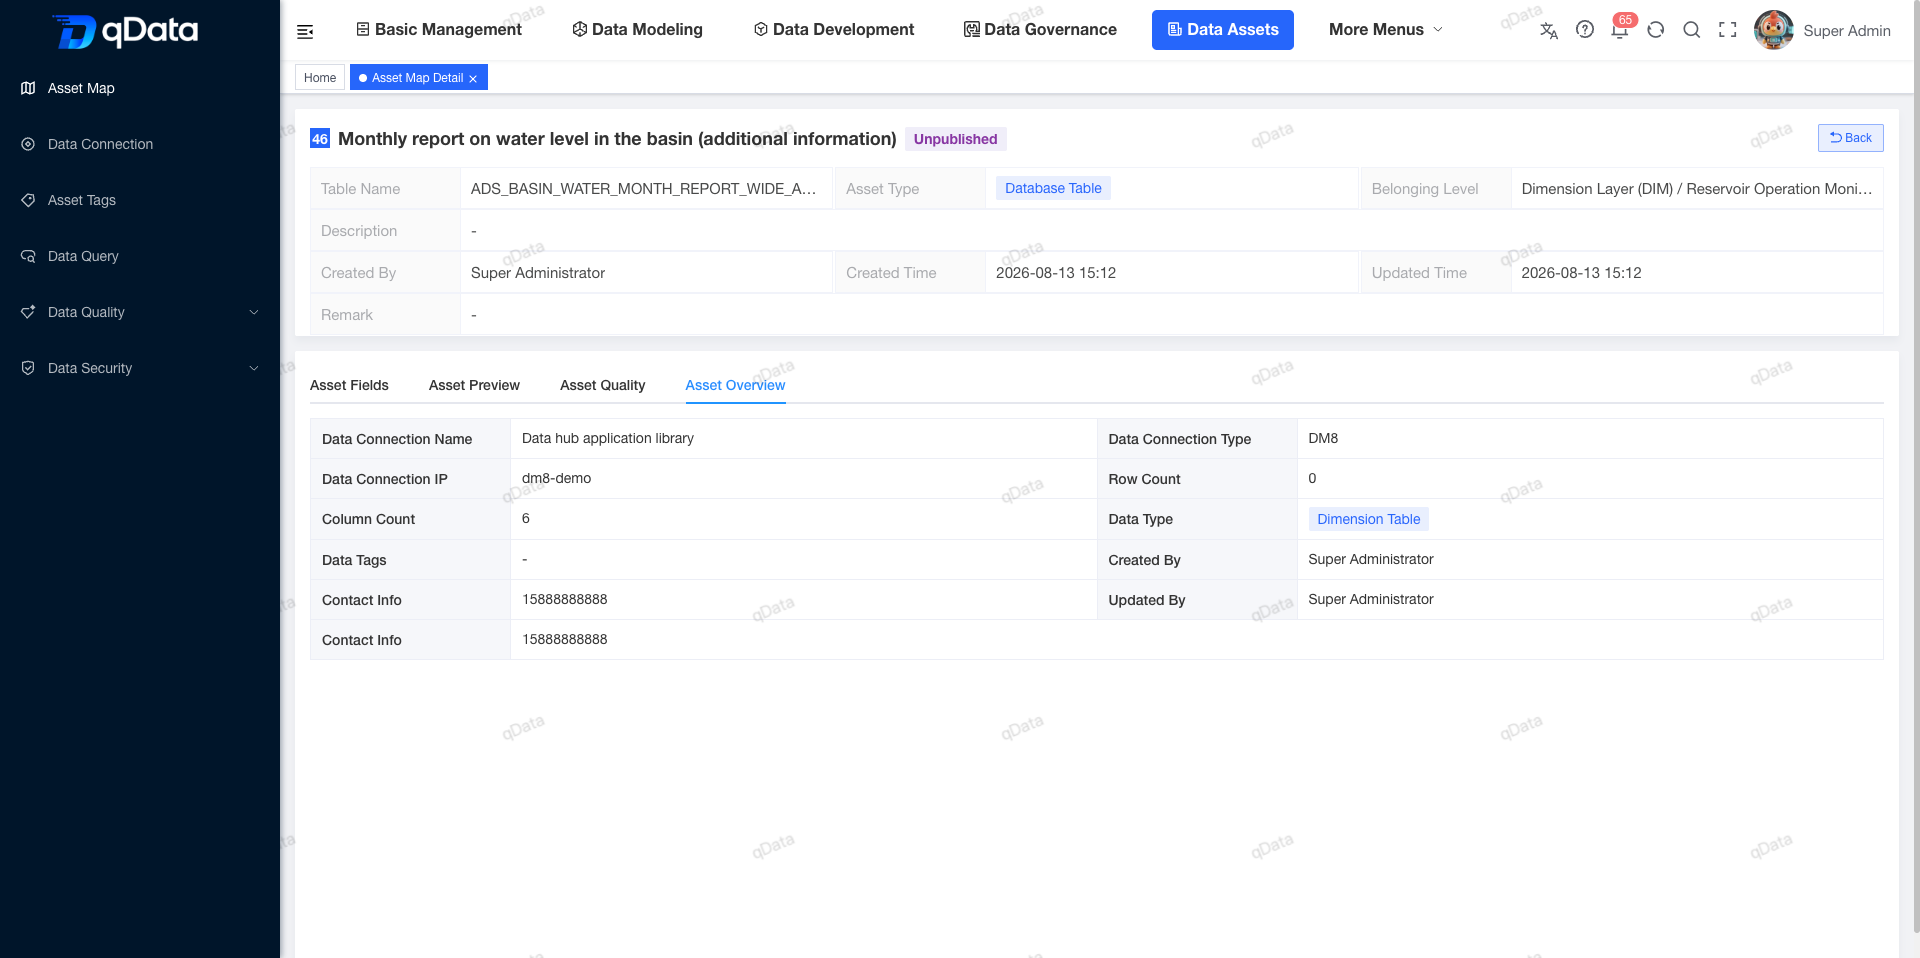
4. Publish the asset
After confirming the business category, data domain, field meanings, and ownership information, click Publish. Publication moves the asset from registration or maintenance status into the official catalog where it can be discovered and used.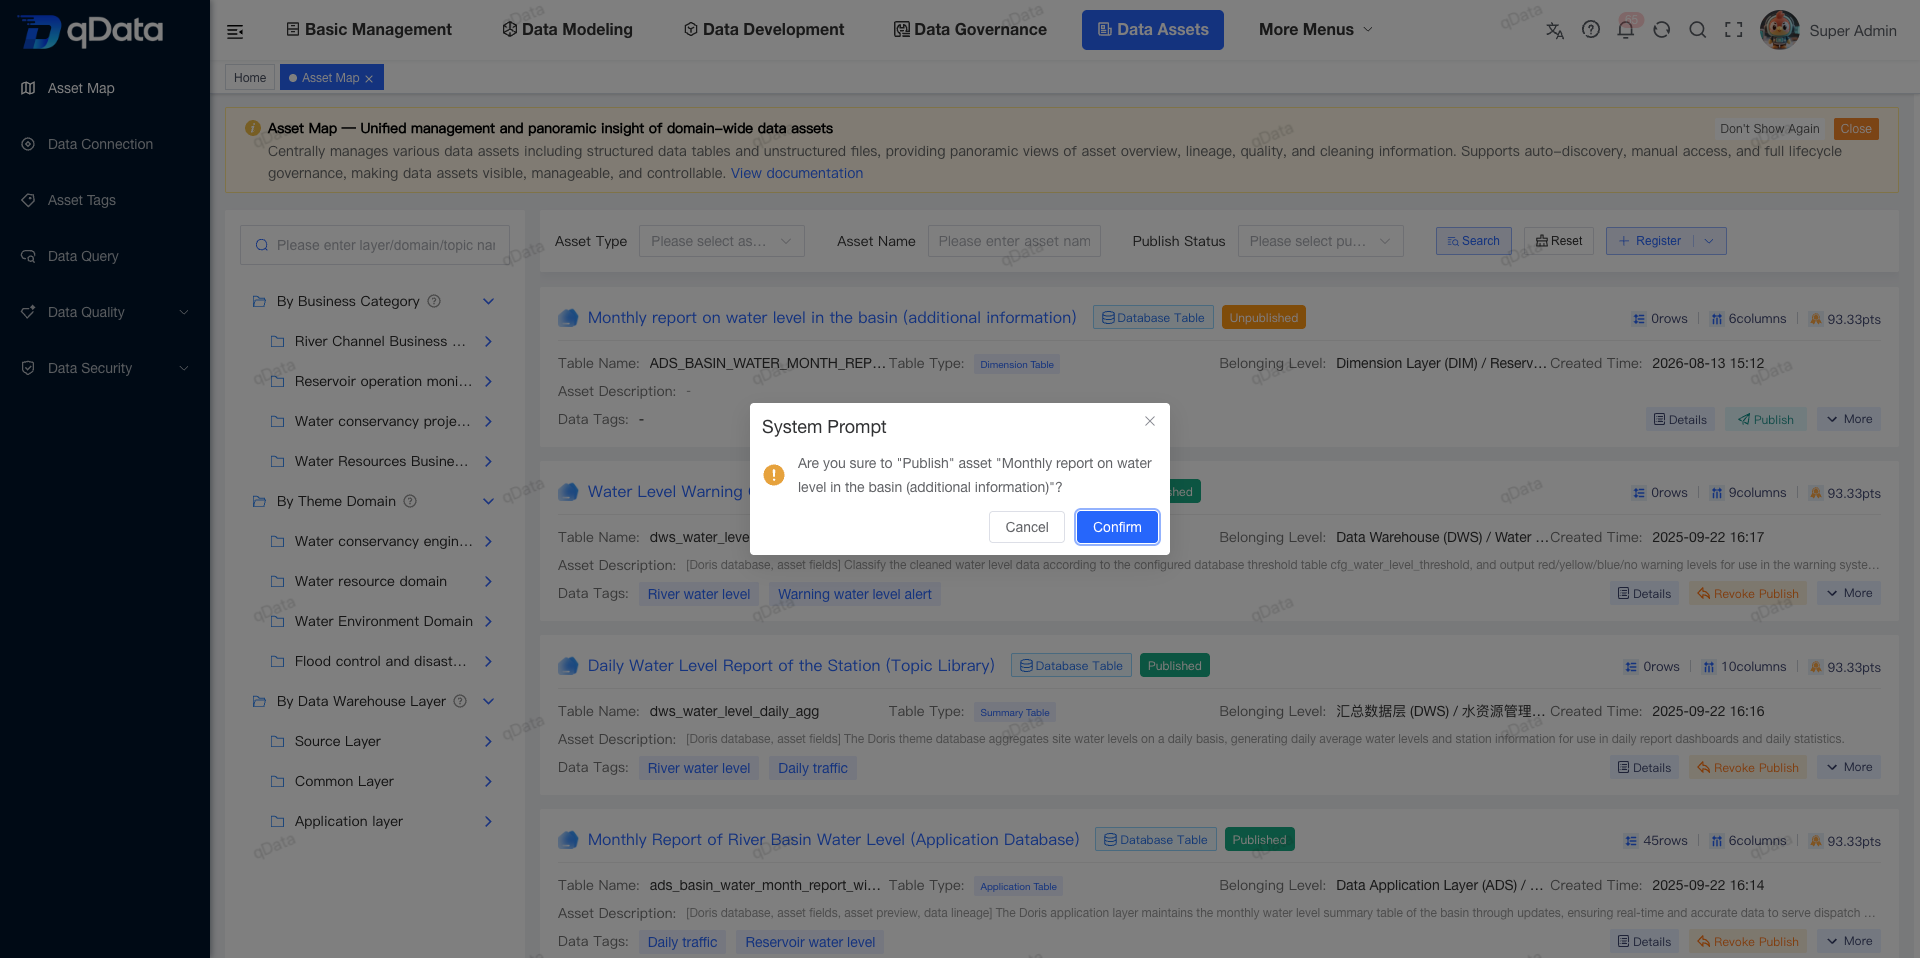
Before publication, verify that:
- the source system, data connection, and target table are correct;
- the table type, warehouse layer, business category, and data domain follow organizational standards;
- field names and descriptions are understandable to people who did not create the table;
- sensitive fields have appropriate access and preview permissions;
- the maintainer or accountable data owner is identified;
- important assets have appropriate quality tasks and business-term associations.
This produces the following closed loop:
Source system
→ Data connection
→ Collection task
→ Collection instance
→ Run log
→ Latest metadata
→ Register data asset
→ Add governance attributes
→ Inspect fields, preview, quality, and overview
→ Publish asset
Step 7: Connect the Entire Workflow
The complete process moves through four stages: business ownership, technical access, collection validation, and assetization.
1. Establish business ownership
Source system
→ Smart Reservoir Operations Management System
The source system first answers: Which business system owns this data, and who is responsible for it? It establishes a consistent business origin for the tables and fields collected later and serves as their ownership basis in the metadata tree and asset catalog.
2. Establish technical access
Data connection
→ Data Platform Application Database (ADS)
  → DM8
    → dm8-demo:5236
The connection answers: Where does qData read the data structure? The database type, network address, account, and permissions together determine whether qData can discover the tables and fields in ADS.
3. Collect and validate the result
Collection task
→ Source system: Smart Reservoir Operations Management System
→ Connection: Data Platform Application Database (ADS)
→ Scope: ADS
→ Scheduler: Quartz
  ↓
Publish and run once
  ↓
Create an instance and run log
  ↓
Add 7 latest-metadata records
This stage answers: Did qData actually discover and save the target metadata? Do not rely only on a successful task status. Verify all of the following:
- The collection instance succeeded.
- The instance contains seven tables.
- The first collection added seven records.
- Latest Metadata also contains seven ADS records.
- The source system, database, version, and execution time correspond to one another.
Only when “7 added” in the instance matches “7 records” in Latest Metadata can you confirm that the collection result moved from task execution into metadata management.
4. Turn technical metadata into a data asset
Latest Metadata
→ ADS_BASIN_WATER_MONTH_REPORT_WIDE_APPEND
  → Register a database-table asset
    → Add governance attributes
      → Inspect fields, preview, quality, and overview
        → Publish the asset
This stage answers: Does the collected data now have business meaning and meet the conditions for use? Metadata records what exists in the database; data assets add business categories, governance ownership, field semantics, and quality information so business and technical users can understand and use the data together.
The complete closed loop
Source system
→ Data connection
→ Collection task
→ Collection instance
→ Run log
→ Latest metadata
→ Asset registration
→ Governance attributes
→ Asset-detail verification
→ Asset publication
In this workflow:
- Source systems establish business ownership.
- Data connections provide technical access.
- Collection tasks define scan scope and execution strategy.
- Collection instances and logs prove that tasks actually ran.
- Latest Metadata stores technical information such as tables and fields.
- Data assets add business semantics, governance attributes, and usage context.
- Asset publication moves data from internal registration into an official, searchable, understandable, and usable catalog.
Only when the task, instance, log, metadata count, and asset information agree has the workflow from database access to asset publication truly closed the loop.
Frequently Asked Questions
1. The source system cannot be selected
Go to:
Basic Management → Source SystemsVerify that the source-system record has been saved and is enabled.
2. The data connection test or enable action fails
Check each of the following: database type, IP address, port, account, password, database name, schema, network connectivity, and database permissions.
3. The instance does not appear
Open and refresh:
Collection InstancesVerify the task name, creation time, source system, task ID, and execution time so that an older instance is not mistaken for the current run.