Quick Use
Overview
This guide is intended for users who are using the qData data platform for the first time. After deployment and login, it helps you quickly complete an end-to-end experience covering data source configuration, data development, execution log viewing, data synchronization, and result verification.
If you have not completed environment deployment, first follow Quick Deployment to start the platform.
Recommended Workflow
- Complete system deployment and log in to the platform.
- Configure a data source in Data Development > Data Connections.
- Create tables and insert data in Data Development > Data Development.
- View execution logs in Data Development > Data Development Instances.
- View the created tables and data in Data Assets > Data Query.
- Configure a data synchronization task in Data Development > Data Integration.
- View data synchronization logs in Data Development > Data Integration Instances.
- View the synchronized data in Data Assets > Data Query.
1. Log In to the Platform
Open the deployed qData access URL, then enter the administrator account and password to log in. After login succeeds, you can enter the platform home page and start configuring data sources, development tasks, and data synchronization tasks.
2. Configure a Data Source
Go to Data Development > Data Connections, click Add, select a data source type, and fill in the data source name, connection address, port, account, password, and other information. After the connection test succeeds, save the data source configuration.
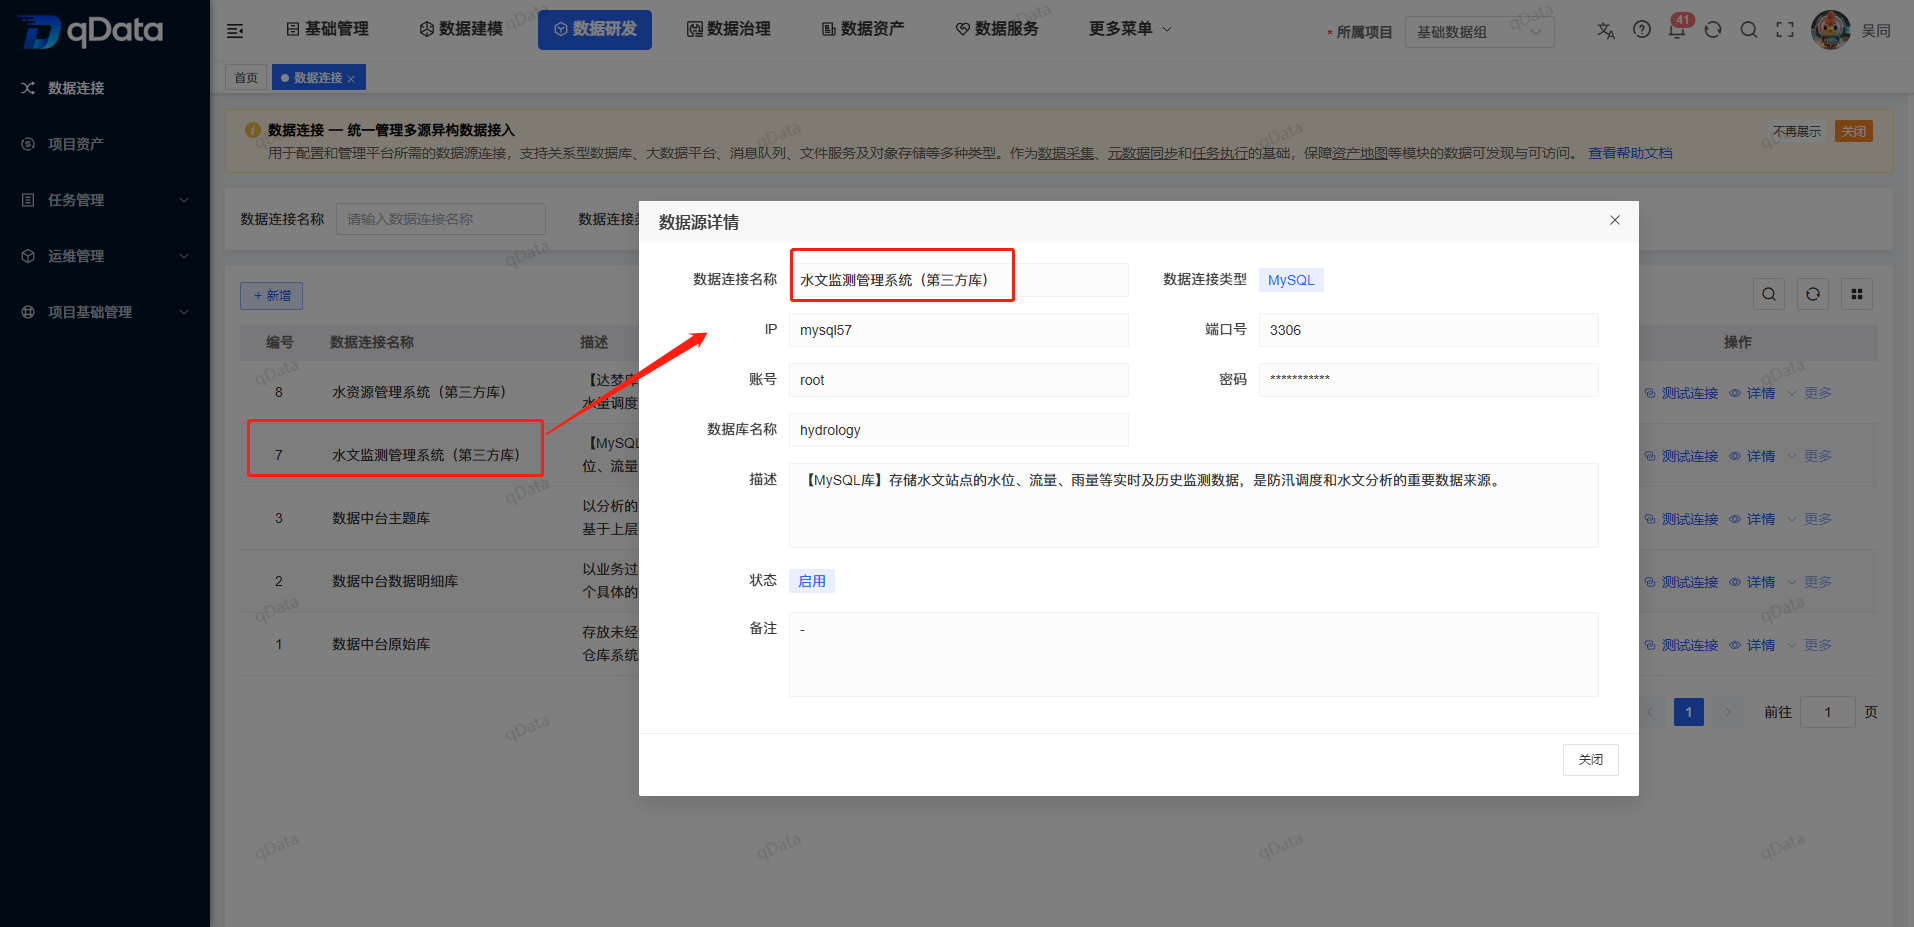
Option 1: Use the built-in system data source. No configuration is required.
Option 2: Configure a data source in your own environment.
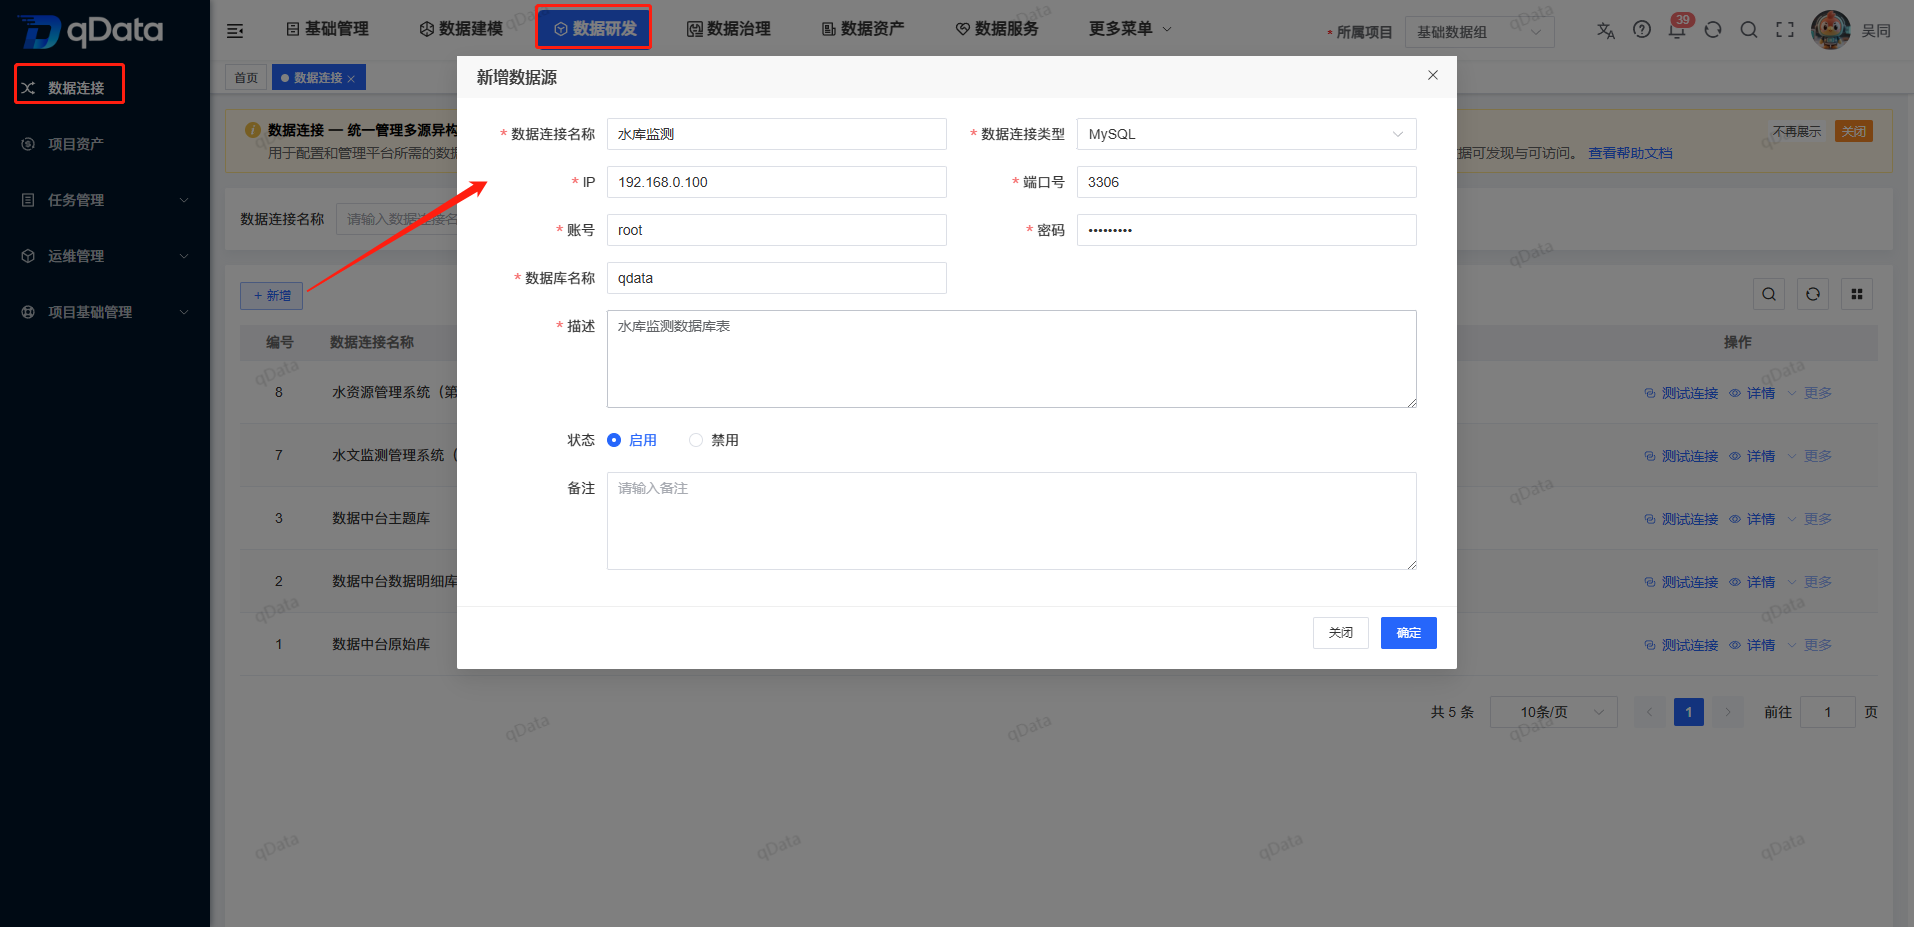
The Add Data Source page is used to configure the connection information required for the platform to access business databases. Before saving, we recommend running a connection test to confirm that the network, account, and permissions are valid.
Note: The following workflow uses the built-in system data source, Hydrological Monitoring Management System (third-party database), to store data.
3. Create a Data Development Task
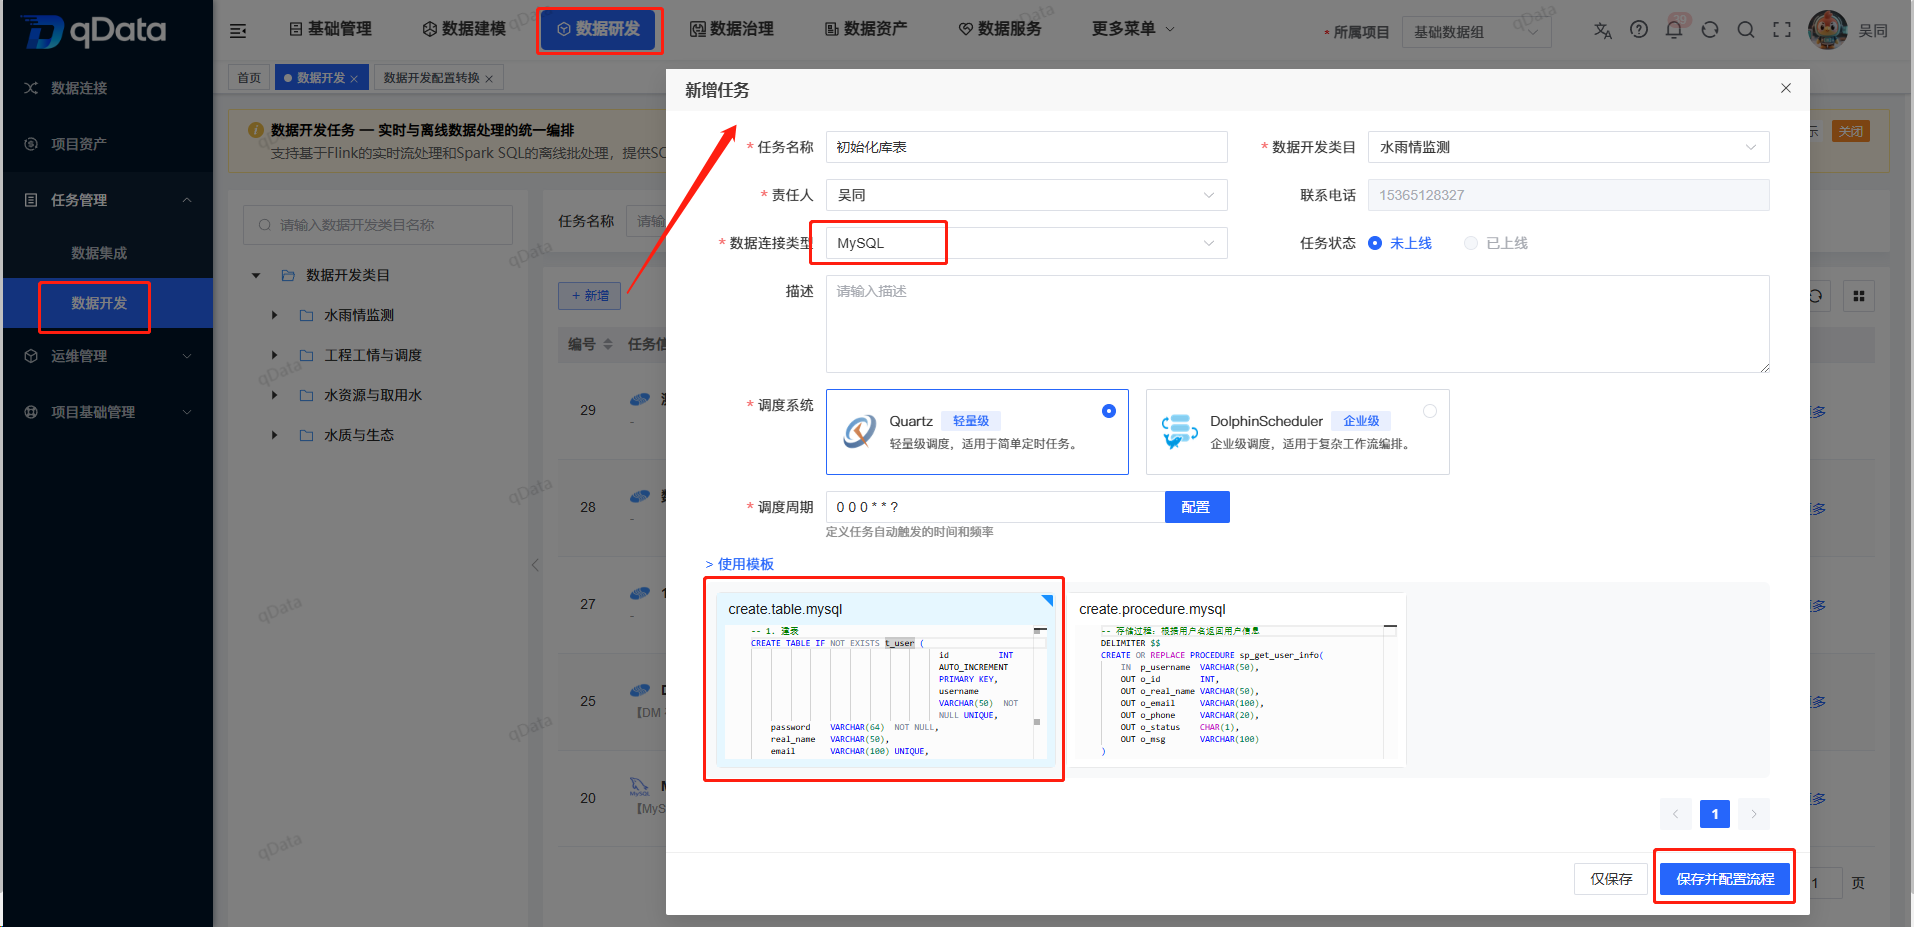
Go to Data Development > Data Development, click Add, fill in the task name, task description, and related configuration, then create a data development task. Select the same database type as the configured data source. The scheduling task can use Quartz (lightweight) by default. Use Template 1 for a database table structure, or Template 2 for a stored procedure structure.
3.1 Create Tables and Insert Data
Write the table creation statement and data insertion statement in the data development task. In execution configuration, select the required data source and save the task.
Note: The data source can be the one configured in Step 2, or the built-in data source.
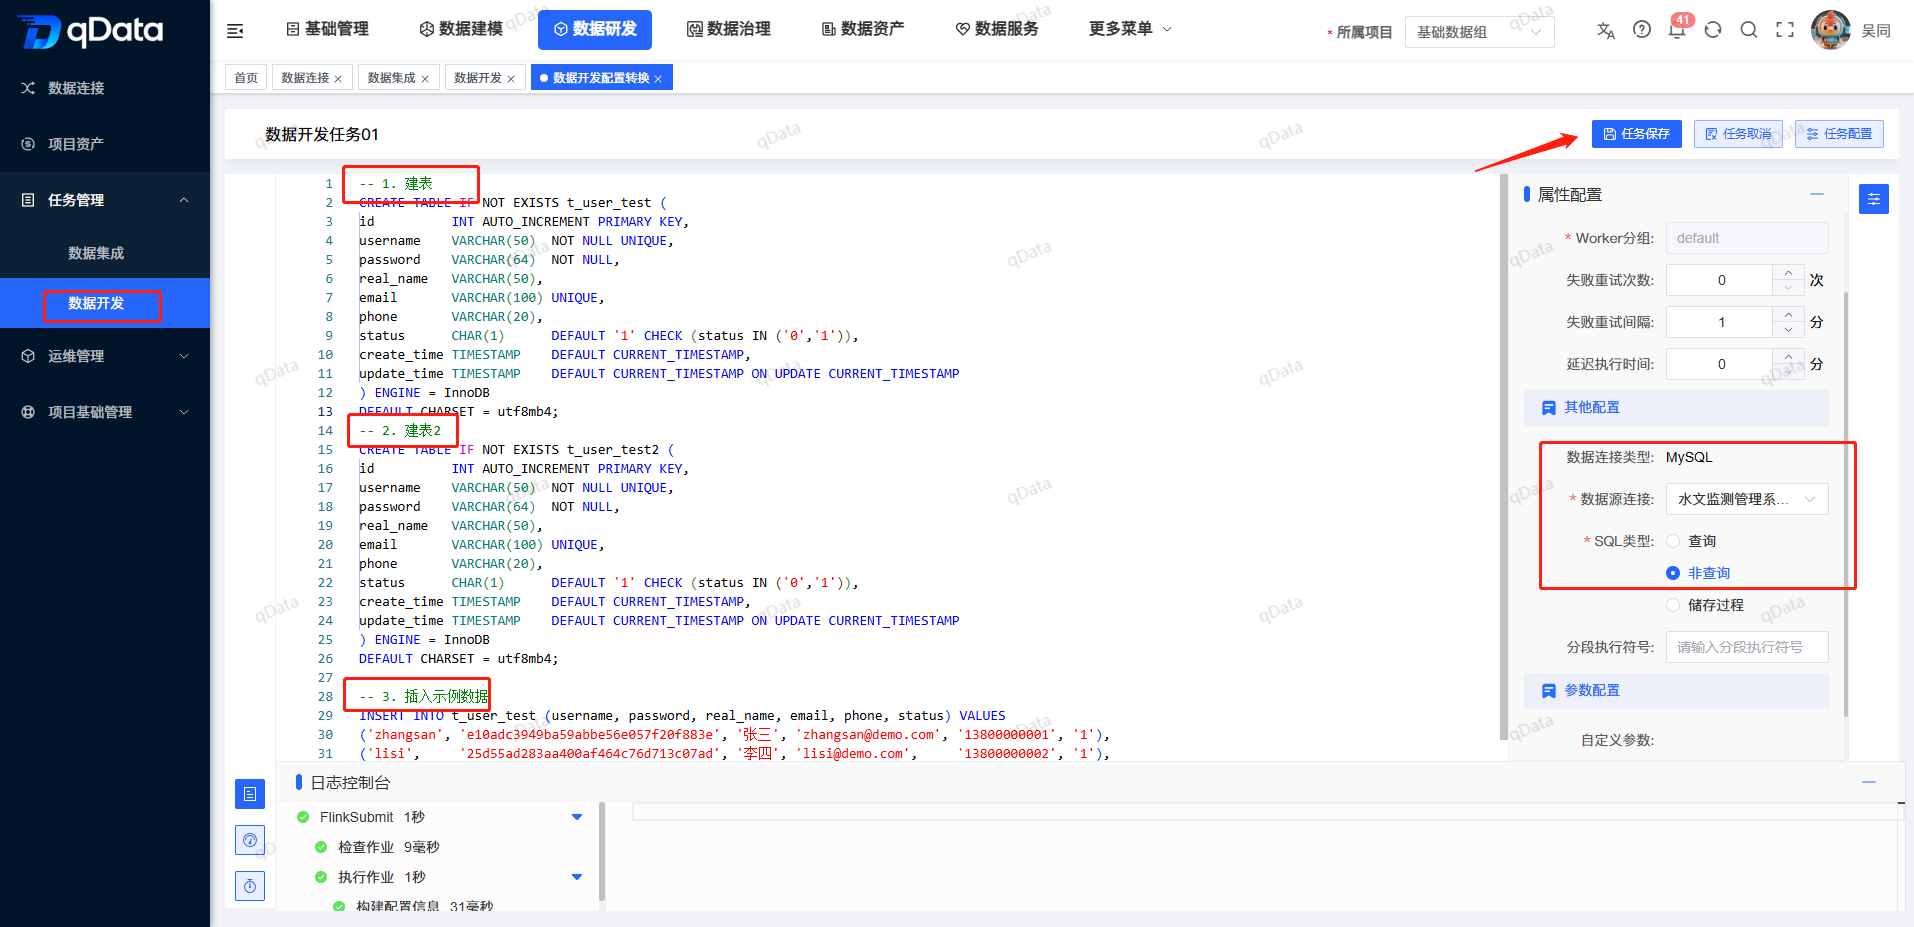
Table Creation Statement: Create 2 Tables and Insert 3 Rows into One Table
-- 1. Create table
CREATE TABLE IF NOT EXISTS t_user_test (
id          INT AUTO_INCREMENT PRIMARY KEY,
username    VARCHAR(50)  NOT NULL UNIQUE,
password    VARCHAR(64)  NOT NULL,
real_name   VARCHAR(50),
email       VARCHAR(100) UNIQUE,
phone       VARCHAR(20),
status      CHAR(1)      DEFAULT '1' CHECK (status IN ('0','1')),
create_time TIMESTAMP    DEFAULT CURRENT_TIMESTAMP,
update_time TIMESTAMP    DEFAULT CURRENT_TIMESTAMP ON UPDATE CURRENT_TIMESTAMP
) ENGINE = InnoDB
DEFAULT CHARSET = utf8mb4;
-- 2. Create table 2
CREATE TABLE IF NOT EXISTS t_user_test2 (
id          INT AUTO_INCREMENT PRIMARY KEY,
username    VARCHAR(50)  NOT NULL UNIQUE,
password    VARCHAR(64)  NOT NULL,
real_name   VARCHAR(50),
email       VARCHAR(100) UNIQUE,
phone       VARCHAR(20),
status      CHAR(1)      DEFAULT '1' CHECK (status IN ('0','1')),
create_time TIMESTAMP    DEFAULT CURRENT_TIMESTAMP,
update_time TIMESTAMP    DEFAULT CURRENT_TIMESTAMP ON UPDATE CURRENT_TIMESTAMP
) ENGINE = InnoDB
DEFAULT CHARSET = utf8mb4;

-- 3. Insert sample data
INSERT INTO t_user_test (username, password, real_name, email, phone, status) VALUES
('zhangsan', 'e10adc3949ba59abbe56e057f20f883e', 'Zhang San', 'zhangsan@demo.com', '13800000001', '1'),
('lisi',     '25d55ad283aa400af464c76d713c07ad', 'Li Si',     'lisi@demo.com',     '13800000002', '1'),
('wangwu',   '5f4dcc3b5aa765d61d8327deb882cf99', 'Wang Wu',   'wangwu@demo.com',   '13800000003', '0');
This step prepares test data for later query and data synchronization. The table creation statement creates the target tables, and the insertion statement writes sample data.
3.2 Execute the Data Development Task
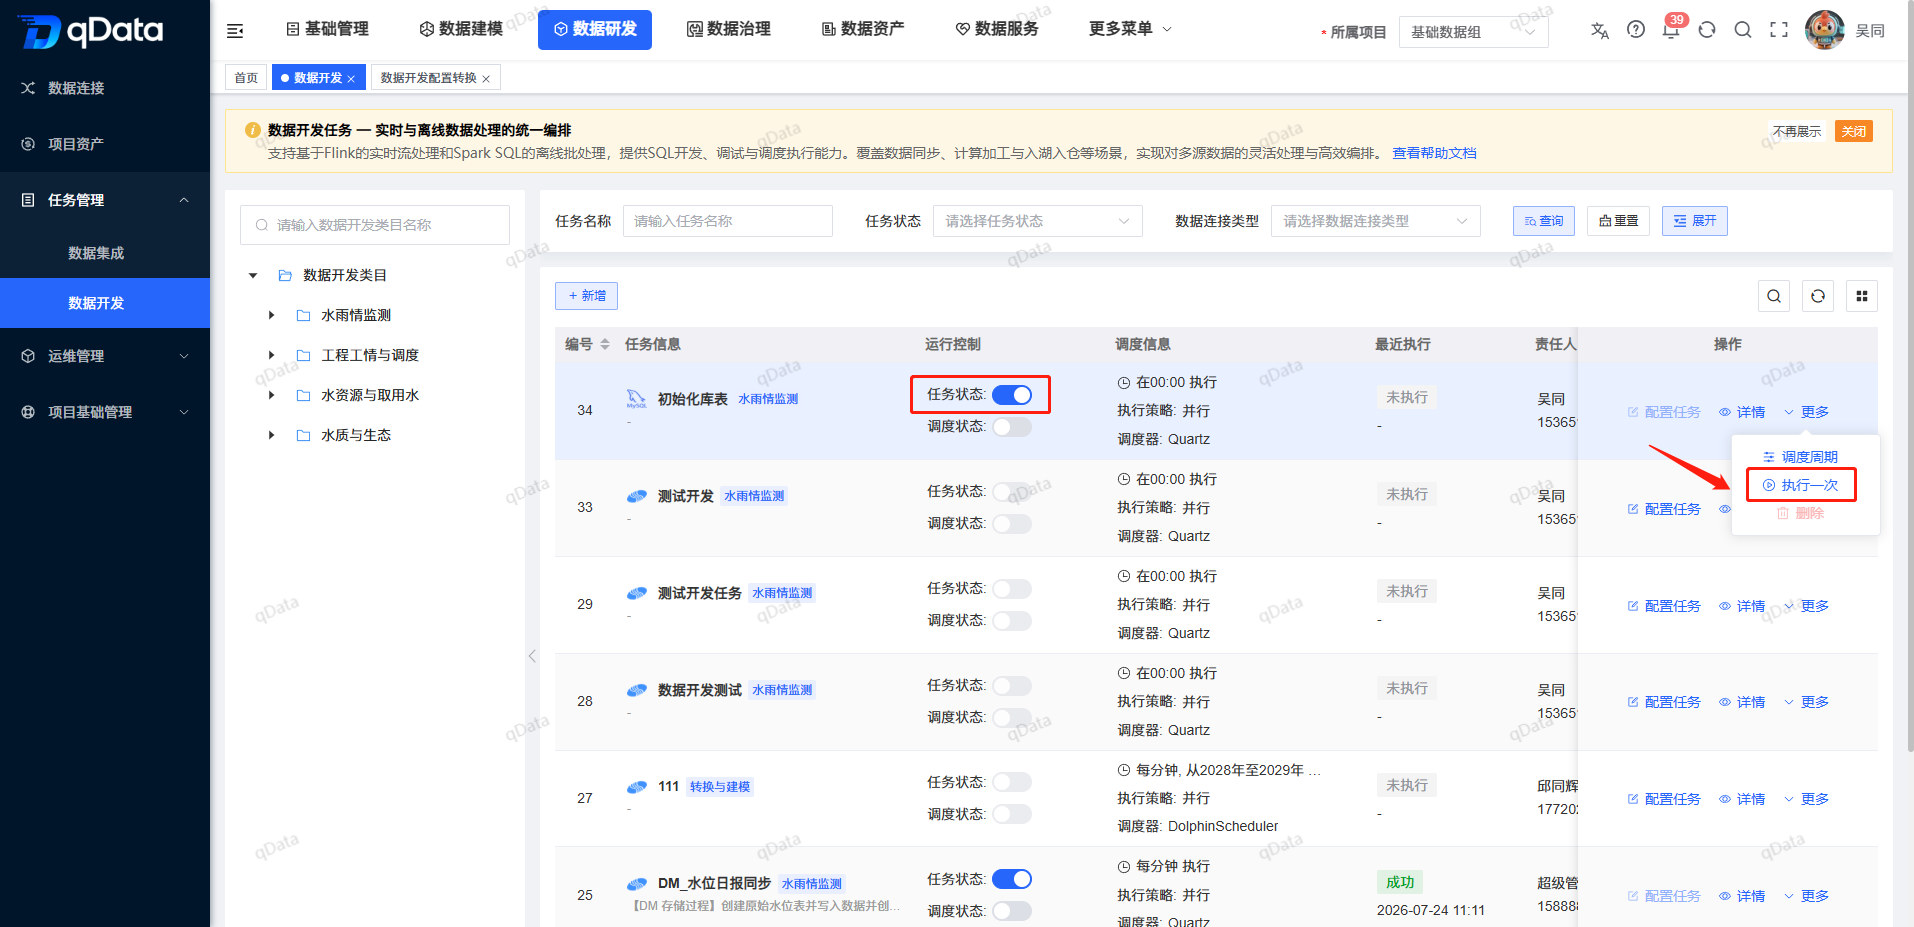
After confirming that the task configuration is correct, enable the task status and click Run Once to execute the data development task.
4. View Data Development Execution Logs
Go to Data Development > Data Development Instances, select the corresponding task instance, and view the execution logs.
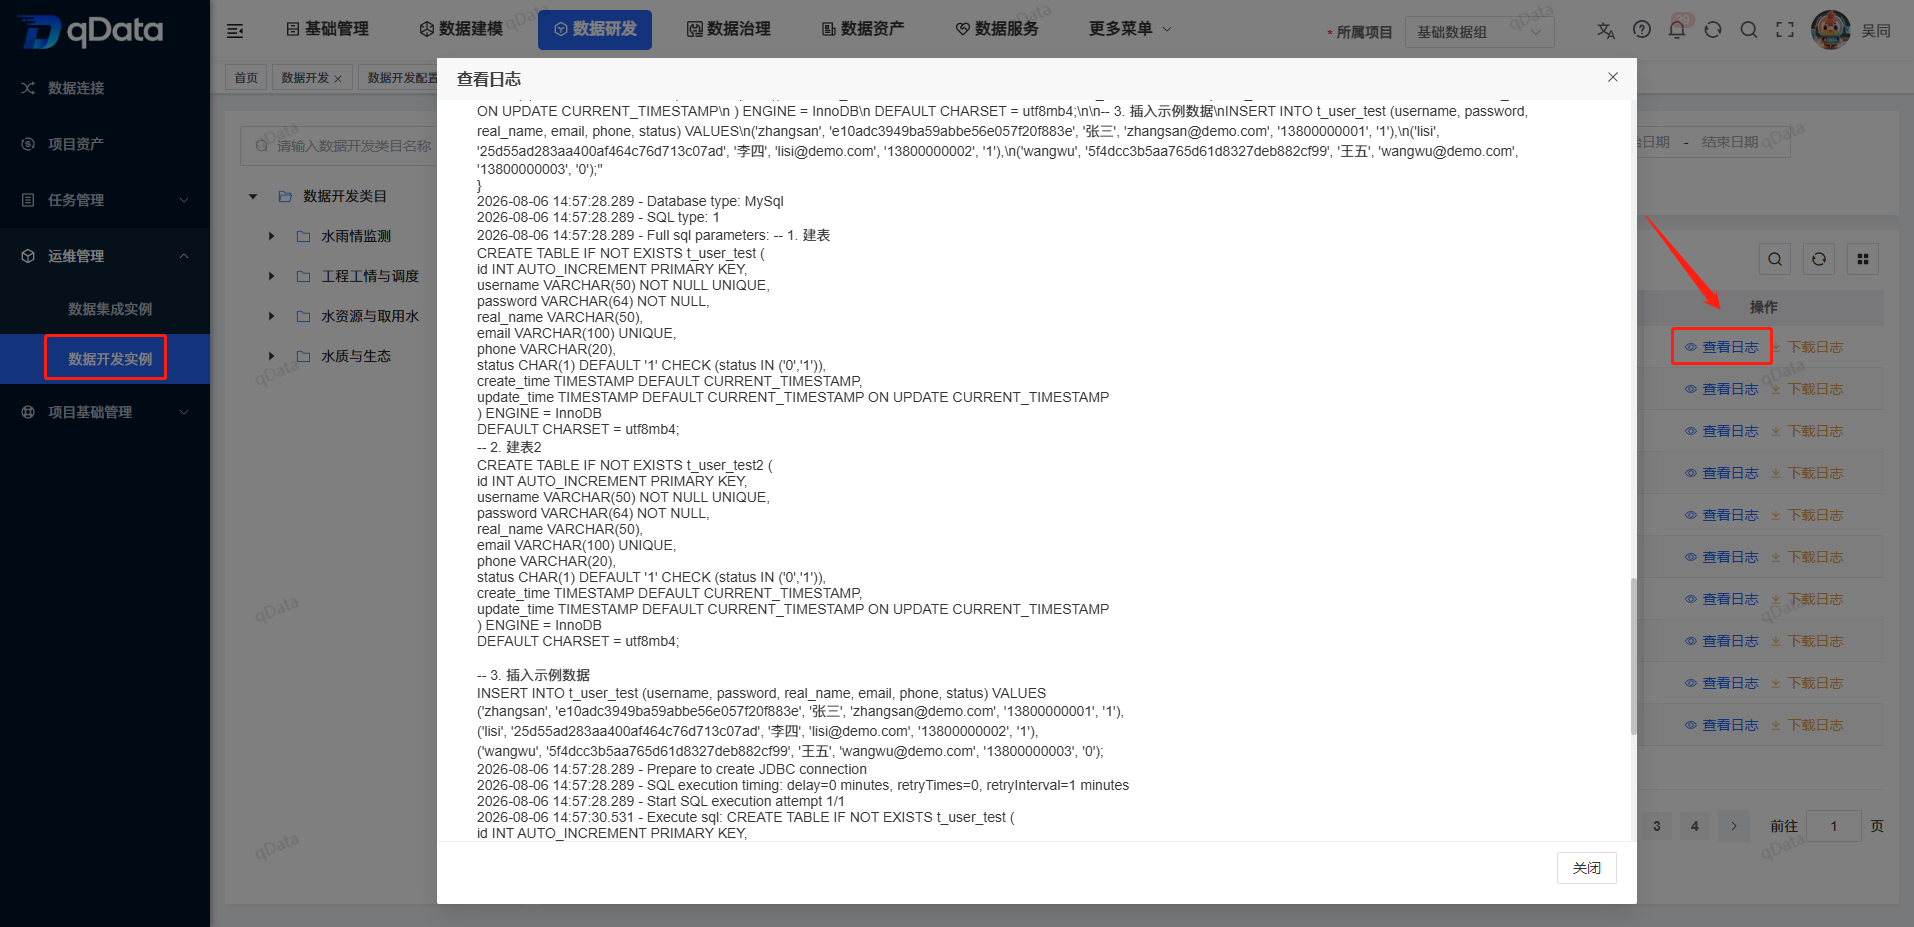
Execution logs can be used to confirm whether table creation and data insertion succeeded, and to locate SQL execution, data source connection, or permission configuration issues.
5. View the Created Tables and Data
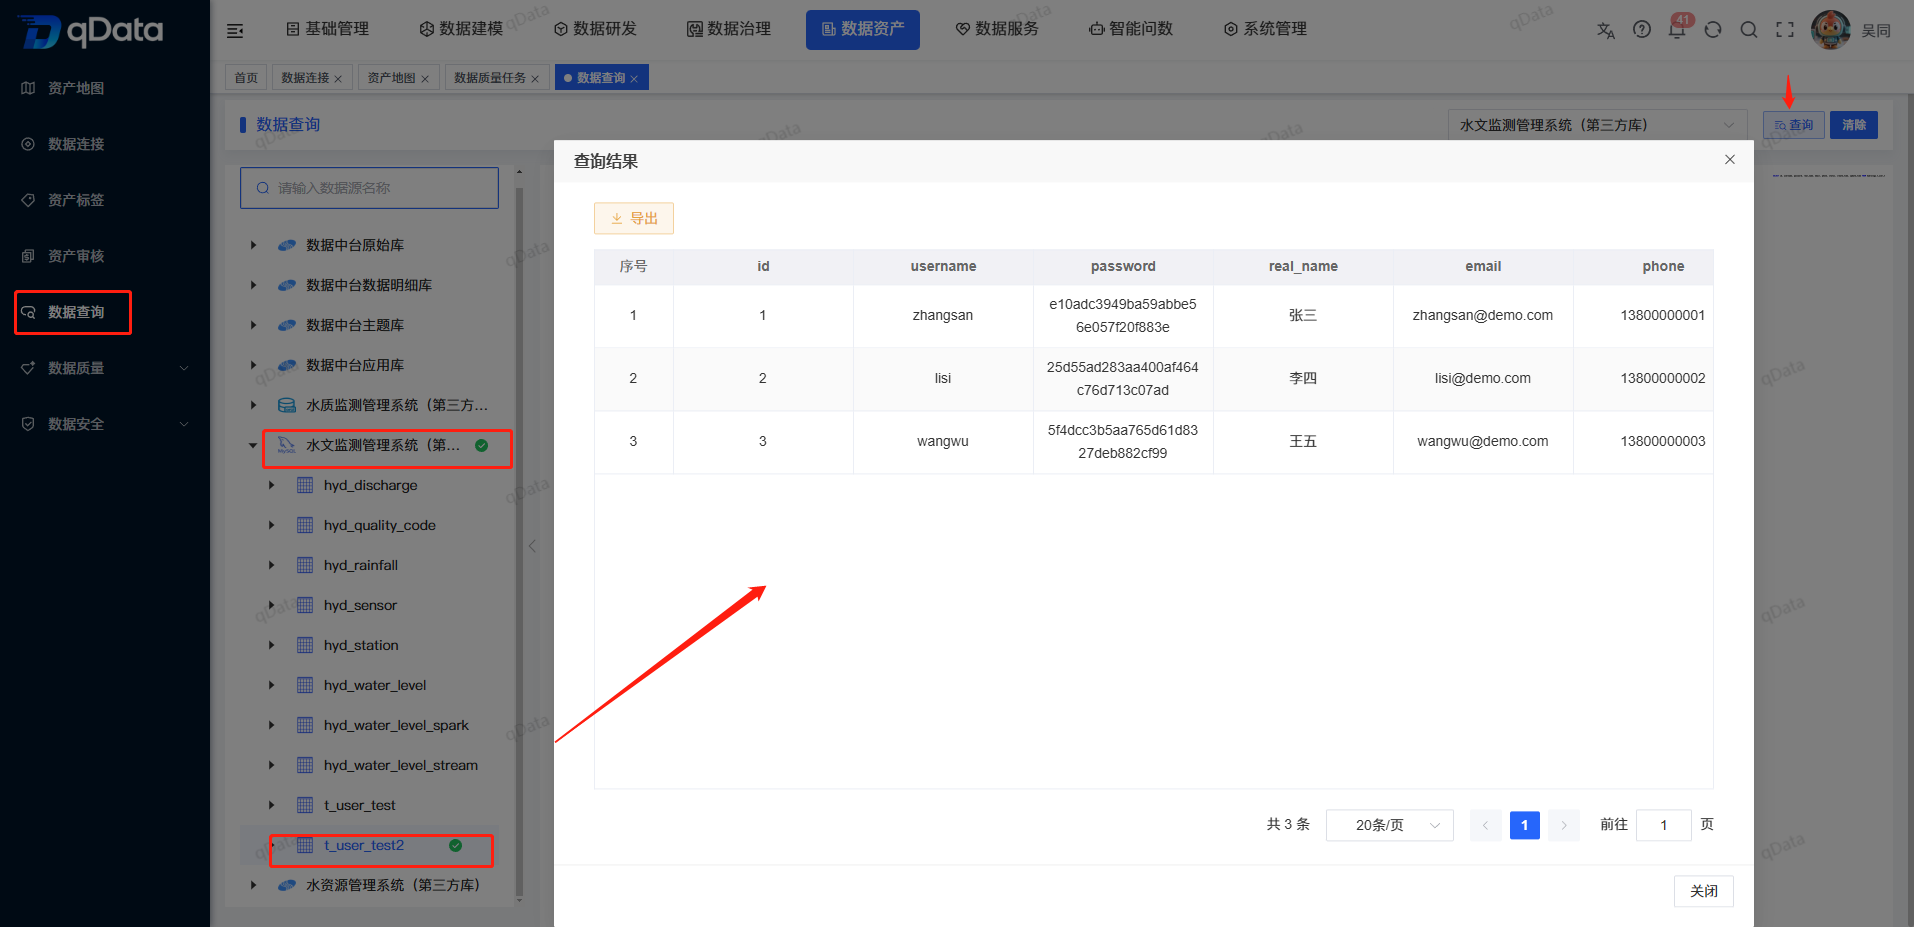
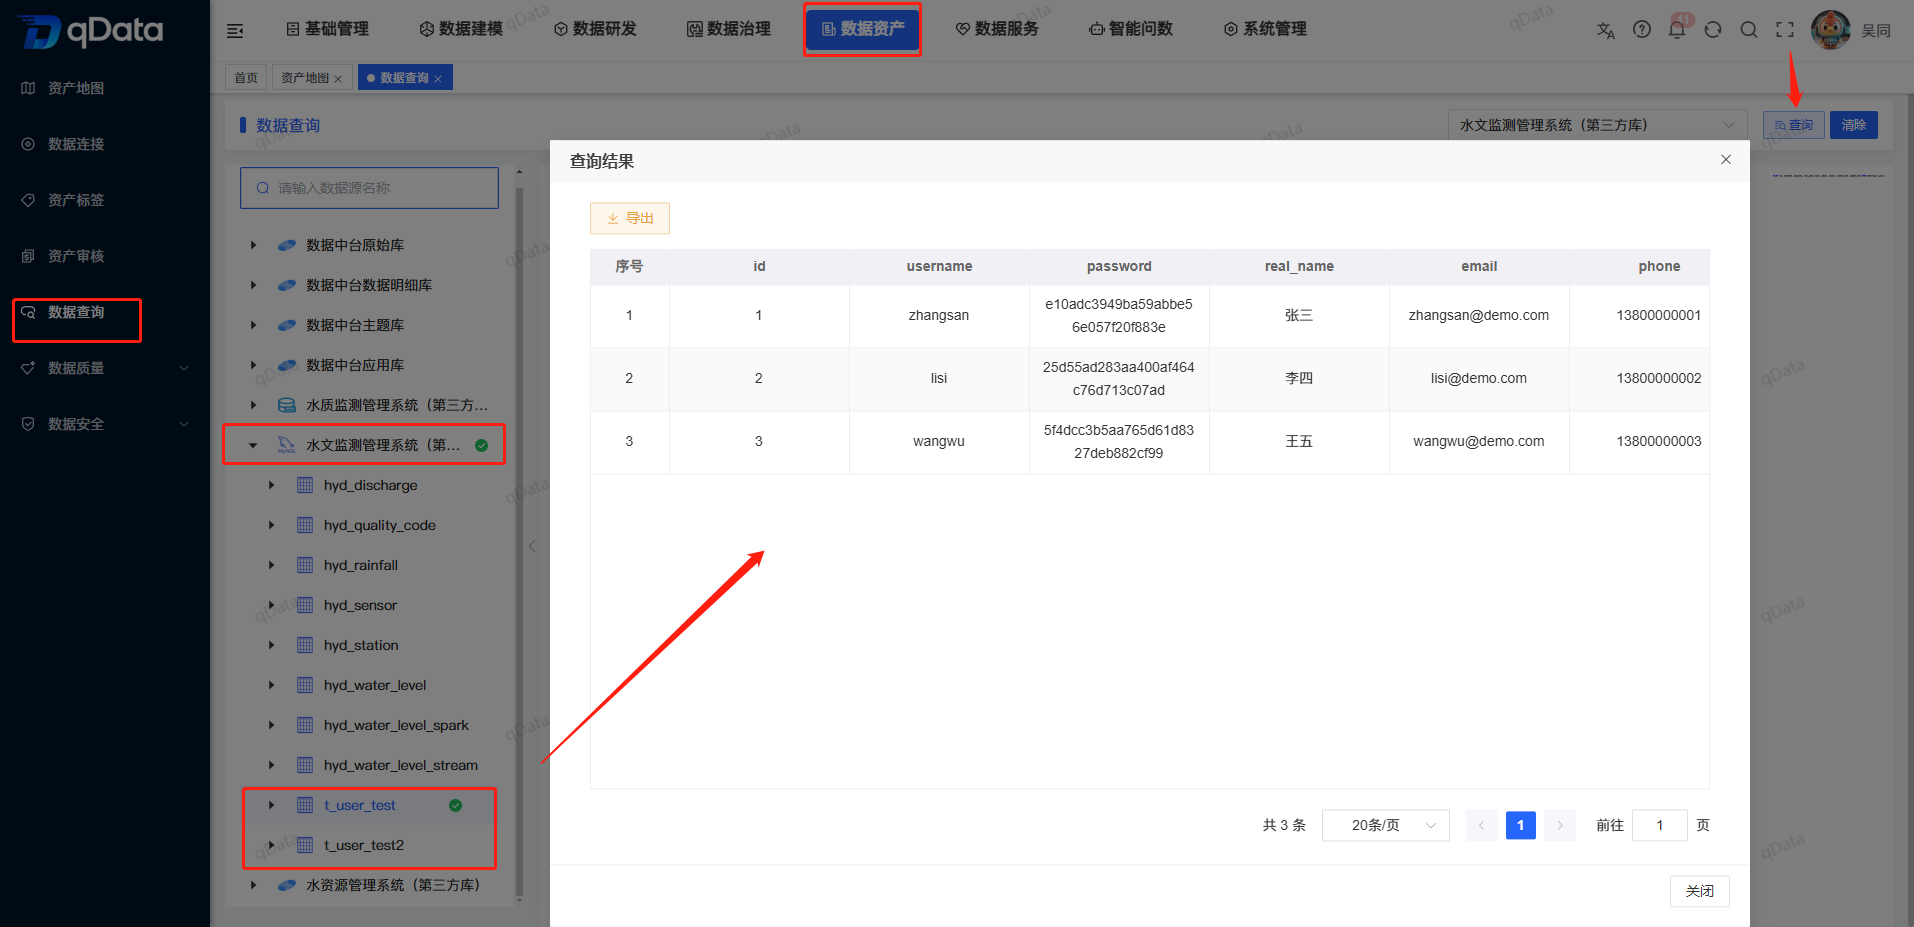
Go to Data Assets > Data Query, select the data source used in Step 3 and the data table, then view the tables and data that were just created.
6. Create a Data Synchronization Task
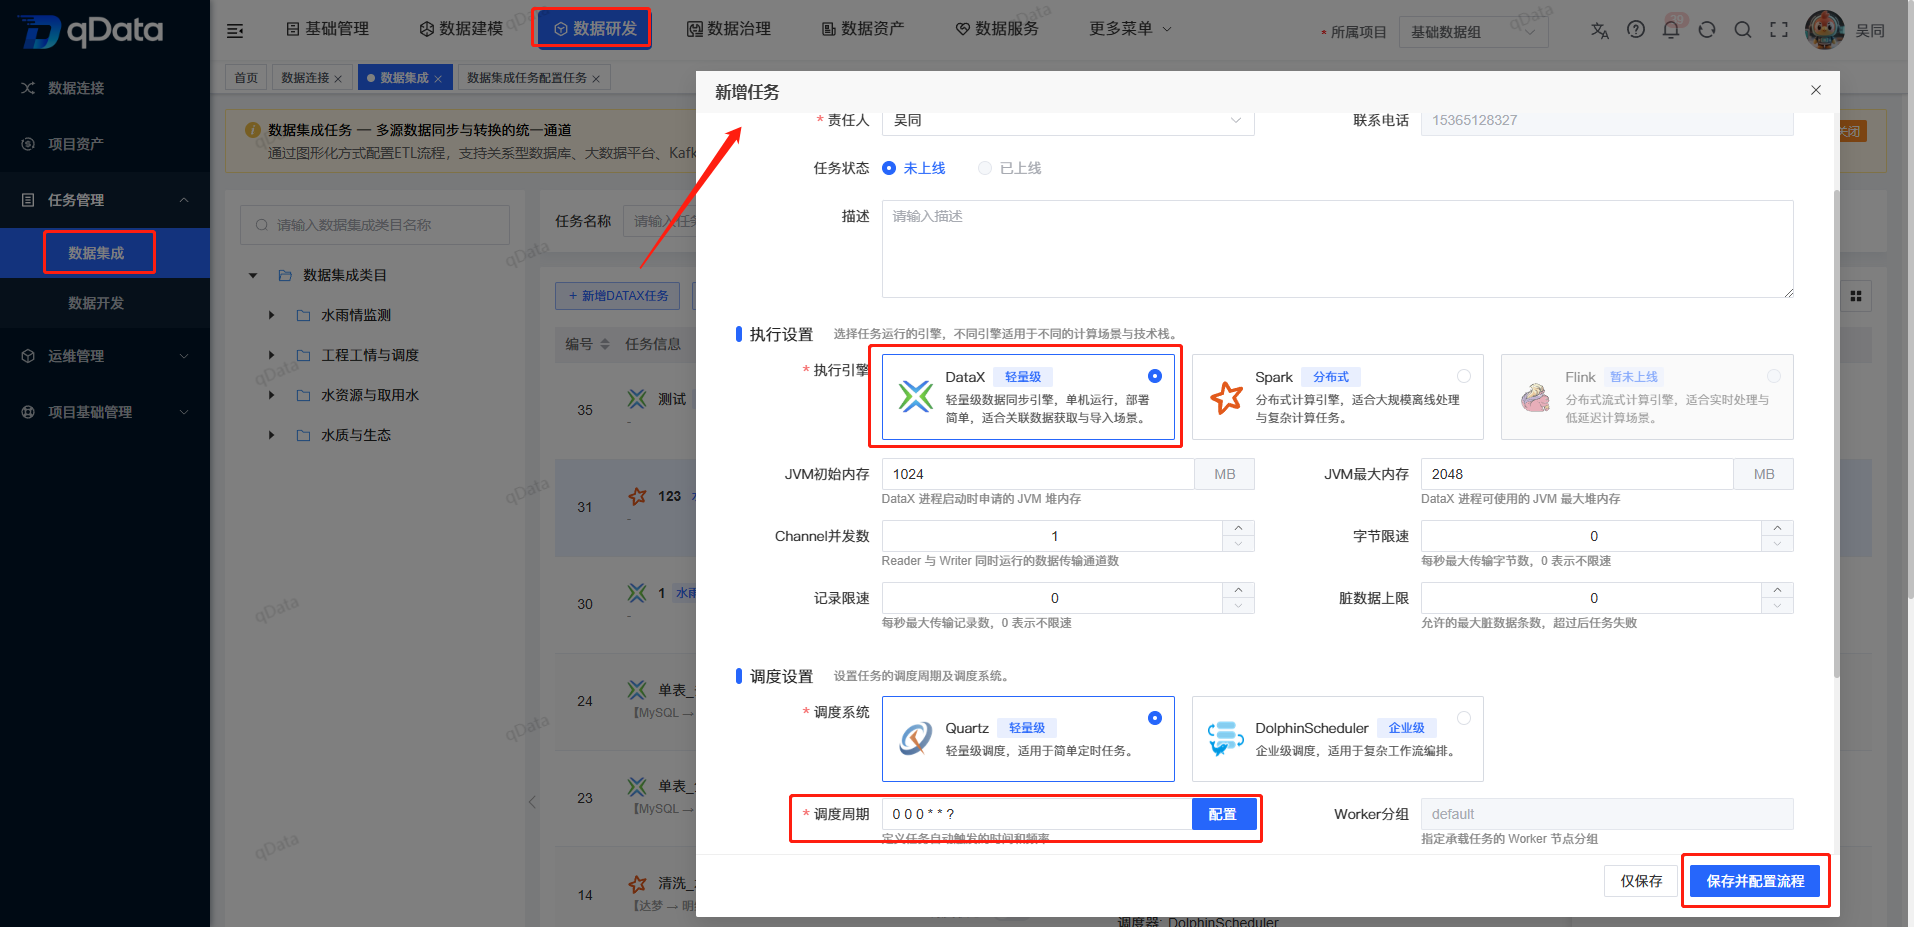
Go to Data Development > Data Integration, click Add, fill in the synchronization task name, task description, source information, and target information. The execution engine can use DataX (lightweight) by default. The scheduling cycle is the automatic execution time point for the integration task. After completing the form, click Save and Configure Flow to open the flow configuration page.
6.1 Configure the Data Synchronization Flow
Open the data synchronization task configuration page, then drag components from the left side to the right side and connect them. Use a table input component, transform component, and table output component to form a complete data processing flow.
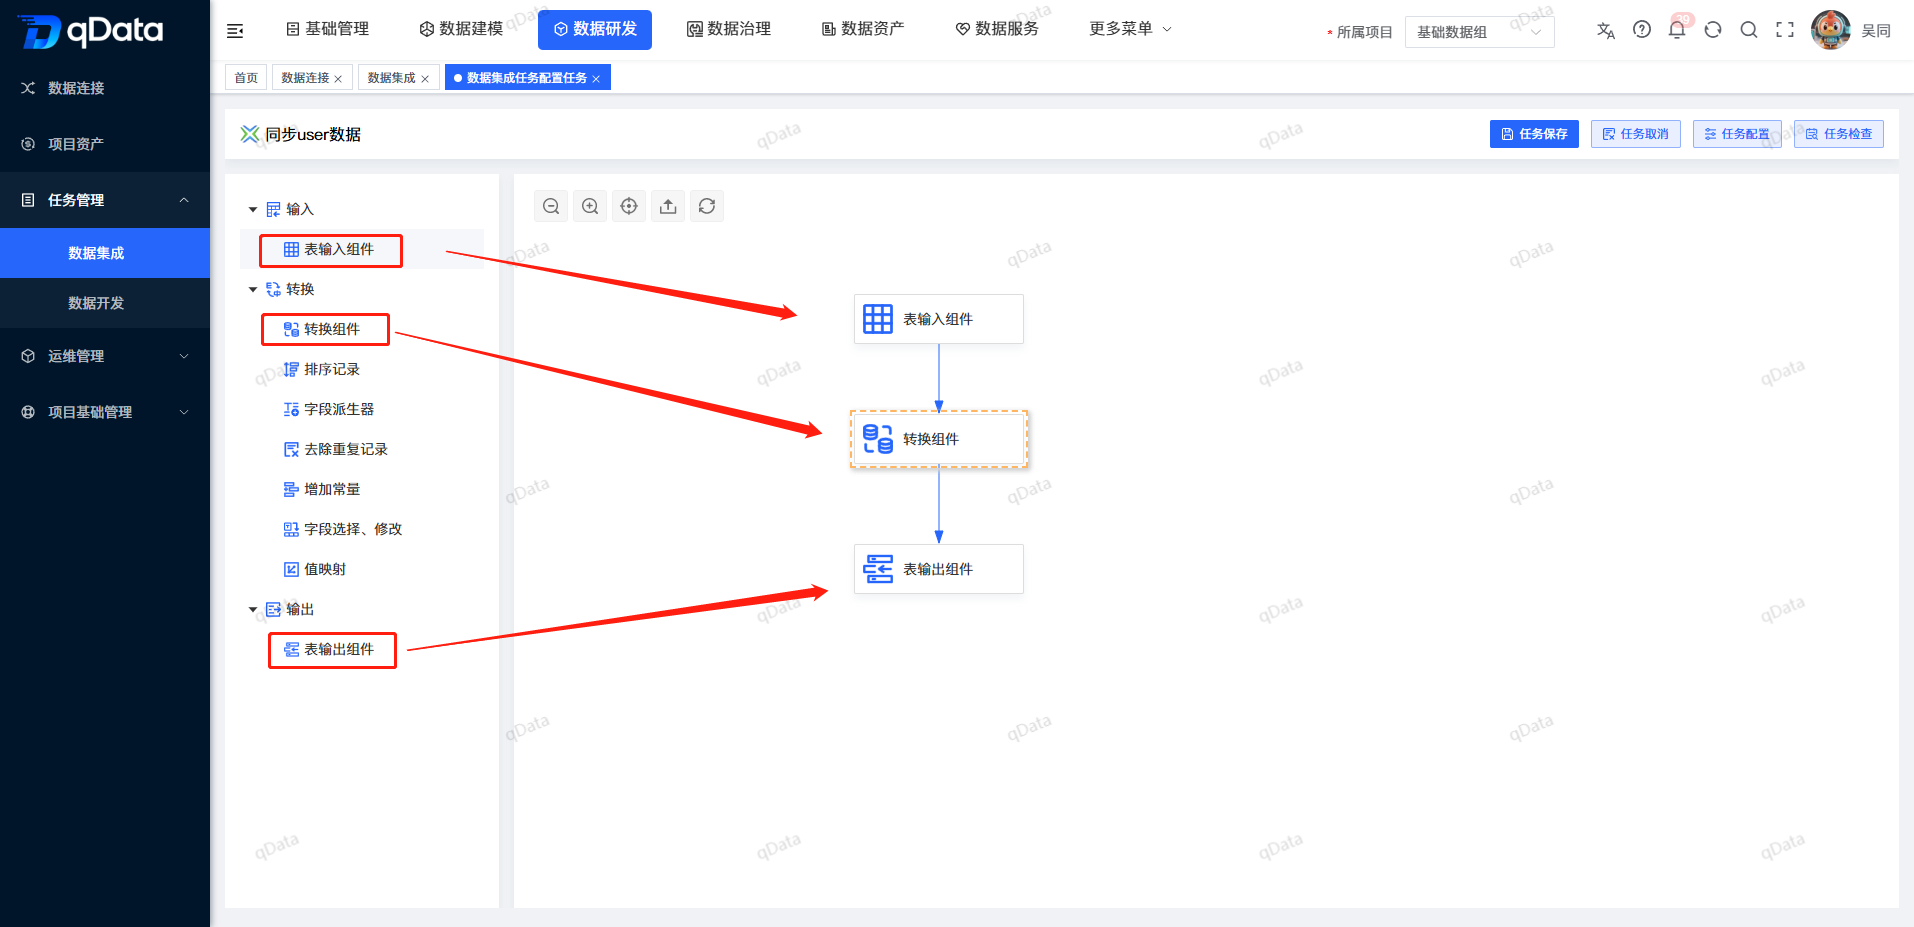
Table Input Component
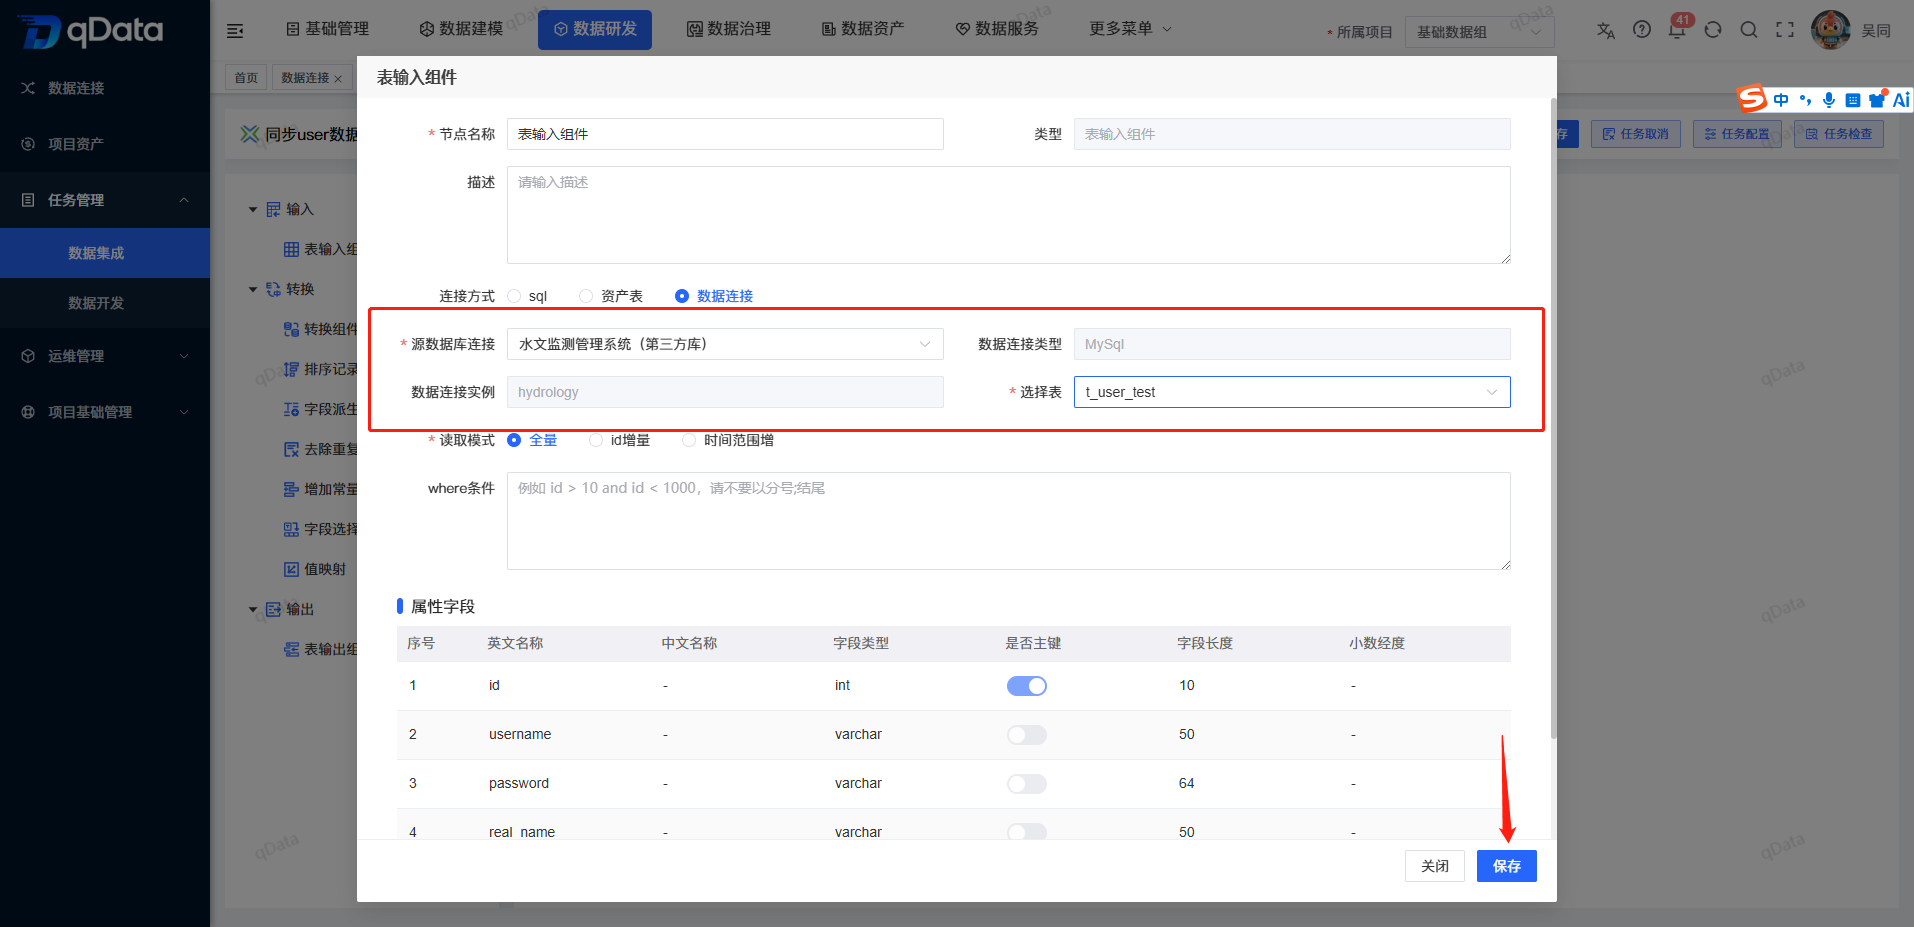
Configure the table input component. Select the data source used in Step 3, the database, and the table. By default, all fields in the table are read. You can select the table into which data has already been inserted.
Transform Component
Configure the transform component according to business requirements to perform field mapping, cleansing, format conversion, or calculation on the input data.
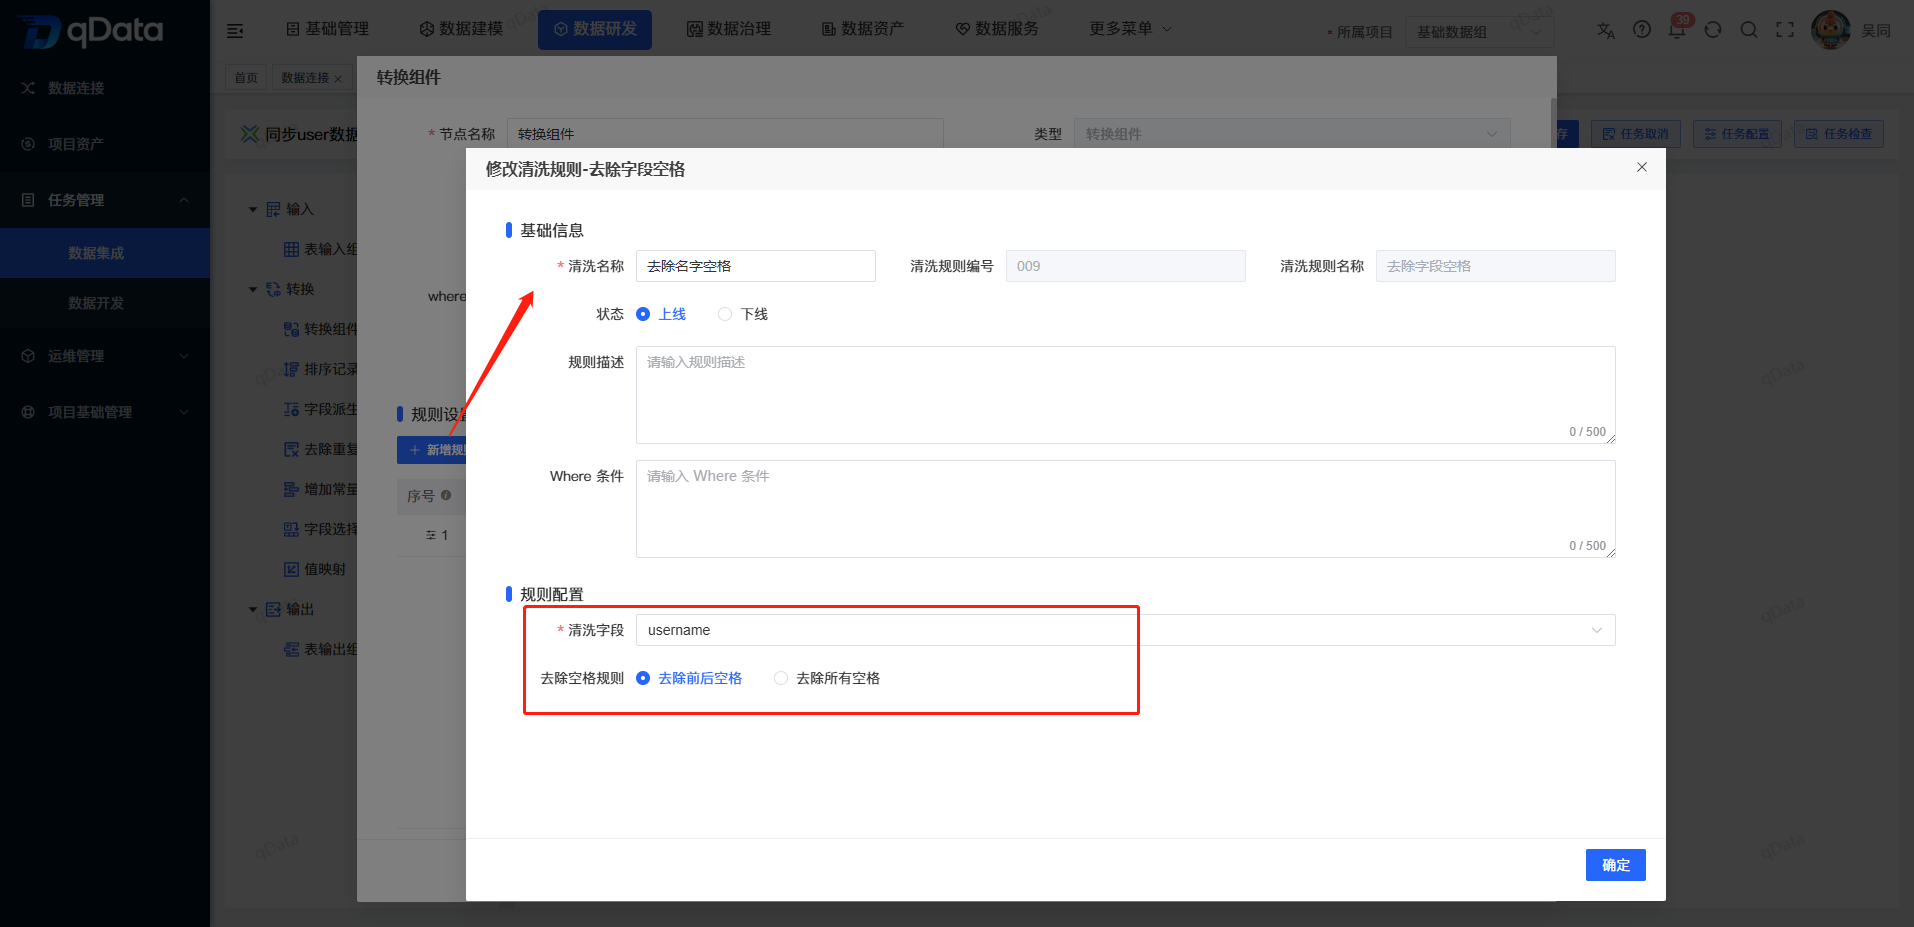
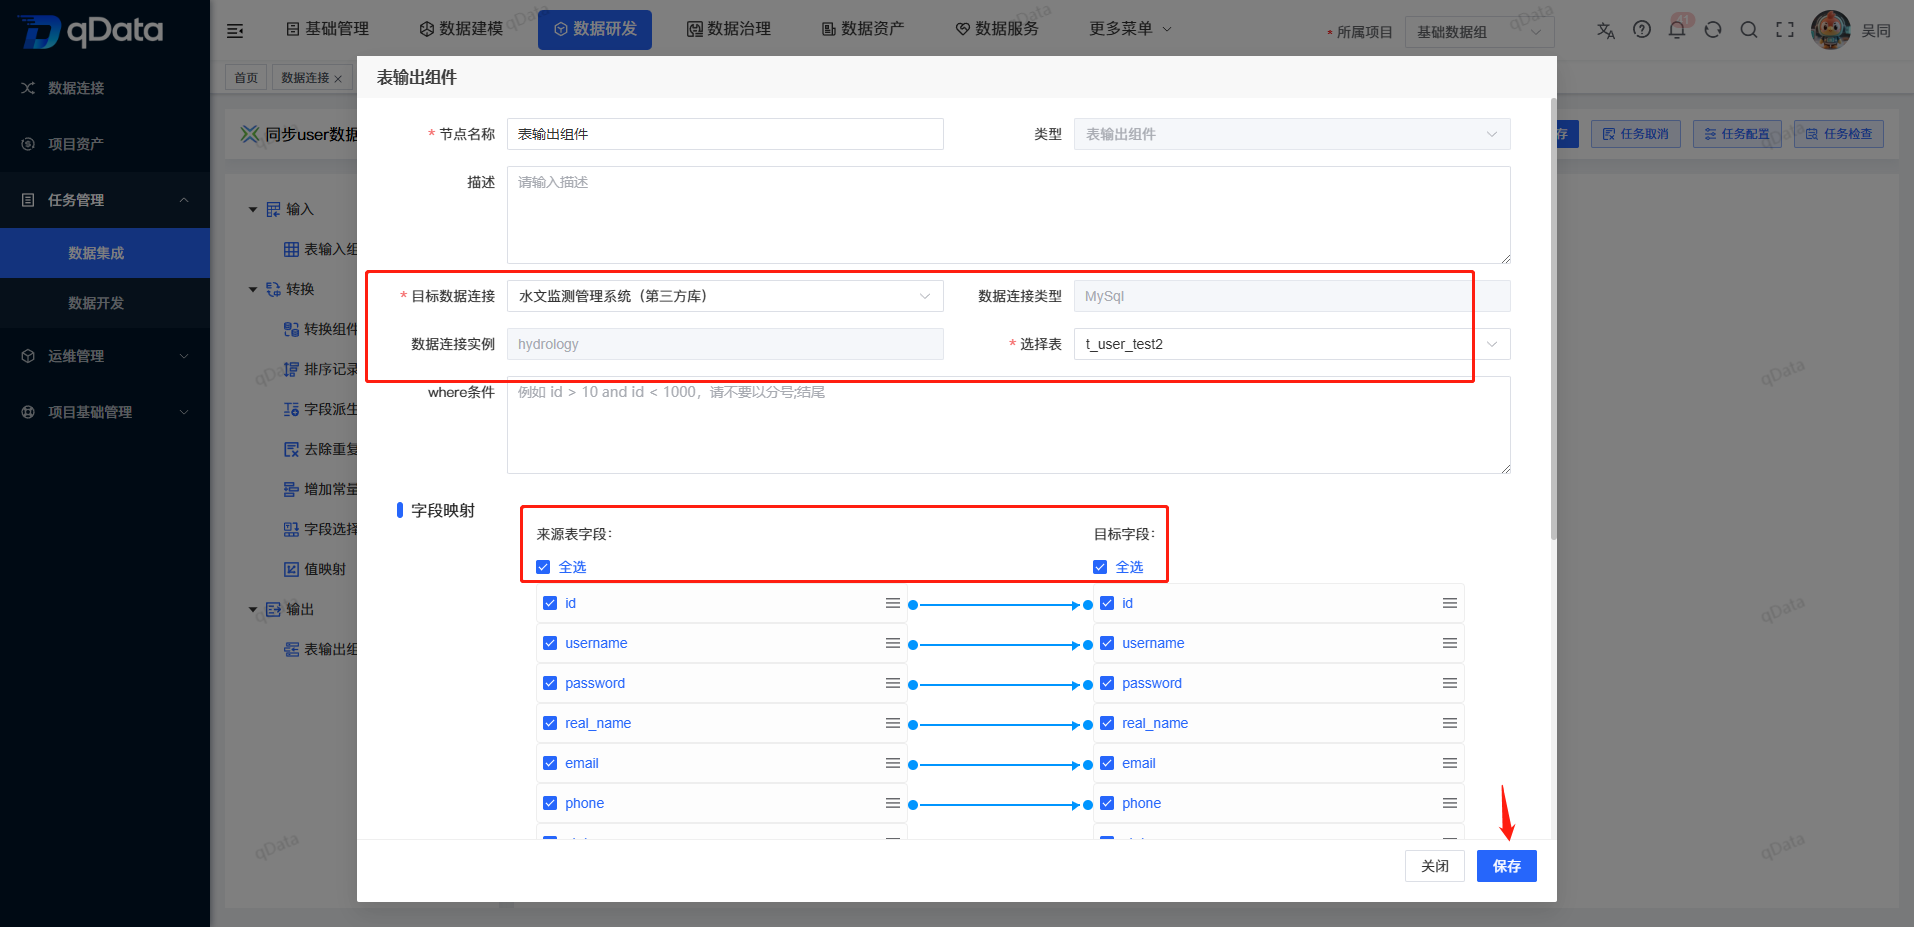
Table Output Component
Configure the table output component. Select the target data source used in Step 3, the database, and the table, then set the field mappings and write mode.
6.2 Save and Execute the Synchronization Task
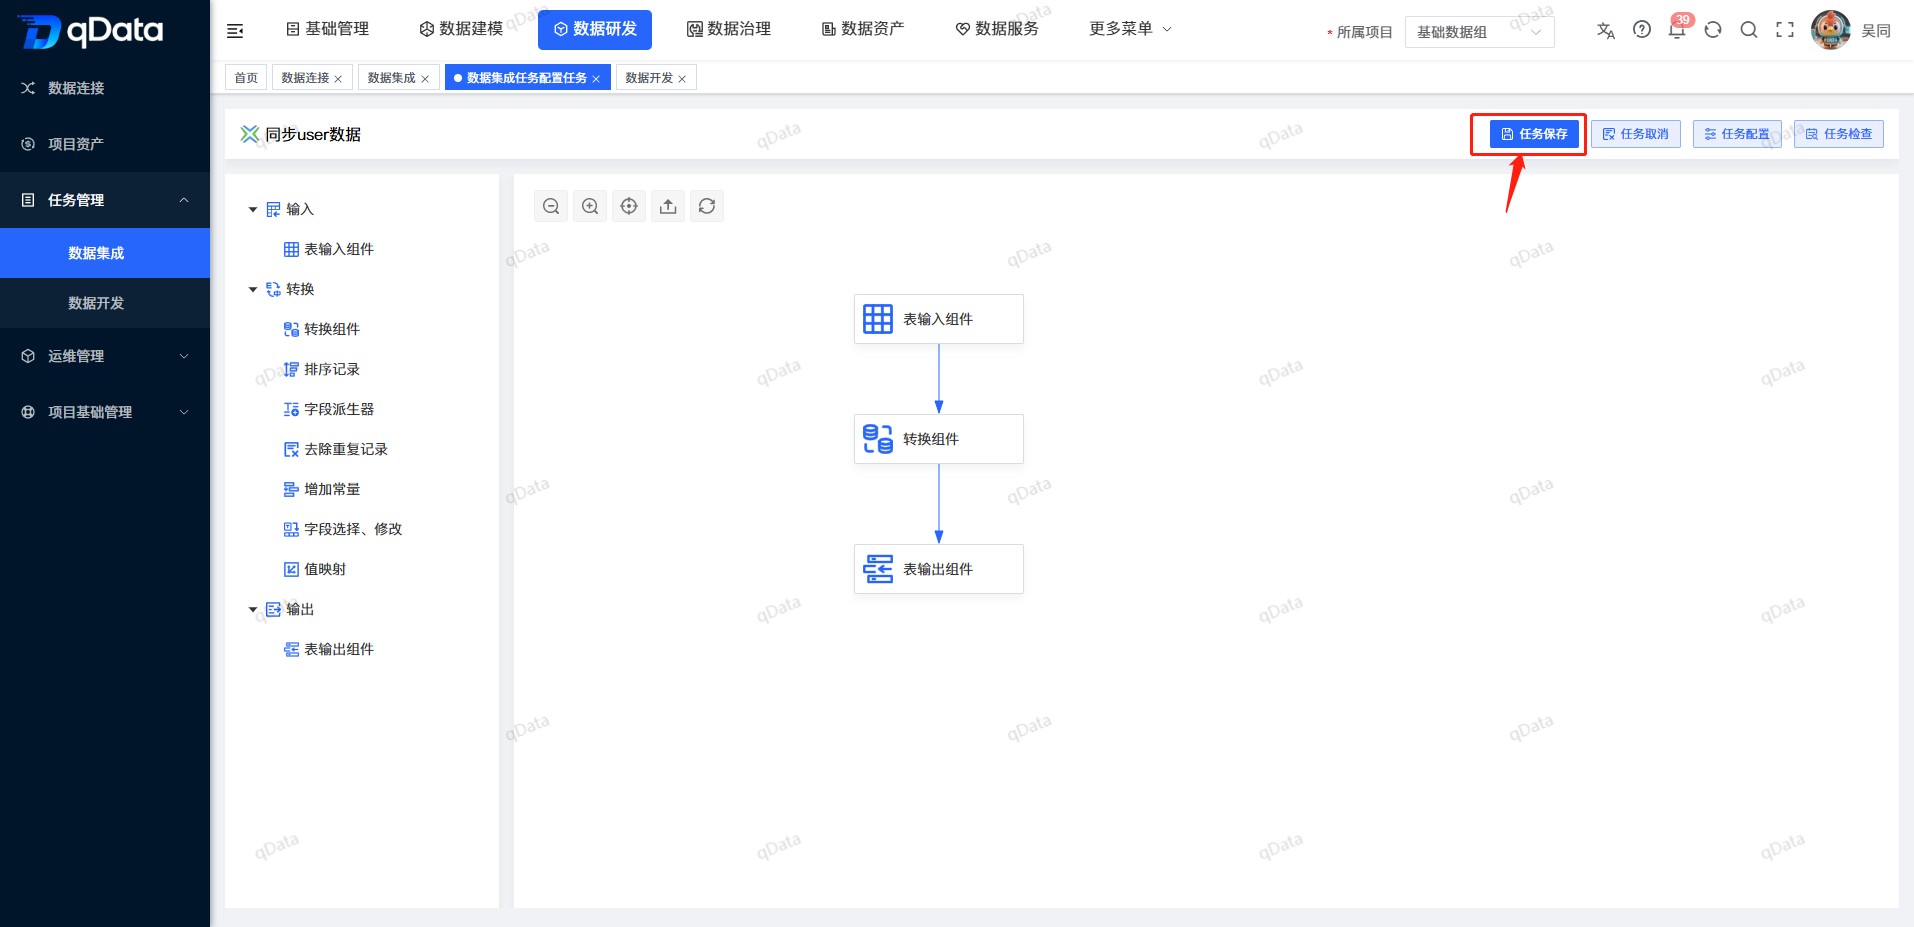
After completing component configuration and connections, click Save Task to save the synchronization task.
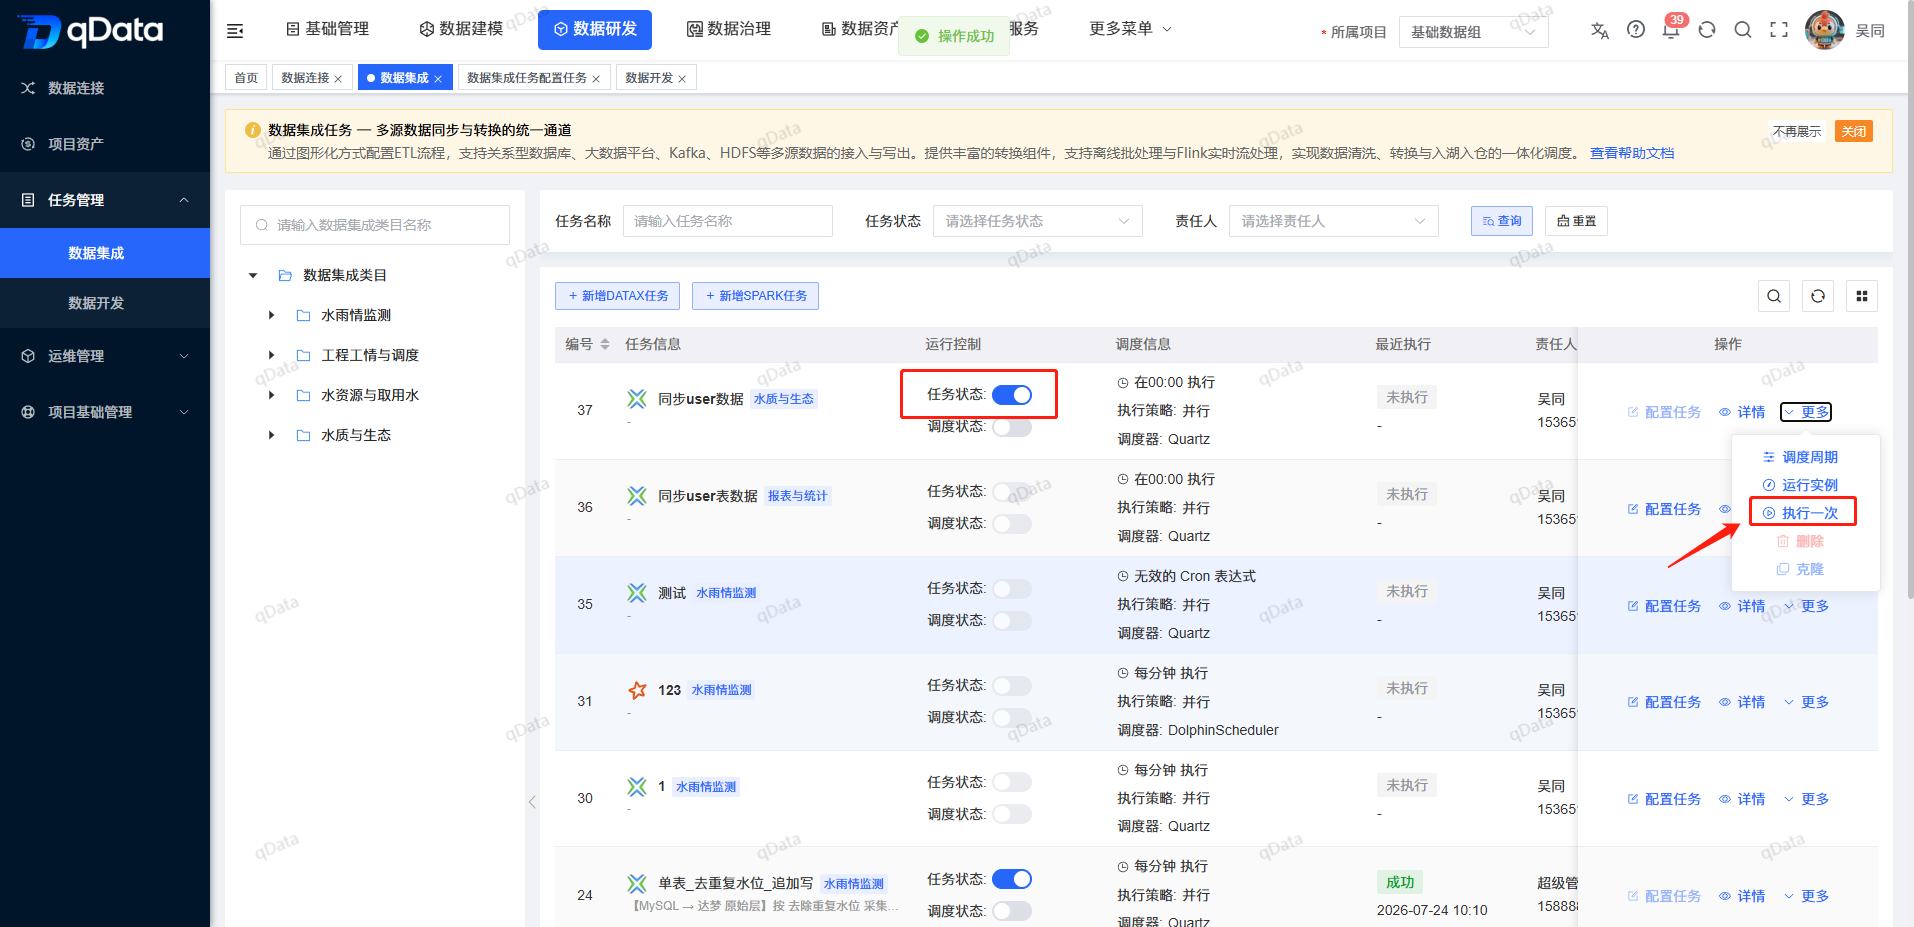
After saving, return to the list, enable the task status, and click Run Once to start data synchronization.
7. View Data Synchronization Logs
Go to Data Development > Data Integration Instances, select the corresponding synchronization instance, and view the execution logs.
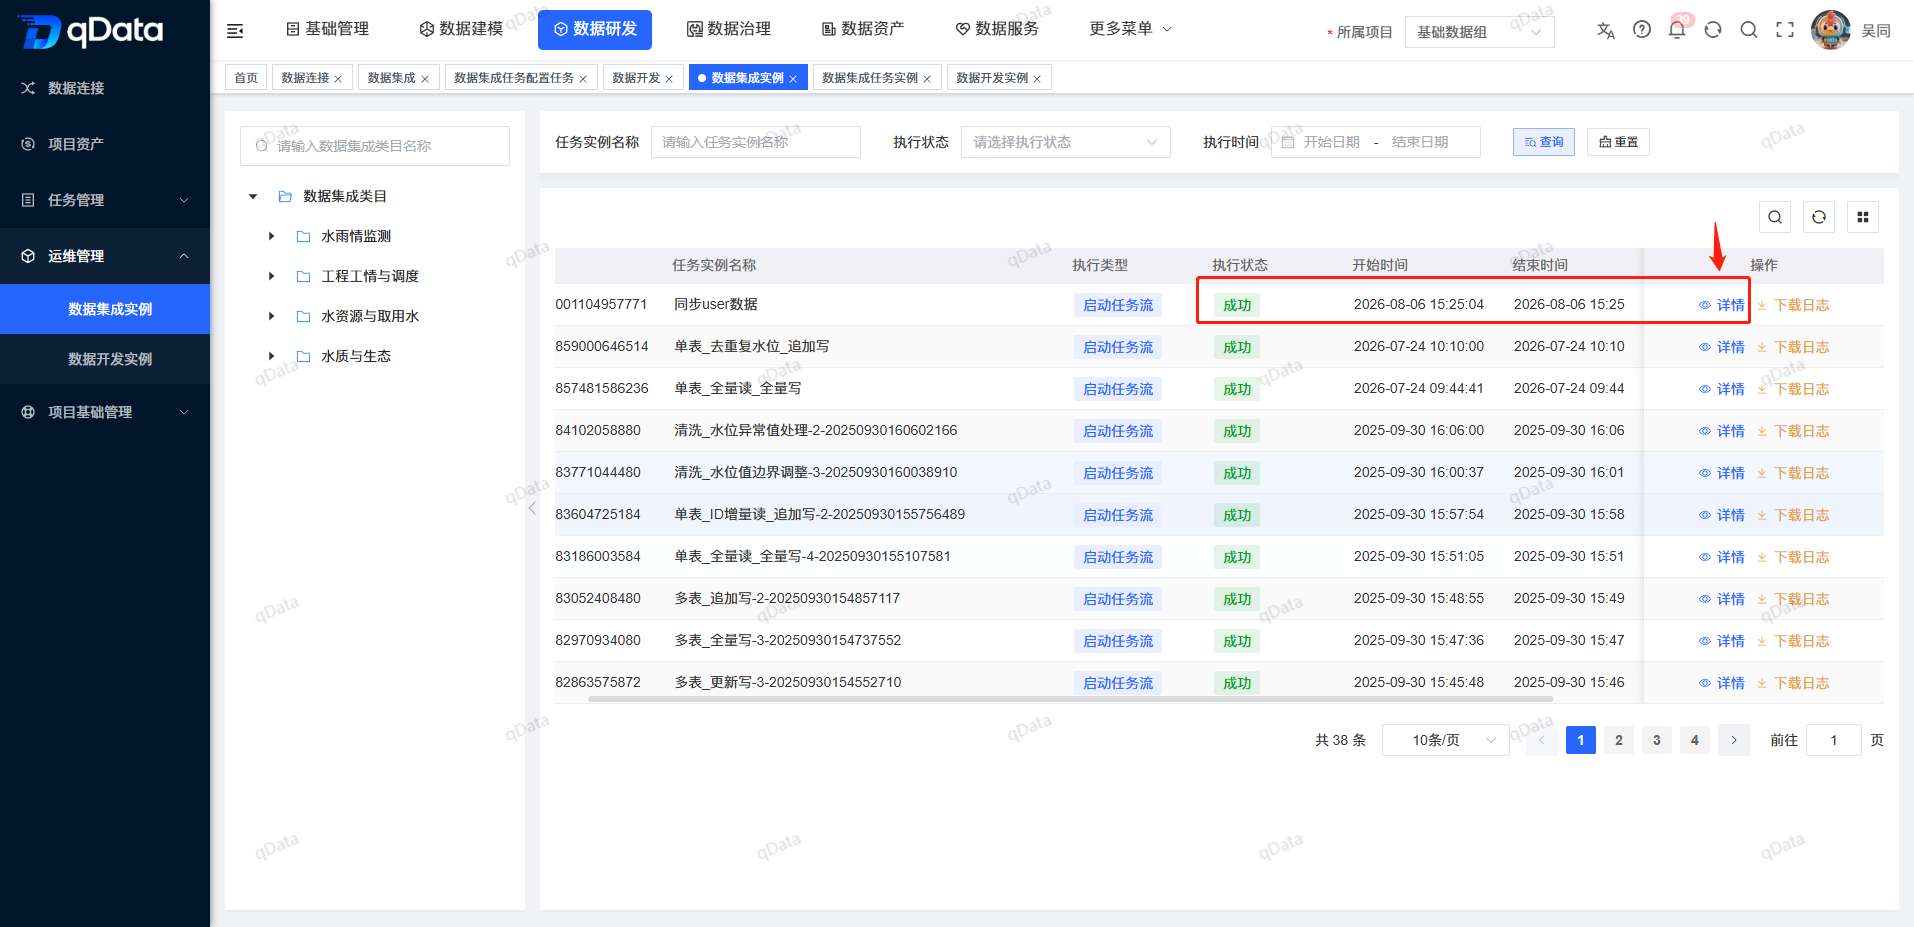
Synchronization logs show the execution status, processed data volume, and exception information of each component, helping you locate the cause of synchronization failures.
8. View Synchronization Results
After synchronization is complete, go to Data Assets > Data Query, select the target data source and target table, then view the synchronized data and compare it with the source table data.